Office, Office Professional Plus, Office 365, Microsoft 365 Apps for Enterprise. Call it what you like. Name aside, it’s just boring old Word, Excel, Outlook and a few other apps 99% of people don’t use, or overuse (PowerPoint, I’m looking at you). But… it’s also an essential suite of productivity tools that you’ll find installed on 99% of devices, at least within an enterprise reliant on Microsoft technology.
So before I go into a hole… lets address the elephant in the room. Why would you choose to do this instead of using the “Microsoft 365 Apps for Windows 10 and later” application type that does all this for you in three clicks from inside the Intune UI?
There are many ways to achieve the desired output. This is what I have found to work the best, it is not gospel. But the answer as to why I choose to do it this way is, control, and more importantly, to avoid/reduce errors. Using the example herein, of three packages for 365 Apps, Visio and Project. If you were to do this, in the same manner, using the built in CSP (Intune UI), you would run into detection errors (Install Pending, Office SxS Installer failing to terminate/complete or Error: 0x87D1041E within the Intune Ui). It’s as simple as that. If the CSP method allowed you to use Custom Detection methods, then all this would likely be resolved, but alas, it does not.
As a Device Management aficionado, installing “Office” is something I have to plan for frequently. But actually getting down to it and installing Office, as in building the package(s), is something I do few and far between. So actually, this post is more of a note to self for /next time/ than anything else.
Every engagement, always has the same discussions… What bitness is required? What products are required? Do you need Visio or Project? and what about some Language support for good measure?
Every time, there’s confusion, unknowns, what if’s, and Finance departments entirely reliant on business critical Excel add-ins and macros from 1993.
There’s very little I can do or say about add-ins and macros from 1993. You know you shouldn’t still be using them, and you know that your business being 100% reliant on those macro’s is a bad thing. Me recommending you eradicate them, install the 64bit edition of Office and reinvent your entire working procedures, probably isn’t going to go down well. But we all know its the right thing to do…
So, we’ve had a good discussion, we’ve evaluated the business processes, we’ve run the Readiness Toolkit and we’re now all on the same page. 64bit is the way to go and we’re going for it. We’re scrapping everything that’s gone before, and we’re going to be deploying the usual suite (Word, Excel, Outlook etc), and we’re going to factor in support for those times when a user also needs a splash of Visio, a drizzle of Project and those lucky devils who need The Full Monty (Apps for Enterprise, Visio and Project).
So how do we do it? There seems to be many approaches to this in the community and Microsoft documentation even seems to contradict itself on the best way (see: Disadvantage of using Intune Cloud vs A later app assignment will overwrite pre-existing). What’s unclear in the MS documentation is if Visio and/or Project class as an actual Office suite application. During testing (and the creation of this post), I created three packages using the Intune UI, Office (Word, Excel, Outlook etc) and then separate Visio and Project packages. After deploying the Office suite package, and then assigning Visio and/or Project, I ended up in a world of pain. It is because of this pain, that I ventured out into the community for answers…
My research resulted in identifying the following options; One option being to create one “Full Monthy” package with everything included (Apps, Visio and Project). This certainly simplifies things, as you’ve only one package to maintain and worry about. But by doing this, users without a Visio and/or Project license are going to end up with Apps that appear, that actually don’t function no doubt in resulting in support tickets from confused users. Going “Full Monty” also means using additional local storage for no reason whatsoever. The second approach, which is what I’ll cover here relies on OCT, ODT and CDNs and the third approach, is to massively overcomplicate things with packages catering for every possible variable that might be required, try to avoid that.
In any case, the first thing to get to grips with is Click-to-Run. So, How does Click-to-Run work?
“Click-to-Run products use streaming. Think of this in the same way that you think about streaming video. You can watch the first part of the video before the whole file is downloaded. Similarly, with Click-to-Run, you can start using Office before the whole suite or product has been downloaded. While you are using your application, the rest of Office is being downloaded quietly in the background.”
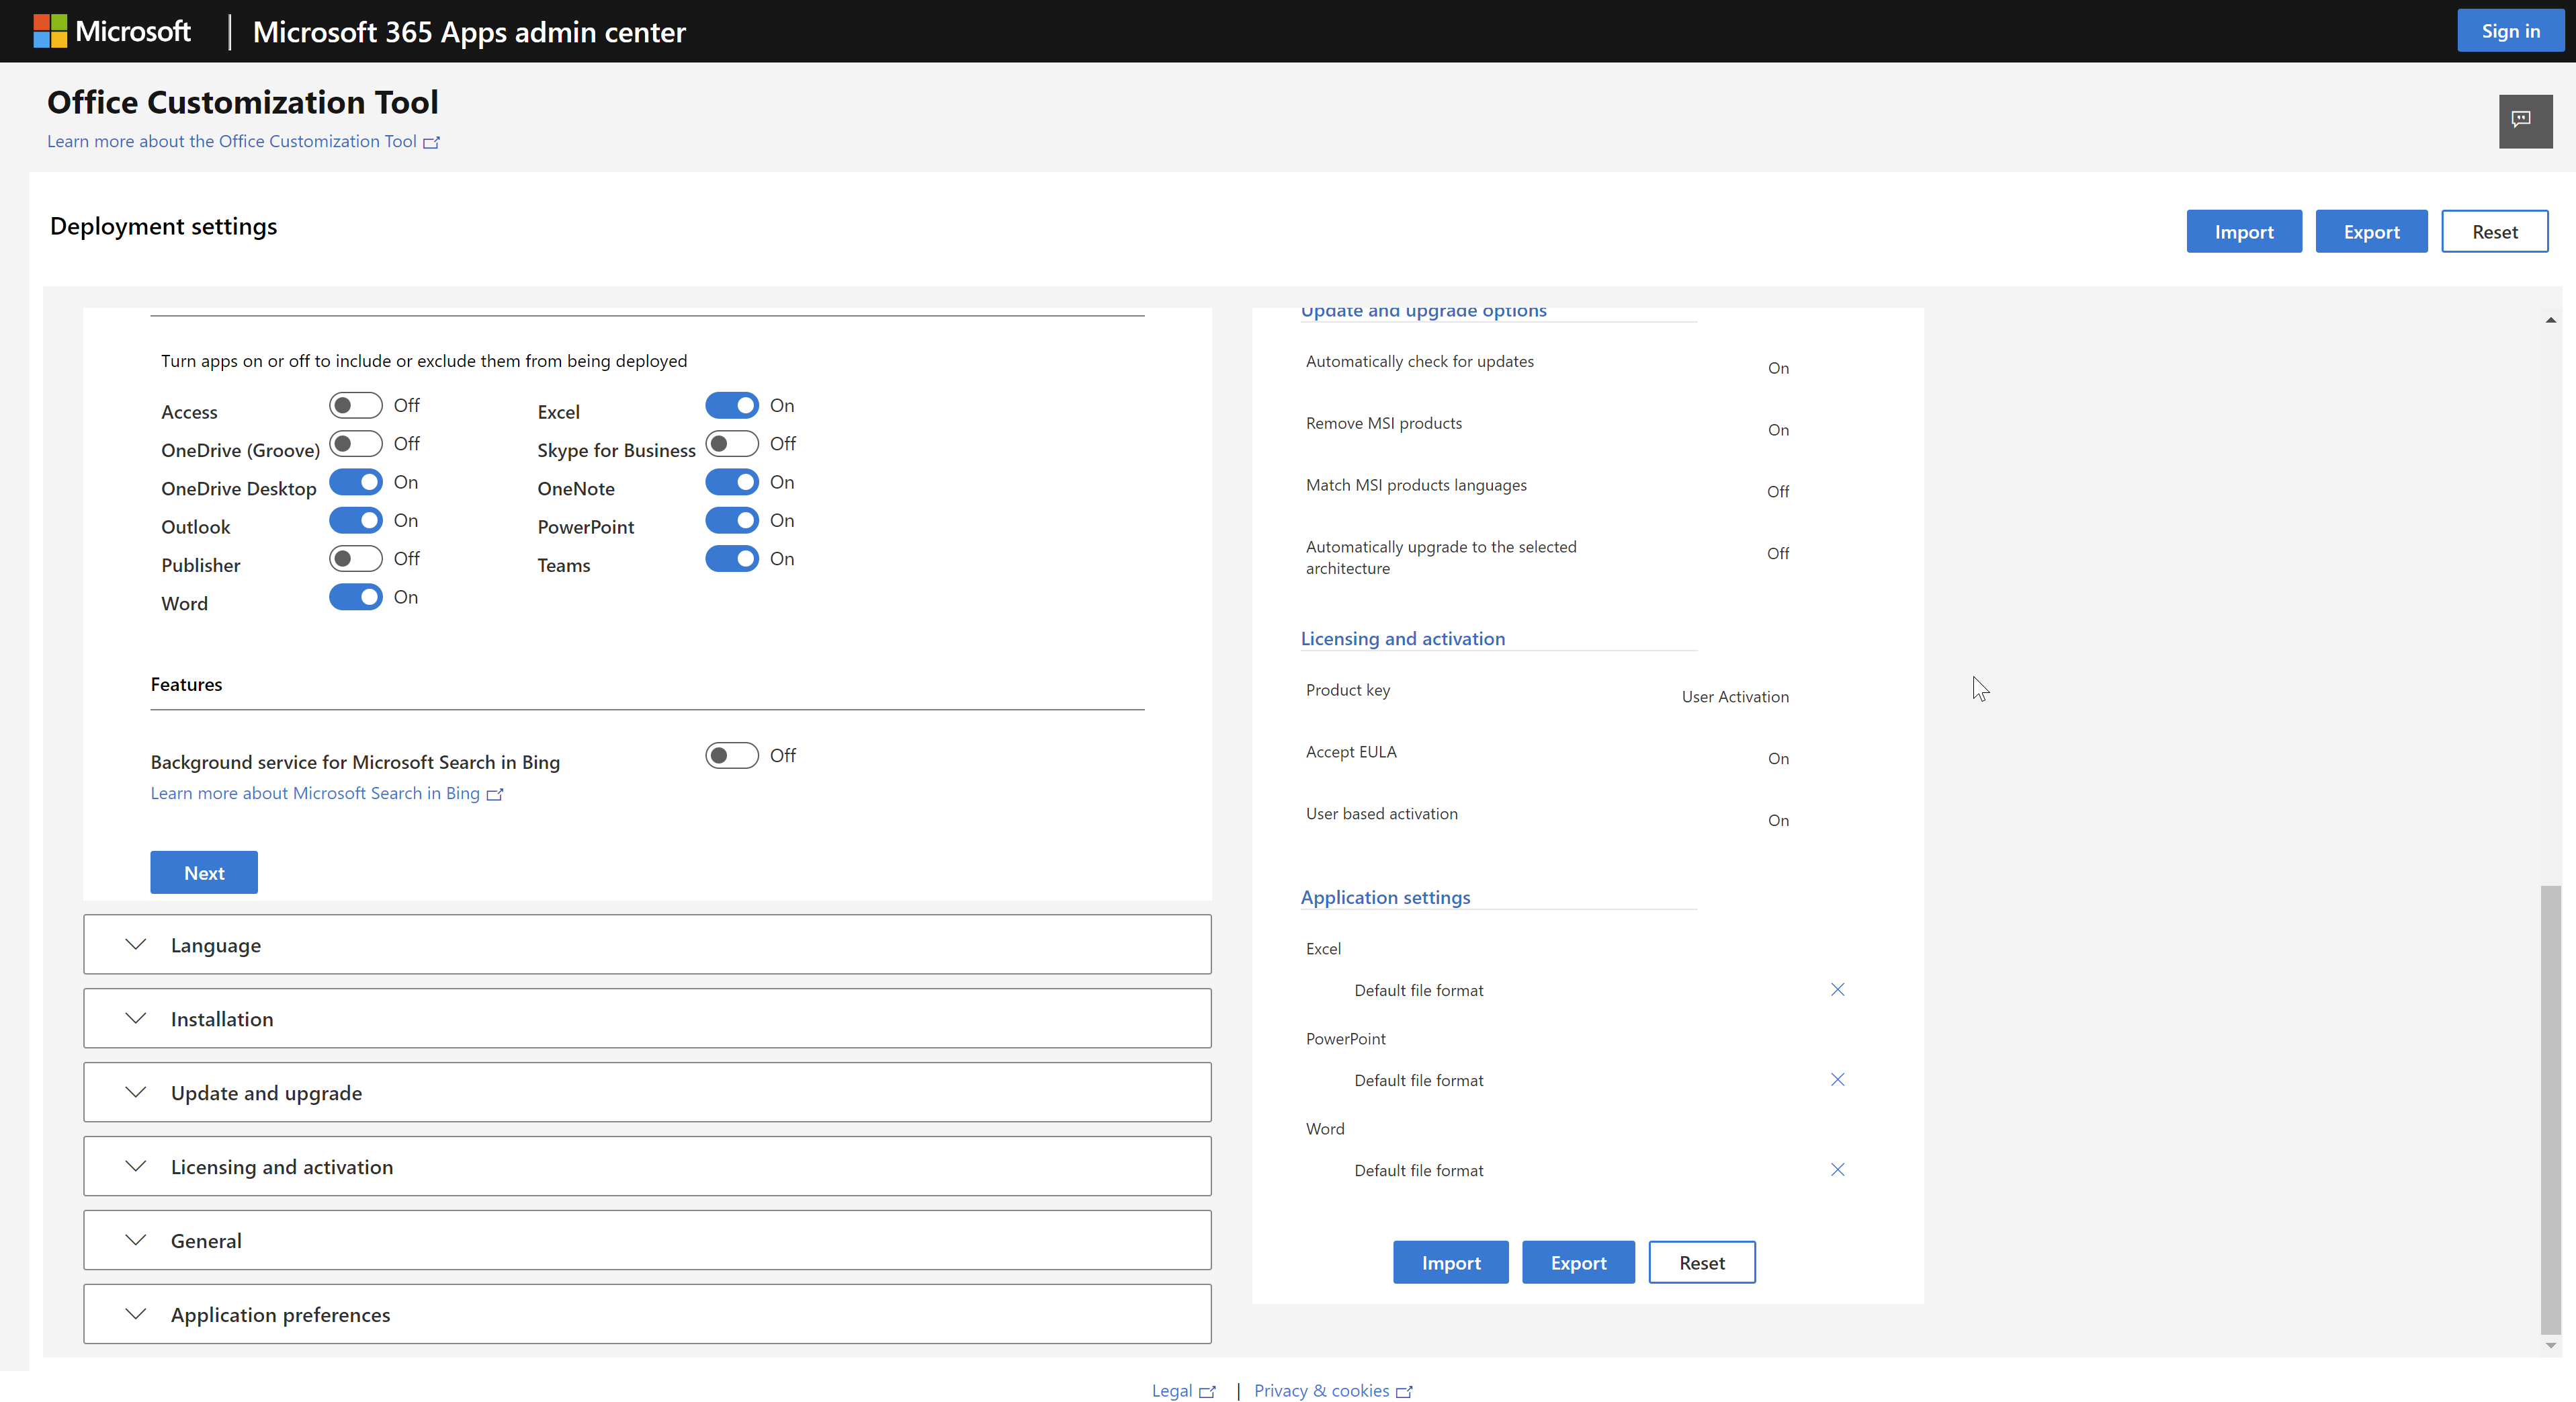
What does that mean and how do I get started? Well, it’s not too difficult thanks to the Office Customisation Tool. Click the link, make a few decisions, press a few buttons and the tool spits out a brilliantly formatted XML file that allows you to hit the ground running. Download the Office Deployment Tool, parse the newly generated XML and you’re away. Happy days.
Intune even tries to take things one step further, and offers to create the package for you at the end. Winner – you’d think! Unfortunately, things go a bit awry when you’re needing to offer multiple packages, or want to provide a little more flexibility of mixing and matching products.
Click-to-Run is the new, but old installation mechanism used by Office (and probably other Microsoft products) that’s now been around since Office 2016 I think. It isn’t actually all that bad, it’s just confusing if you’re not familiar with it. Most people don’t want to have to faff around with XML files and downloading content to create a package. In reality, it can be both daunting, but brilliant. Dedicating 15 minutes to understanding it, and you should be good. The problem is, as you only tend to package Office once in a blue moon, you’ve slept, lived and done lots of other stuff before you’re having to revisit an Office package, and you find yourself having to re-educate yourself once again, because Click-to-Run has evolved and things are slightly different to the last time you did it.
Anyway, waffle over – the good stuff (valid at the time of writing, and maybe only for a month or so after, until Microsoft mix things up again). In short, in this example I’m going to use the Office Customisation Tool (OCT), to create three configuration files, and then I’ll wrap the resulting XML configurations into a Win32 App package (.intunewin) and publish the three applications into Intune for deployment.
First of all, grab the Office Deployment Tool from the Microsoft Website. The download is a small EXE file, which when you run, you’re faced with an EULA, accepting that, you’re then asked to select a folder to extract the files to. My recommendation, at least for testing, would be to create a temporary folder to extract the contents to. In this example, I’m using C:\Temp\ODT\. After clicking OK to the extraction prompt, you’re given setup.exe and a few example configurations.
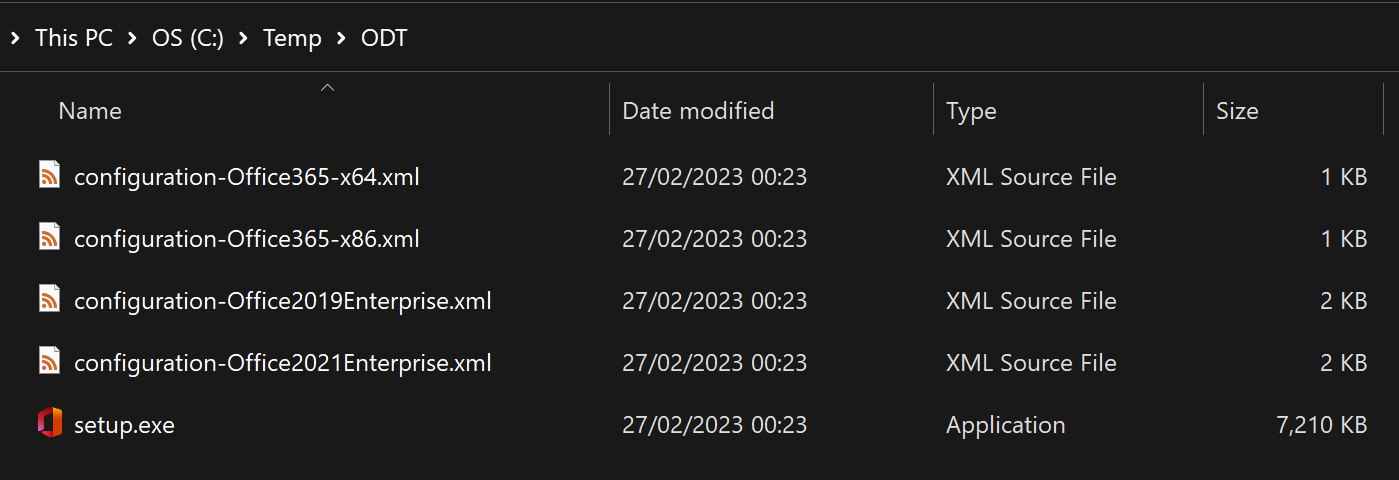
At this point, head over to the Office Customisation Tool, which is effectively a web based GUI, that asks you a few questions and gives you a resulting XML file, which you need to export for use with the Deployment Tool.
In this example, you’ll see I’ve done this 4 times.

I’ve got, four configurations shown here;
- Install-M365Apps.xml
- Install-Project.xml
- Install-Visio.xml
- Install-Publisher.xml
- Uninstall-Visio.xml
- Install-M365Apps-x86.xml
Install-M365Apps.xml
This XML contains Word, Excel, Outlook, OneNote, PowerPoint, Teams and OneDrive Desktop. Either use it as is, or import it into the OCT site and modify as required.
<Configuration>
  <Add OfficeClientEdition="64" Channel="MonthlyEnterprise">
    <Product ID="O365ProPlusRetail">
      <Language ID="MatchOS" />
      <ExcludeApp ID="Access" />
      <ExcludeApp ID="Groove" />
      <ExcludeApp ID="Lync" />
      <ExcludeApp ID="Publisher" />
      <ExcludeApp ID="Bing" />
    </Product>
  </Add>
  <Property Name="SharedComputerLicensing" Value="0" />
  <Property Name="FORCEAPPSHUTDOWN" Value="TRUE" />
  <Property Name="DeviceBasedLicensing" Value="0" />
  <Property Name="SCLCacheOverride" Value="0" />
  <Updates Enabled="TRUE" />
  <RemoveMSI />
  <AppSettings>
    <Setup Name="Company" Value="CompanyName Ltd" />
    <User Key="software\microsoft\office\16.0\excel\options" Name="defaultformat" Value="51" Type="REG_DWORD" App="excel16" Id="L_SaveExcelfilesas" />
    <User Key="software\microsoft\office\16.0\powerpoint\options" Name="defaultformat" Value="27" Type="REG_DWORD" App="ppt16" Id="L_SavePowerPointfilesas" />
    <User Key="software\microsoft\office\16.0\word\options" Name="defaultformat" Value="" Type="REG_SZ" App="word16" Id="L_SaveWordfilesas" />
  </AppSettings>
  <Display Level="None" AcceptEULA="TRUE" />
</Configuration>
Then we move on to the good stuff… The above handles the traditional Office suite, but what about when your users need or want to request Visio, Project or both? Well… you create a separate package for installing alongside the aforementioned suite.
Install-Project.xml
<Configuration>
    <Add Version="MatchInstalled">
     <Product ID="ProjectProRetail">
      <Language ID="MatchInstalled" TargetProduct="O365ProPlusRetail" />
     </Product>
    </Add>
    <Display Level="None" />
</Configuration>
Install-Visio.xml
<Configuration>
    <Add Version="MatchInstalled">
     <Product ID="VisioProRetail">
      <Language ID="MatchInstalled" TargetProduct="O365ProPlusRetail" />
     </Product>
    </Add>
    <Display Level="None" />
</Configuration>
Install-Publisher.xml
<Configuration>
    <Add Version="MatchInstalled">
        <Product ID="PublisherRetail">
            <Language ID="MatchInstalled" TargetProduct="All" />
        </Product>
    </Add>
</Configuration>
Uninstall-Visio.xml
<Configuration>
  <Remove>
     <Product ID="VisioProRetail">
     <Language ID="MatchInstalled" />
     </Product>
  </Remove>
 </Configuration>
So there’s some example configurations shown, the additional configuration that I mentioned “Install-M365Apps-x86.xml” is simply the same as the Microsoft 365 Apps package, but the OfficeClientEdition tag in the XML is changed from 64, to 32, to represent a 32bit edition of Office, which these days no one really wants. However, as a pointer, due to the fact that the Visio and Project configurations are defined to “MatchInstalled” these add-on product XML files, don’t need to change, and will cater for both eventualities, by matching the installed Version, Language and Bitness of the 365 suite that is already installed – which is pretty clever.
So you’ve got the Deployment Tool, and a bunch of random XML files… now what?
Well, if you were to open a Terminal window (it feels dirty saying Terminal on a Windows device, but hey – it’s not), browse to where you downloaded the ODT files and run setup.exe /configure Install-M365Apps.xml, you’d find yourself being informed that Office is now installing. Which is nice if you’re doing this as a one off. But we’re not, we want to create a package that we can use to perform mass deployments using Intune. How?
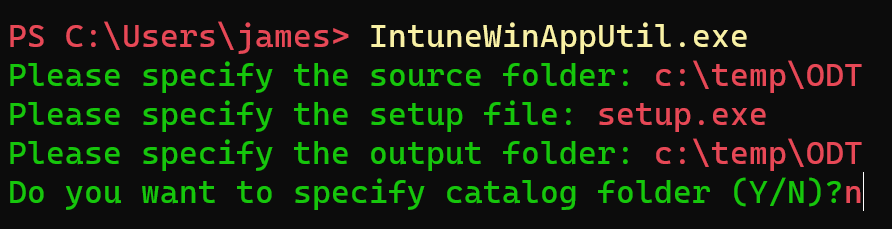
Well, first of all, grab the Intune Content Prep tool from Github. And give this a read if you’re lost — How to create a Win32 App or Intunewin Package.
Then, again, from Terminal, launch the IntuneWinAppUtil.exe tool, and follow the prompts to wrap your ODT setup and the XML files into a single .intunewin file. This is effectively a file, not dissimilar to a ZIP file that Intune accepts as a Win32 App package.
Once the .intunewin is created, it’s simply a case of publishing the Application in Intune. This is done from the Apps section, and by adding a new Windows App (Win32) Application type.
When prompted you upload the newly created .intunewin file, and then populate the required fields as desired. The image shown below is purely for example purposes. It shows how you would create a Win32 Application using the single .intunewin file. The beauty of this guide is that you have multiple .xml files in a single .intunewin package, so it can be used as the base for multiple Microsoft 365 Apps. You simply need to reference the specific .xml file in the Install/Uninstall command lines.
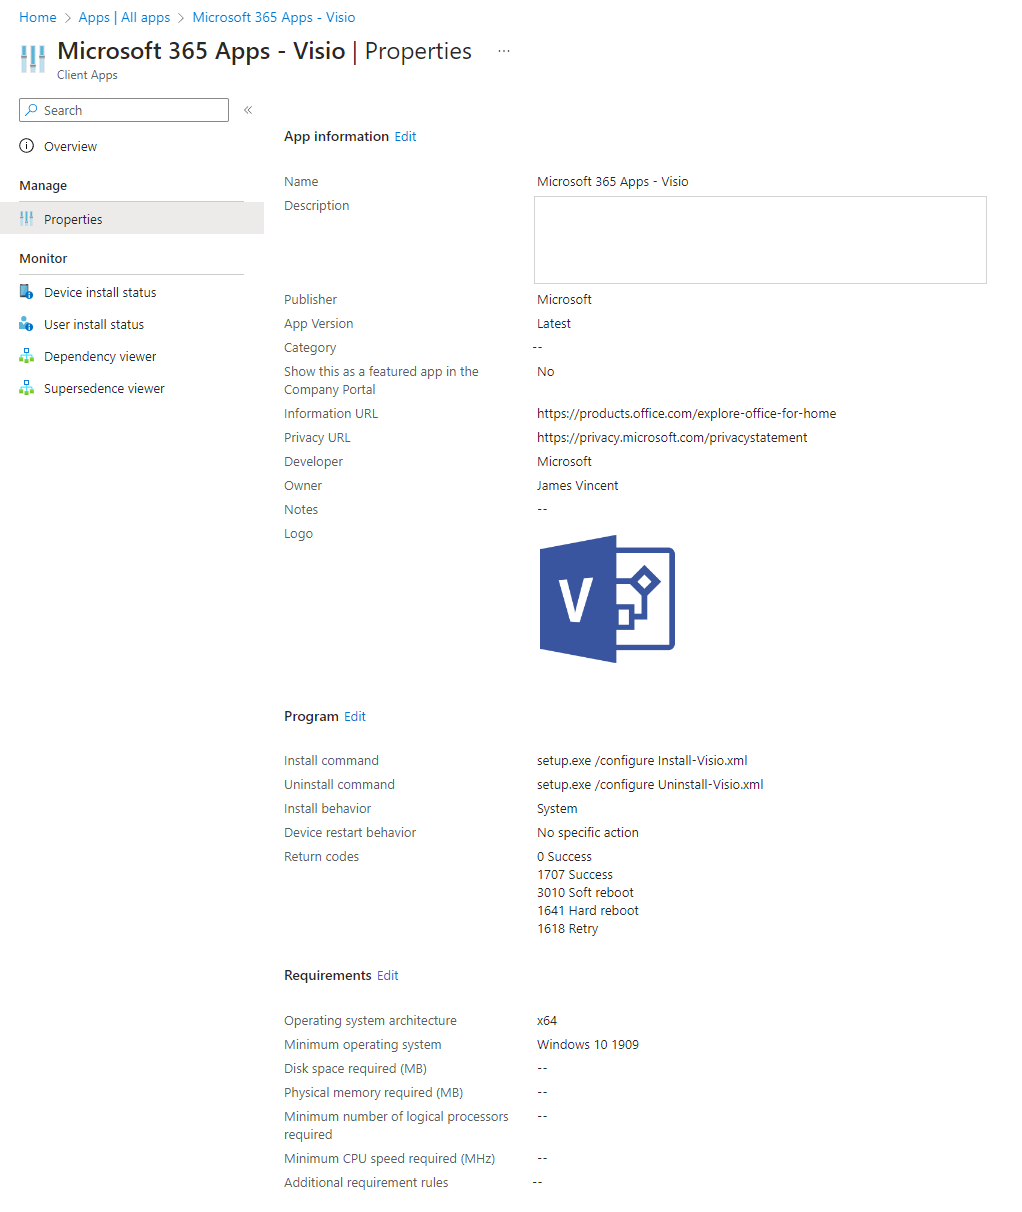
In terms of detection methods, a simple “manually configured detection rule” that checks for the existence of specific files is being performed. Basic, simple, but effective.
| Rule Type | File |
| Path | %ProgramFiles%\Microsoft Office\root\Office16 |
| File or Folder | VISIO.EXE |
| Detection Method | File or Folder exists |
| 32bit App? | No |
Project can be identified using WINPROJ.EXE and the full 365 Apps for Enterprise suite, by detecting one or more of WINWORD.EXE, EXCEL.EXE, OUTLOOK.EXE for example.
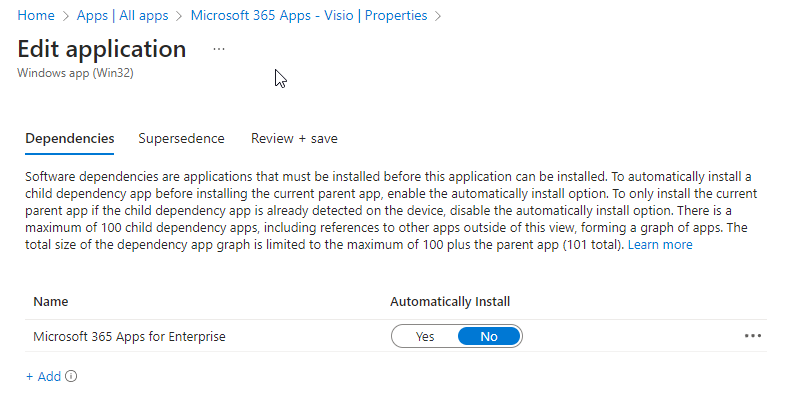
One recommendation/option might be to set a dependency on Visio and/or Project, so that they require the M365 Suite, but this is not essential.
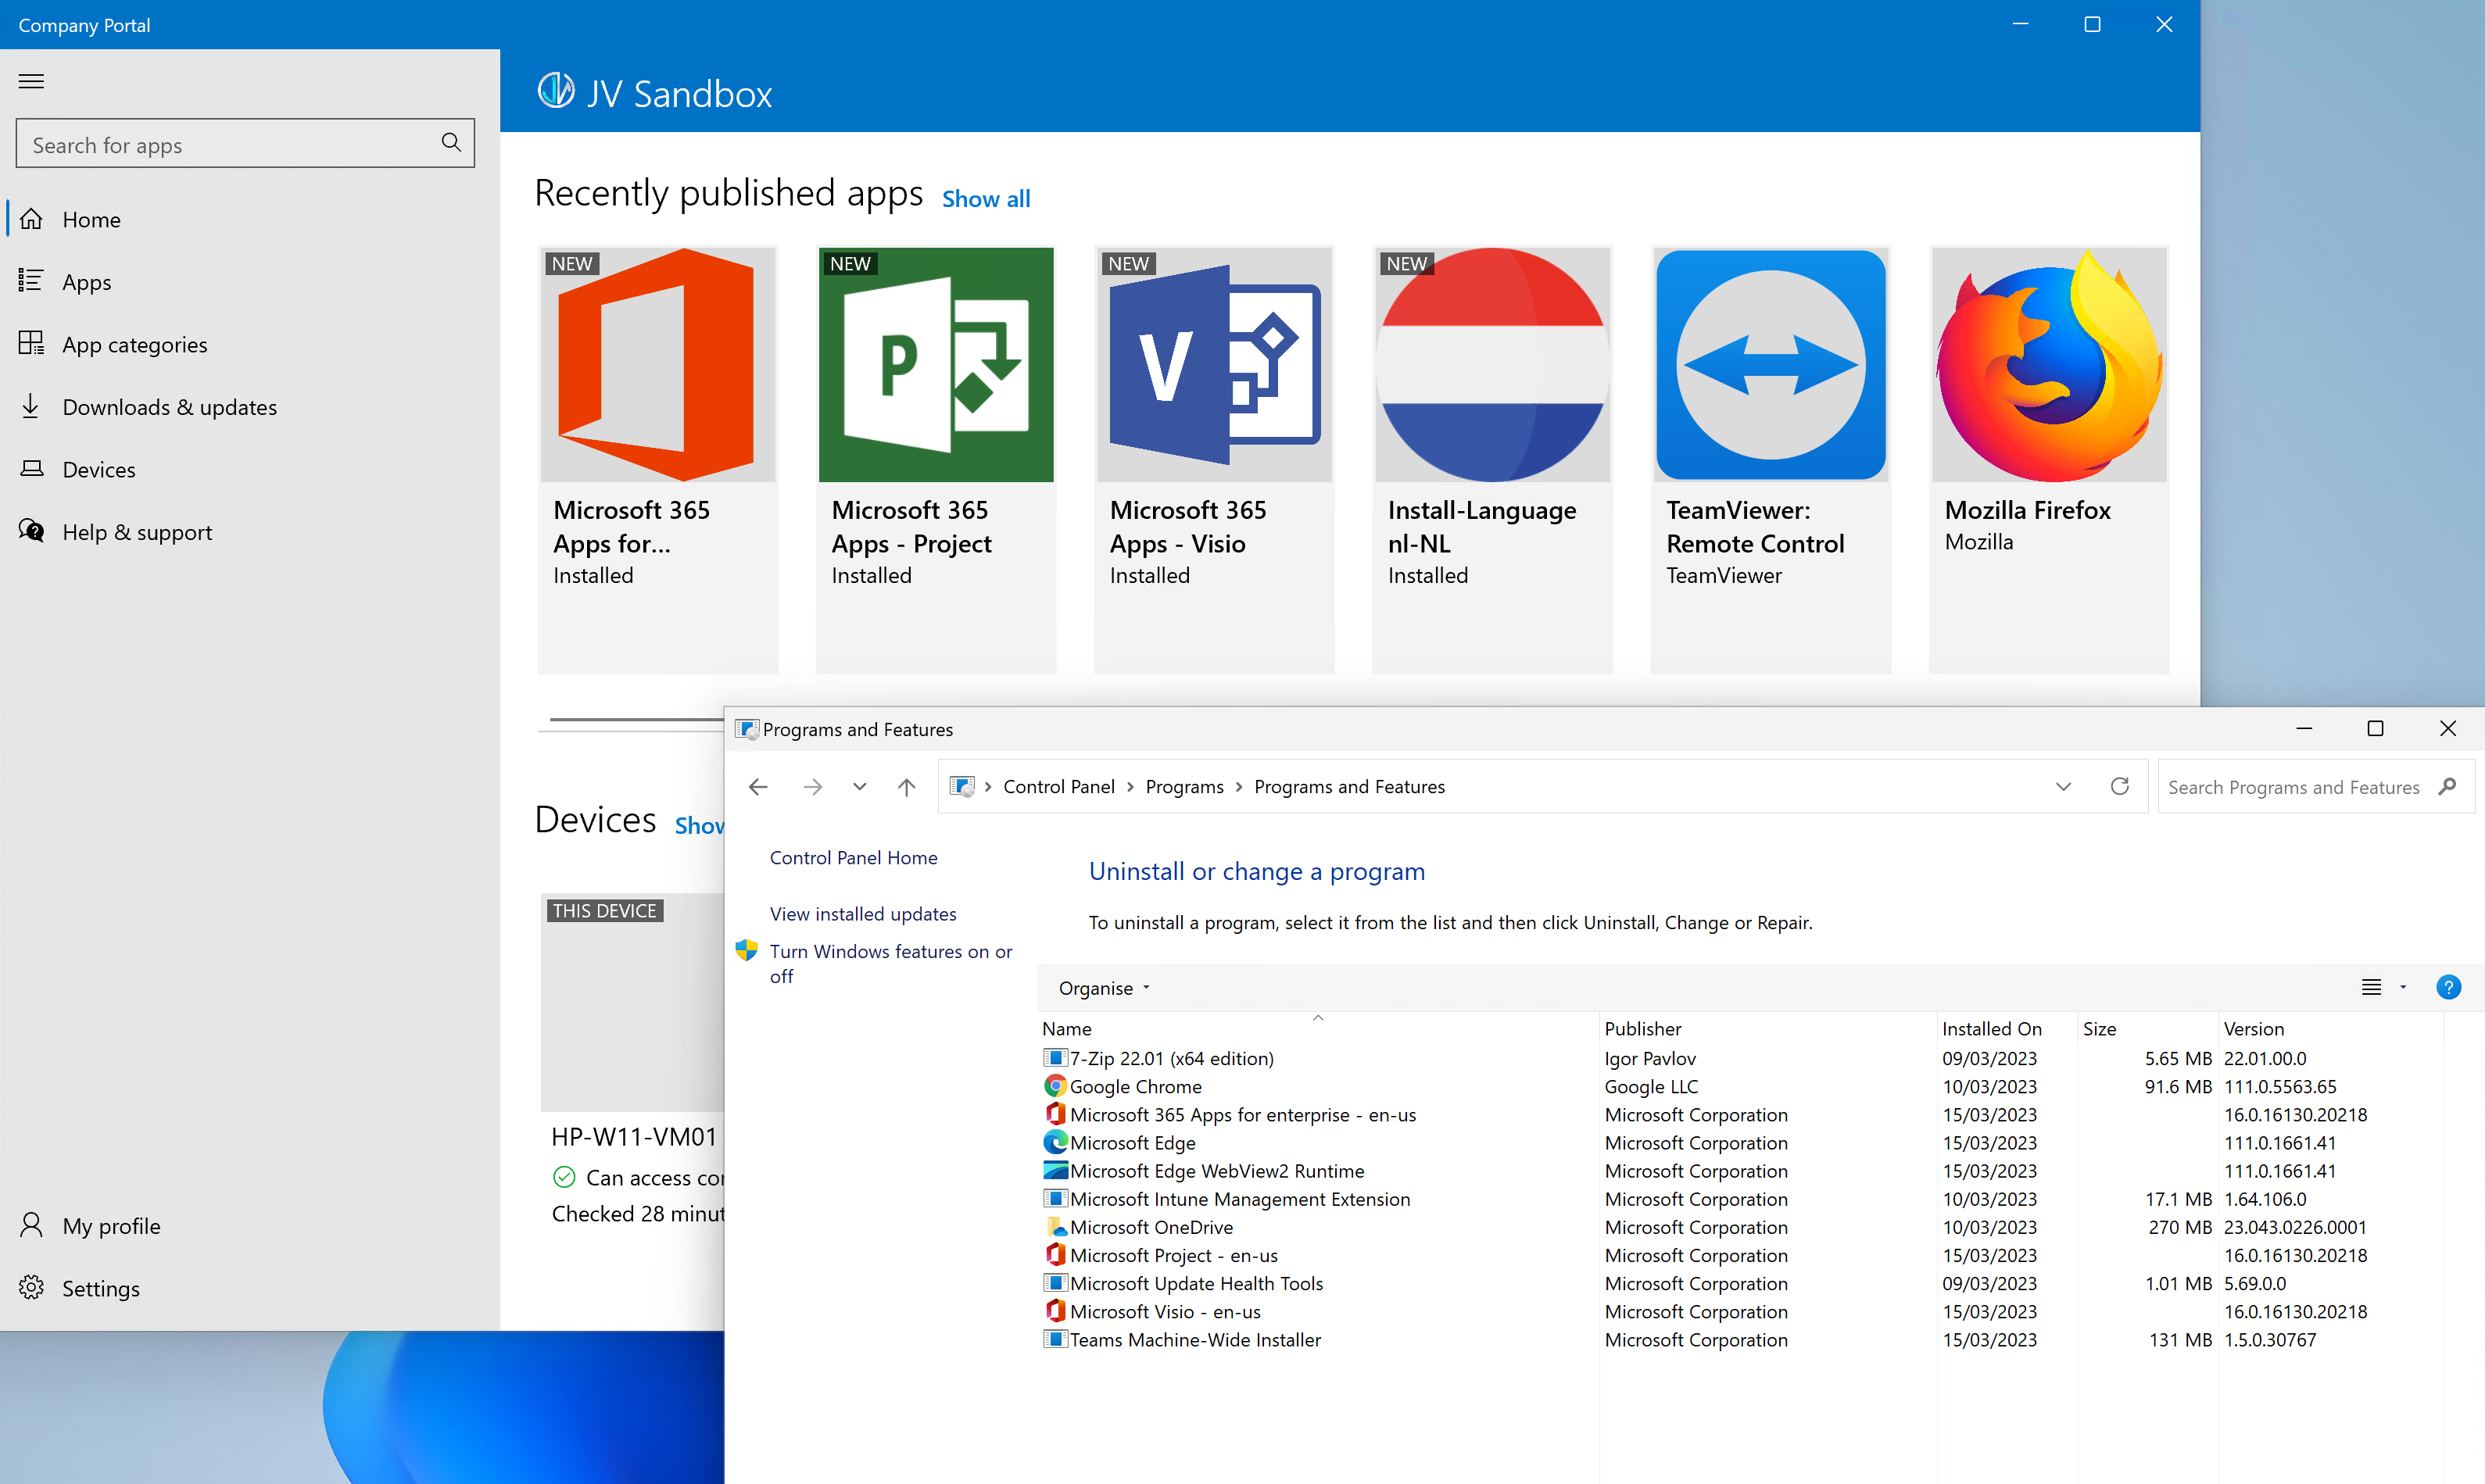
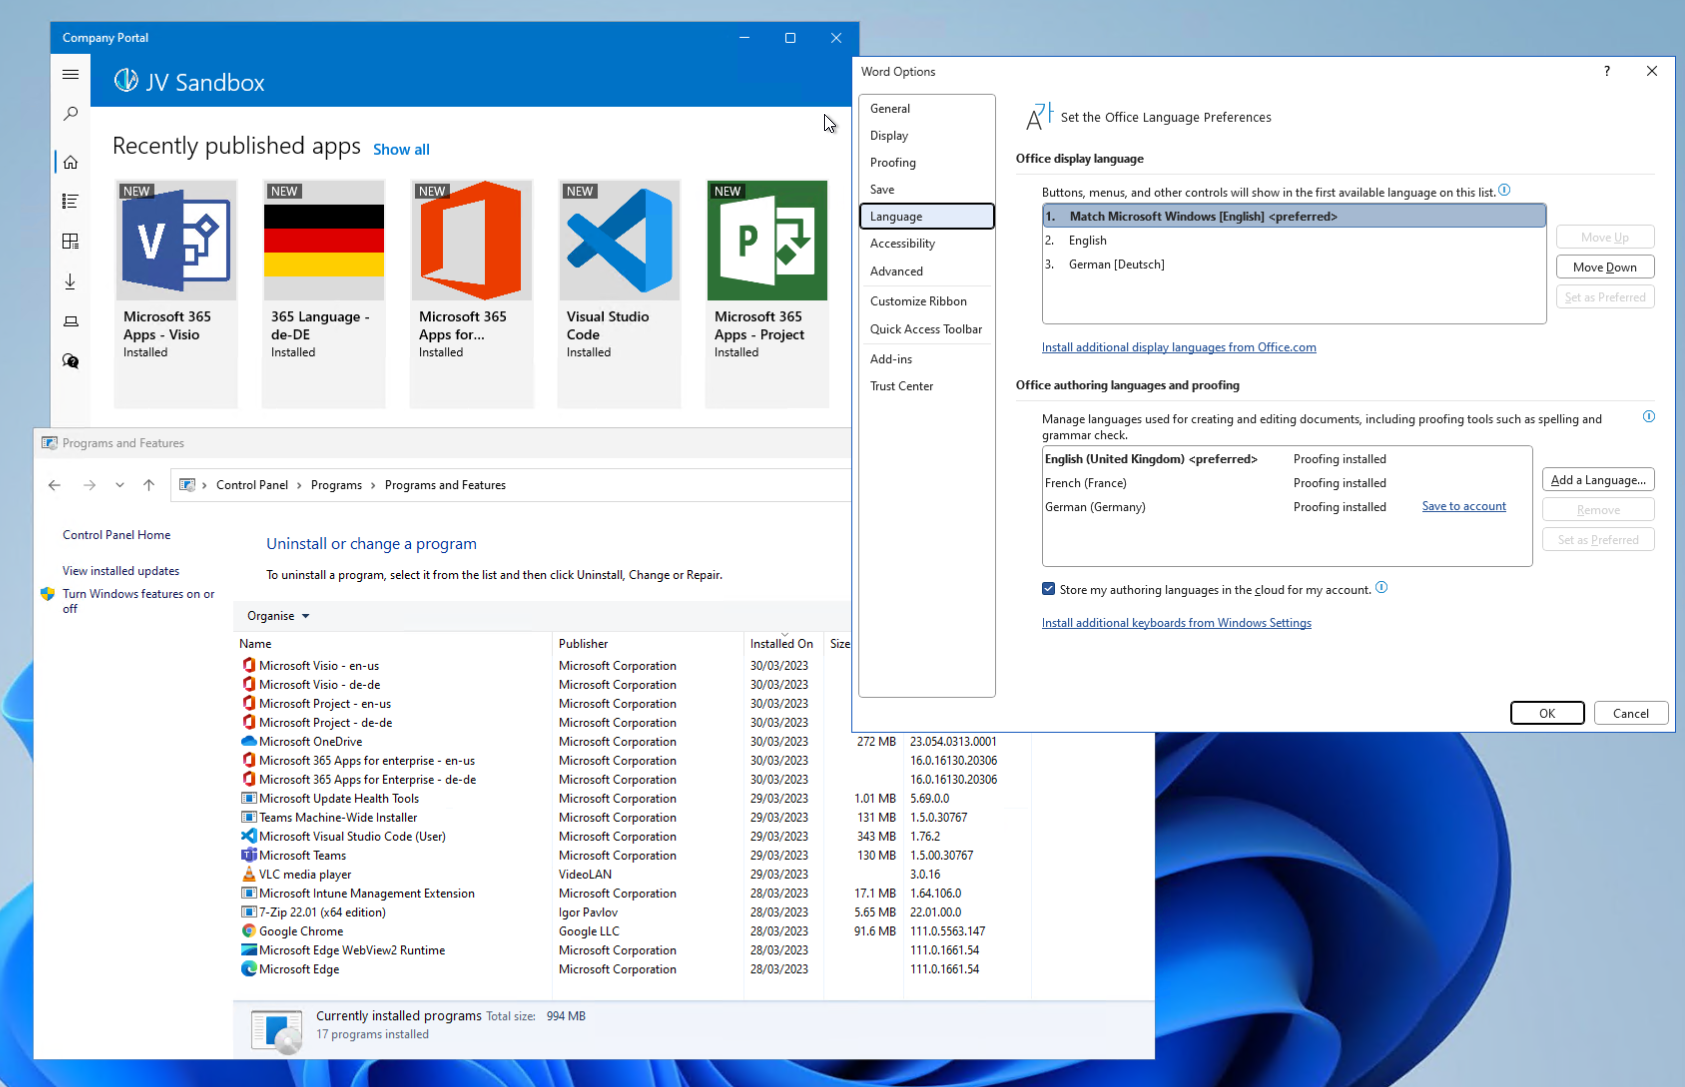
Then it’s simply a case of assigning the application as you would normally. In the example below, each application has been assigned as Available to users, and installed from within Company Portal, one by one for testing/demonstration purposes. Most environments will likely have 365 Apps for Enterprise deployed as a core application, installed at time of deployment…
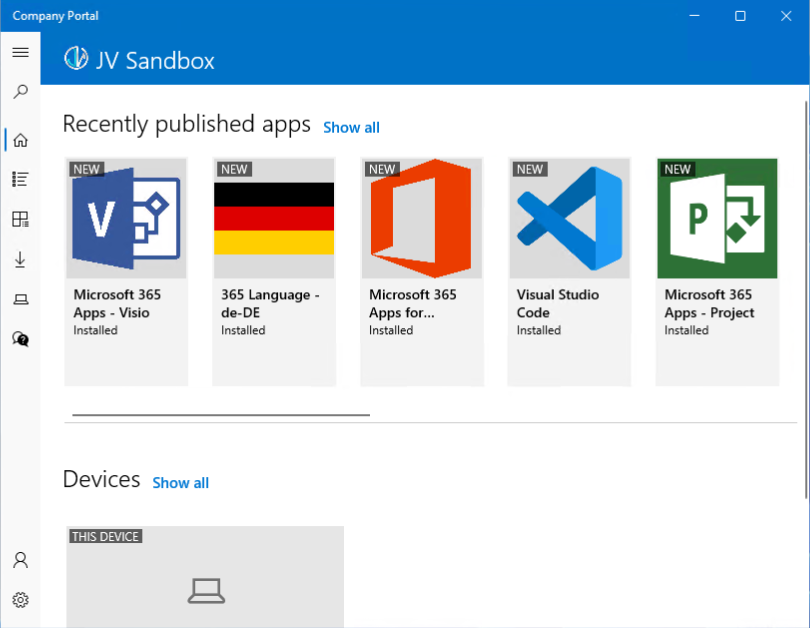
As a bonus and in addition to this, you can also drive additional languages in the same kind of manner. In the image below, you can see a German (de-DE) Language Pack for 365. Package wise, this barely differs from the packages above.
The XML file for the German (de-DE) 365 Language Pack looks like this;
<Configuration>
 <Add Version="MatchInstalled">
  <Product ID="LanguagePack">
   <Language ID="de-de" />
  </Product>
 </Add>
 <Display Level="None" />
</Configuration>
The Product ID can be replaced with ProofingTools should you wish to deploy or install Proofing Tools instead of the full Language Pack(s).
In terms of detecting the Language Pack, again, its based on file existence;
| Rule Type | File |
| Path | %ProgramFiles%\Microsoft Office\root\loc |
| File or Folder | AppXManifestLoc.16.de-de.xml |
| Detection Method | File or Folder exists |
| 32bit App? | No |
and
| Rule Type | File |
| Path | %ProgramFiles%\Microsoft Office\root\Office16 |
| File or Folder | 1031 |
| Detection Method | File or Folder exists |
| 32bit App? | No |
…and after all that, you end up with
References
Leave a Reply