iOS devices are best managed when they’re “Supervised”. In order for devices to be supervised, they must either be enrolled via Apple Business Manager and/or Apple Configurator.
Apple Business Manager is by far the easiest approach, however, not everyone has the ability to create an Apple Business Manager account and… not everyone purchases devices from authorised resellers. Also, there are environments that already have devices in the wild, that cannot be retrospectively added to Apple Business Manager (easily).
This particular article concentrates on the very manual and laborious task of registering and enrolling iOS devices into Intune, using Apple Configurator. It is important to note that device(s) going through this process must be factory reset.
There are prerequisites to this procedure, these are;
Prerequisites
- Physical access to iOS/iPadOS devices
- An Apple MDM push certificate
- Device serial numbers
- USB connection cables
- macOS computer running Apple Configurator 2.0
With all the above in check, start by logging in to Intune. In the left menu click on Devices, and then, click iOS/iPadOS.
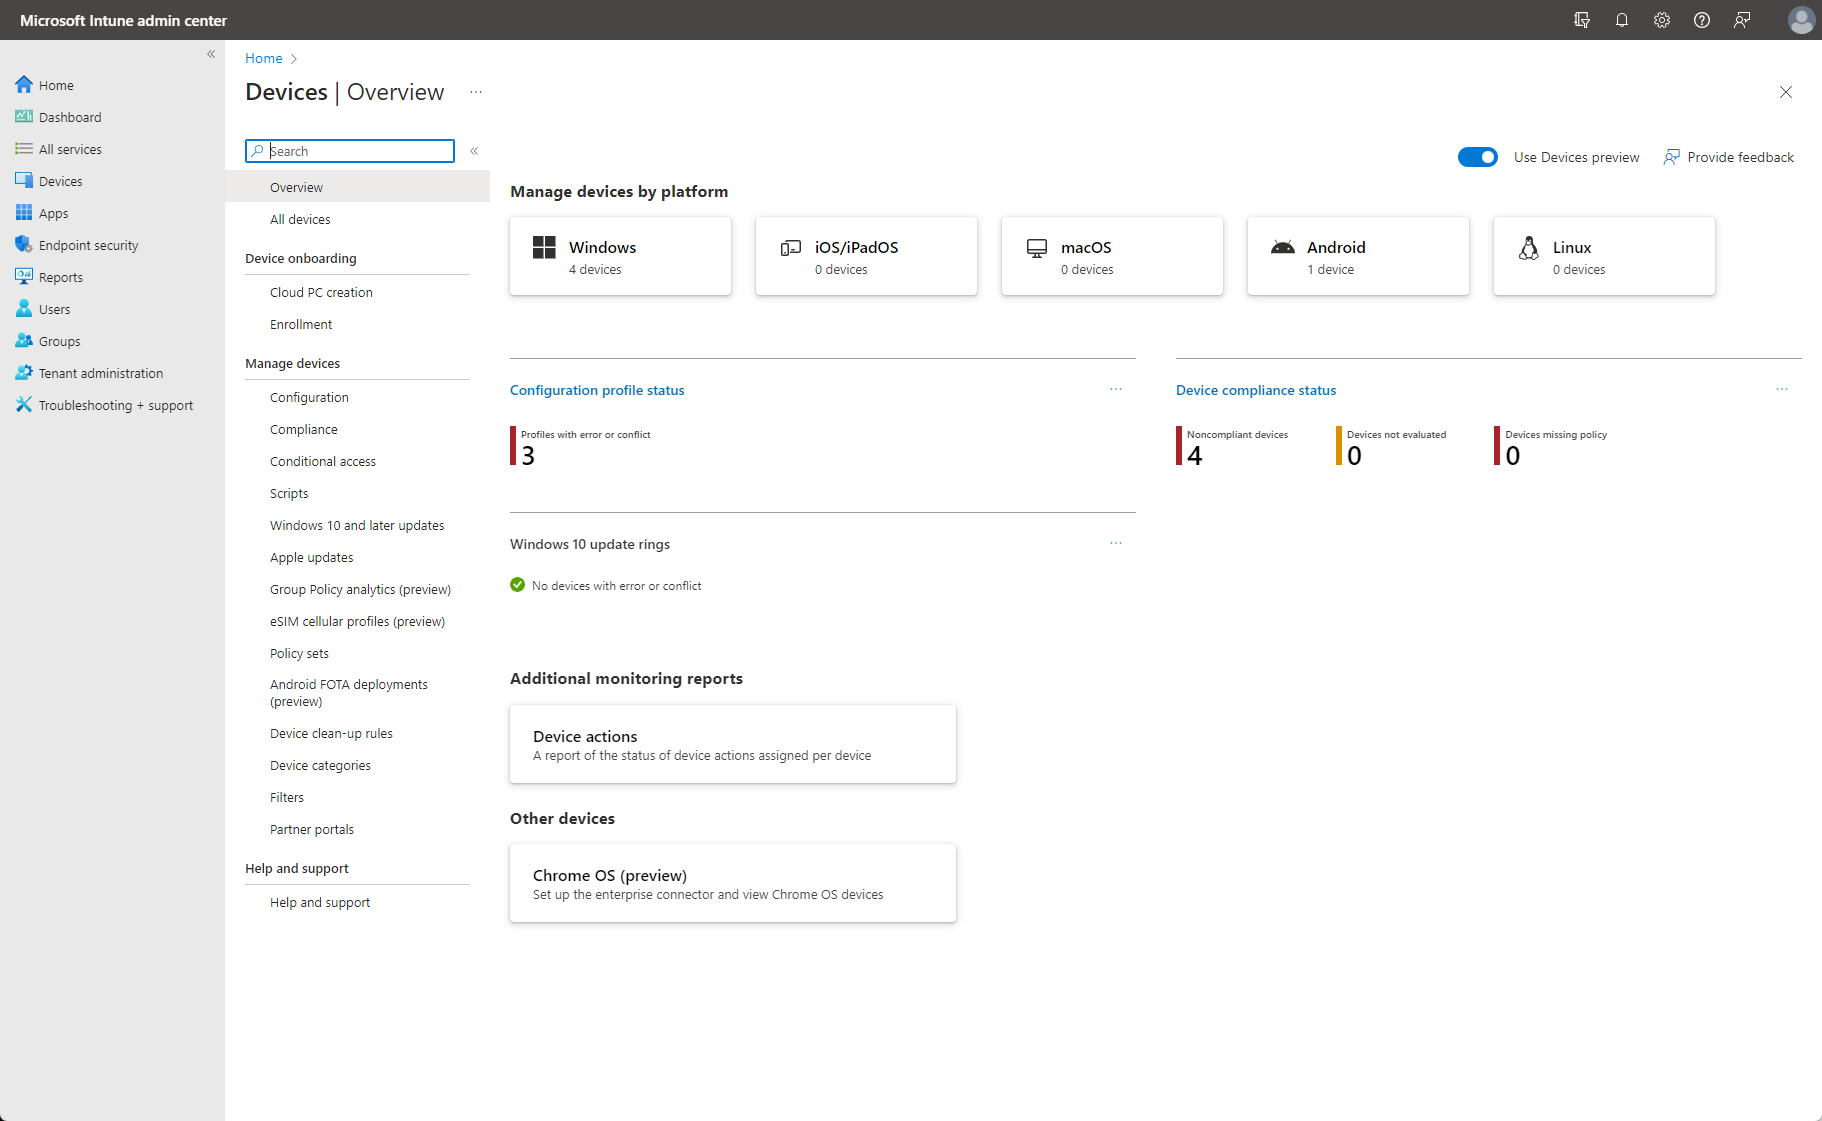
Within the iOS/iPadOS Device Overview, click on iOS/iPadOS enrollment in the left submenu.
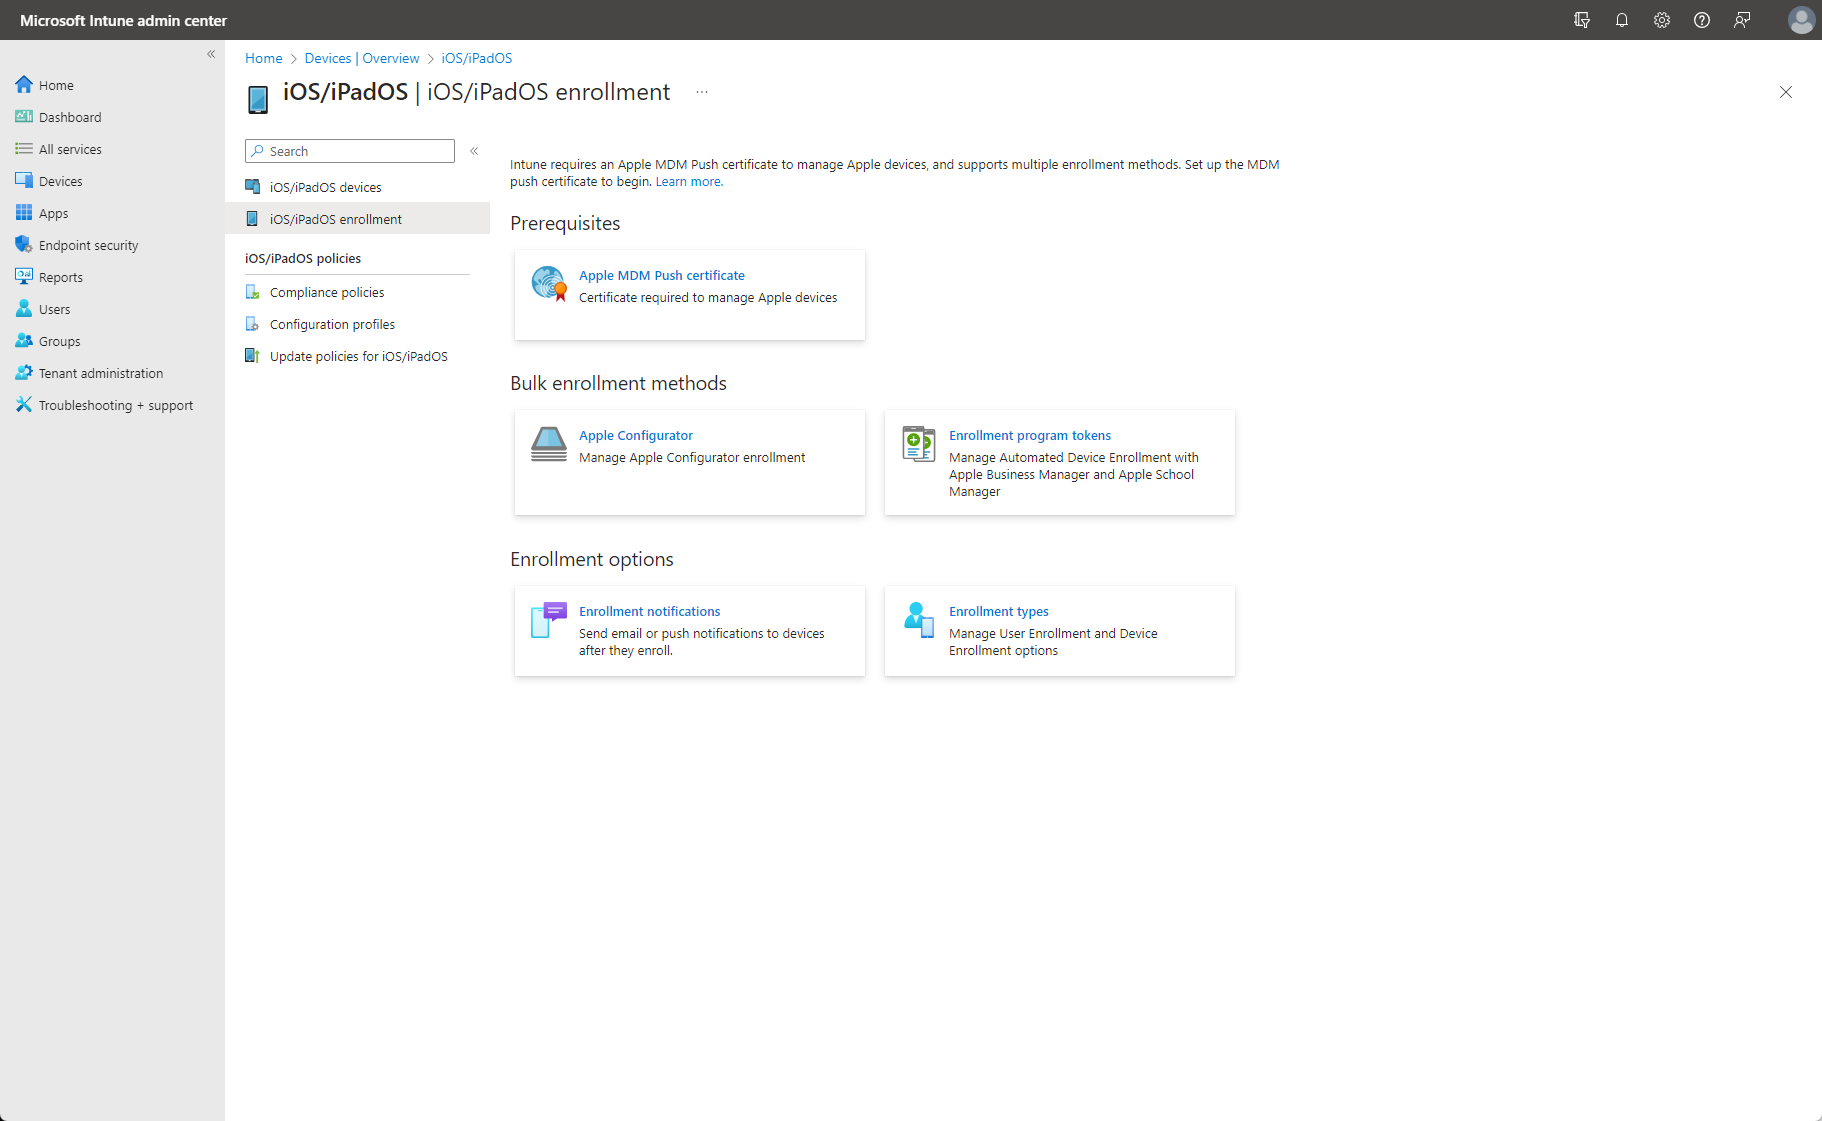
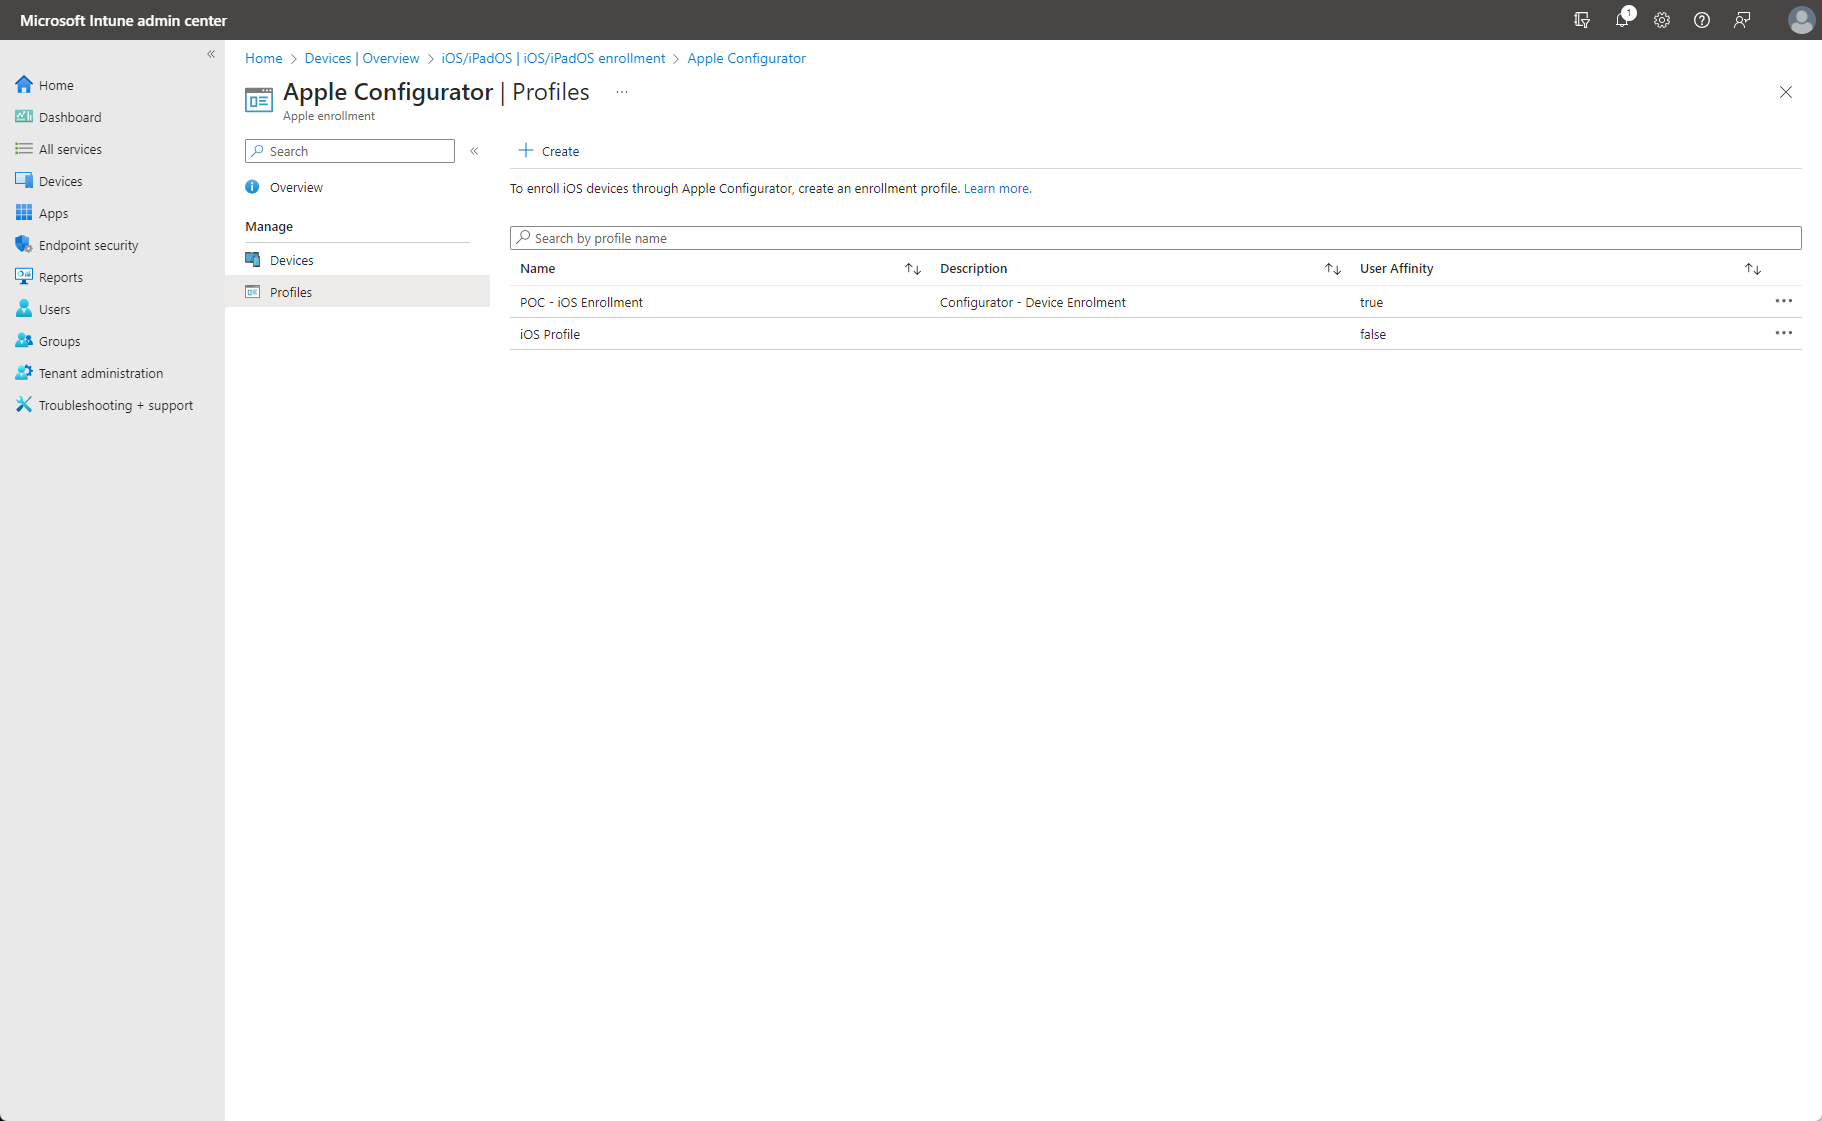
Click on Apple Configurator, and then Profiles. Within the Profiles overview, click Create.
Give your Profile a meaningful name and description, and click Next. Select whether you wish for the device to enroll with or without user affinity. What does this mean??
| Enroll with user affinity – Choose this option for devices that belong to users and that want to use the company portal for services like installing apps. The device must be affiliated with a user with Setup Assistant and can then access company data and email. Only supported for Setup Assistant enrollment. User affinity requires WS-Trust 1.3 Username/Mixed endpoint. | |
| Enroll without User Affinity – Choose this option for devices unaffiliated with a single user. Use this for devices that perform tasks without accessing local user data. Apps requiring user affiliation (including the Company Portal app used for installing line-of-business apps) won’t work. Required for direct enrollment. |
When opting to enroll with user affinity, you must also specify how you wish the user to authenticate. This can be done using Company Portal or Setup Assistant. Which do you need??
| Enroll using Company Portal – If your organization uses multi-factor authentication, select Company Portal; the app will then automatically install on devices at time of enrollment. Setup assistant as a standalone authentication method has been superseded by setup assistant with modern authentication. The modern authentication method prompts users to authenticate based on the settings you’ve configured in Azure AD. | |
| Enroll using Setup Assistant – If your organization uses multi-factor authentication, select Company Portal; the app will then automatically install on devices at time of enrollment. Setup assistant as a standalone authentication method has been superseded by setup assistant with modern authentication. The modern authentication method prompts users to authenticate based on the settings you’ve configured in Azure AD. |
If following this guide and you have zero access to Apple Business Manager, then users will need to sign in with an Apple ID in order to download Company Portal and enroll. If you have access to Apple Business Manager, you definitely want to connect a VPP Token and publish Company Portal (free app) so that it can automatically install without the need for a user to first login using an Apple ID.
With your profile created, you need to go to the Overview page of the newly created profile. In here you will see the option Export Profile. Clicking this will display a new blade showing options for Setup Assistant Enrollment and also Direct Enrollment. Direct Enrollment can only be used in conjunction with profiles that do not have user affinity, this guide concentrates on user to device affinity, so Direct Enrollment is not in scope here.
Under Setup Assistant Enrollment, copy the provided Profile URL. We need to input this into Apple Configurator.
Open Apple Configurator, and in the menu bar, click on Apple Configurator > Settings. Within Settings, click on Organisations and populate an entry for your Organisation. Then do the same for Servers, click Next on the initial information window.
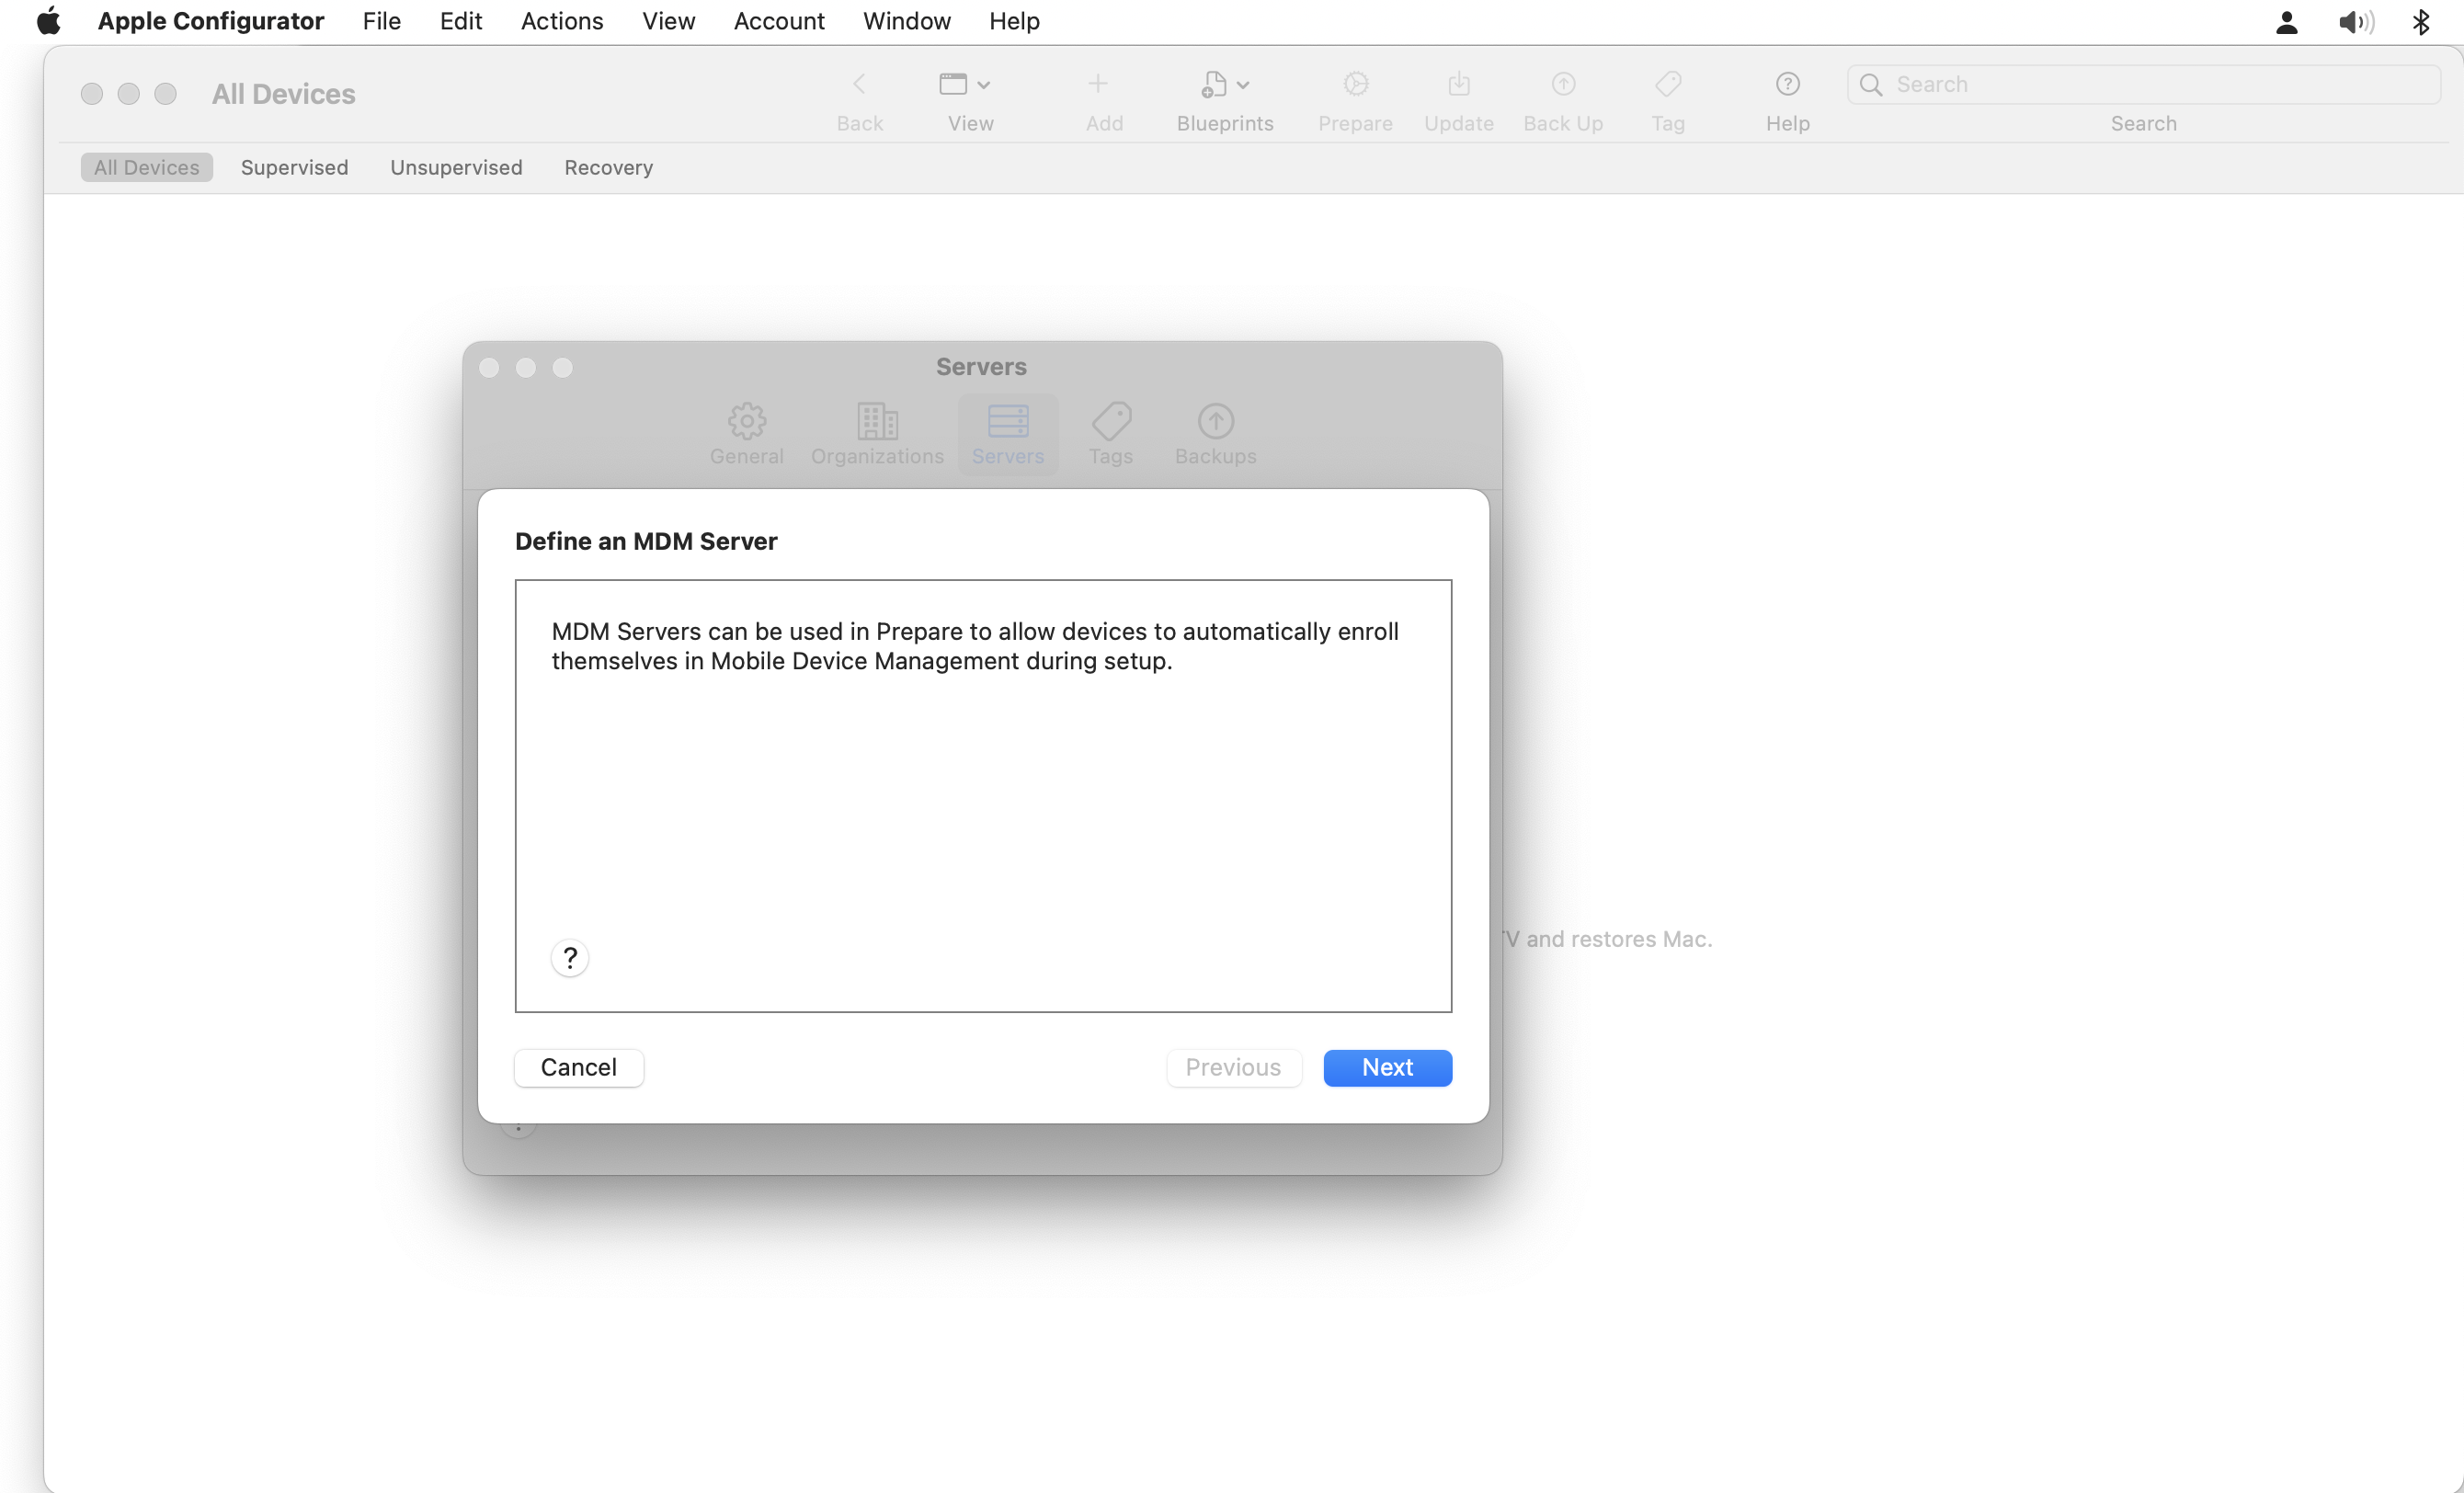
In the “Define an MDM Server” wizard, enter a meaningful name for this server, and under Host name or URL, this is where you need to paste the URL we copied from the “Export Profile” blade in Intune. Then click Next. Upon clicking next, you may receive a warning about not being able to validate or verify the Enrollment Server, this can be ignored.
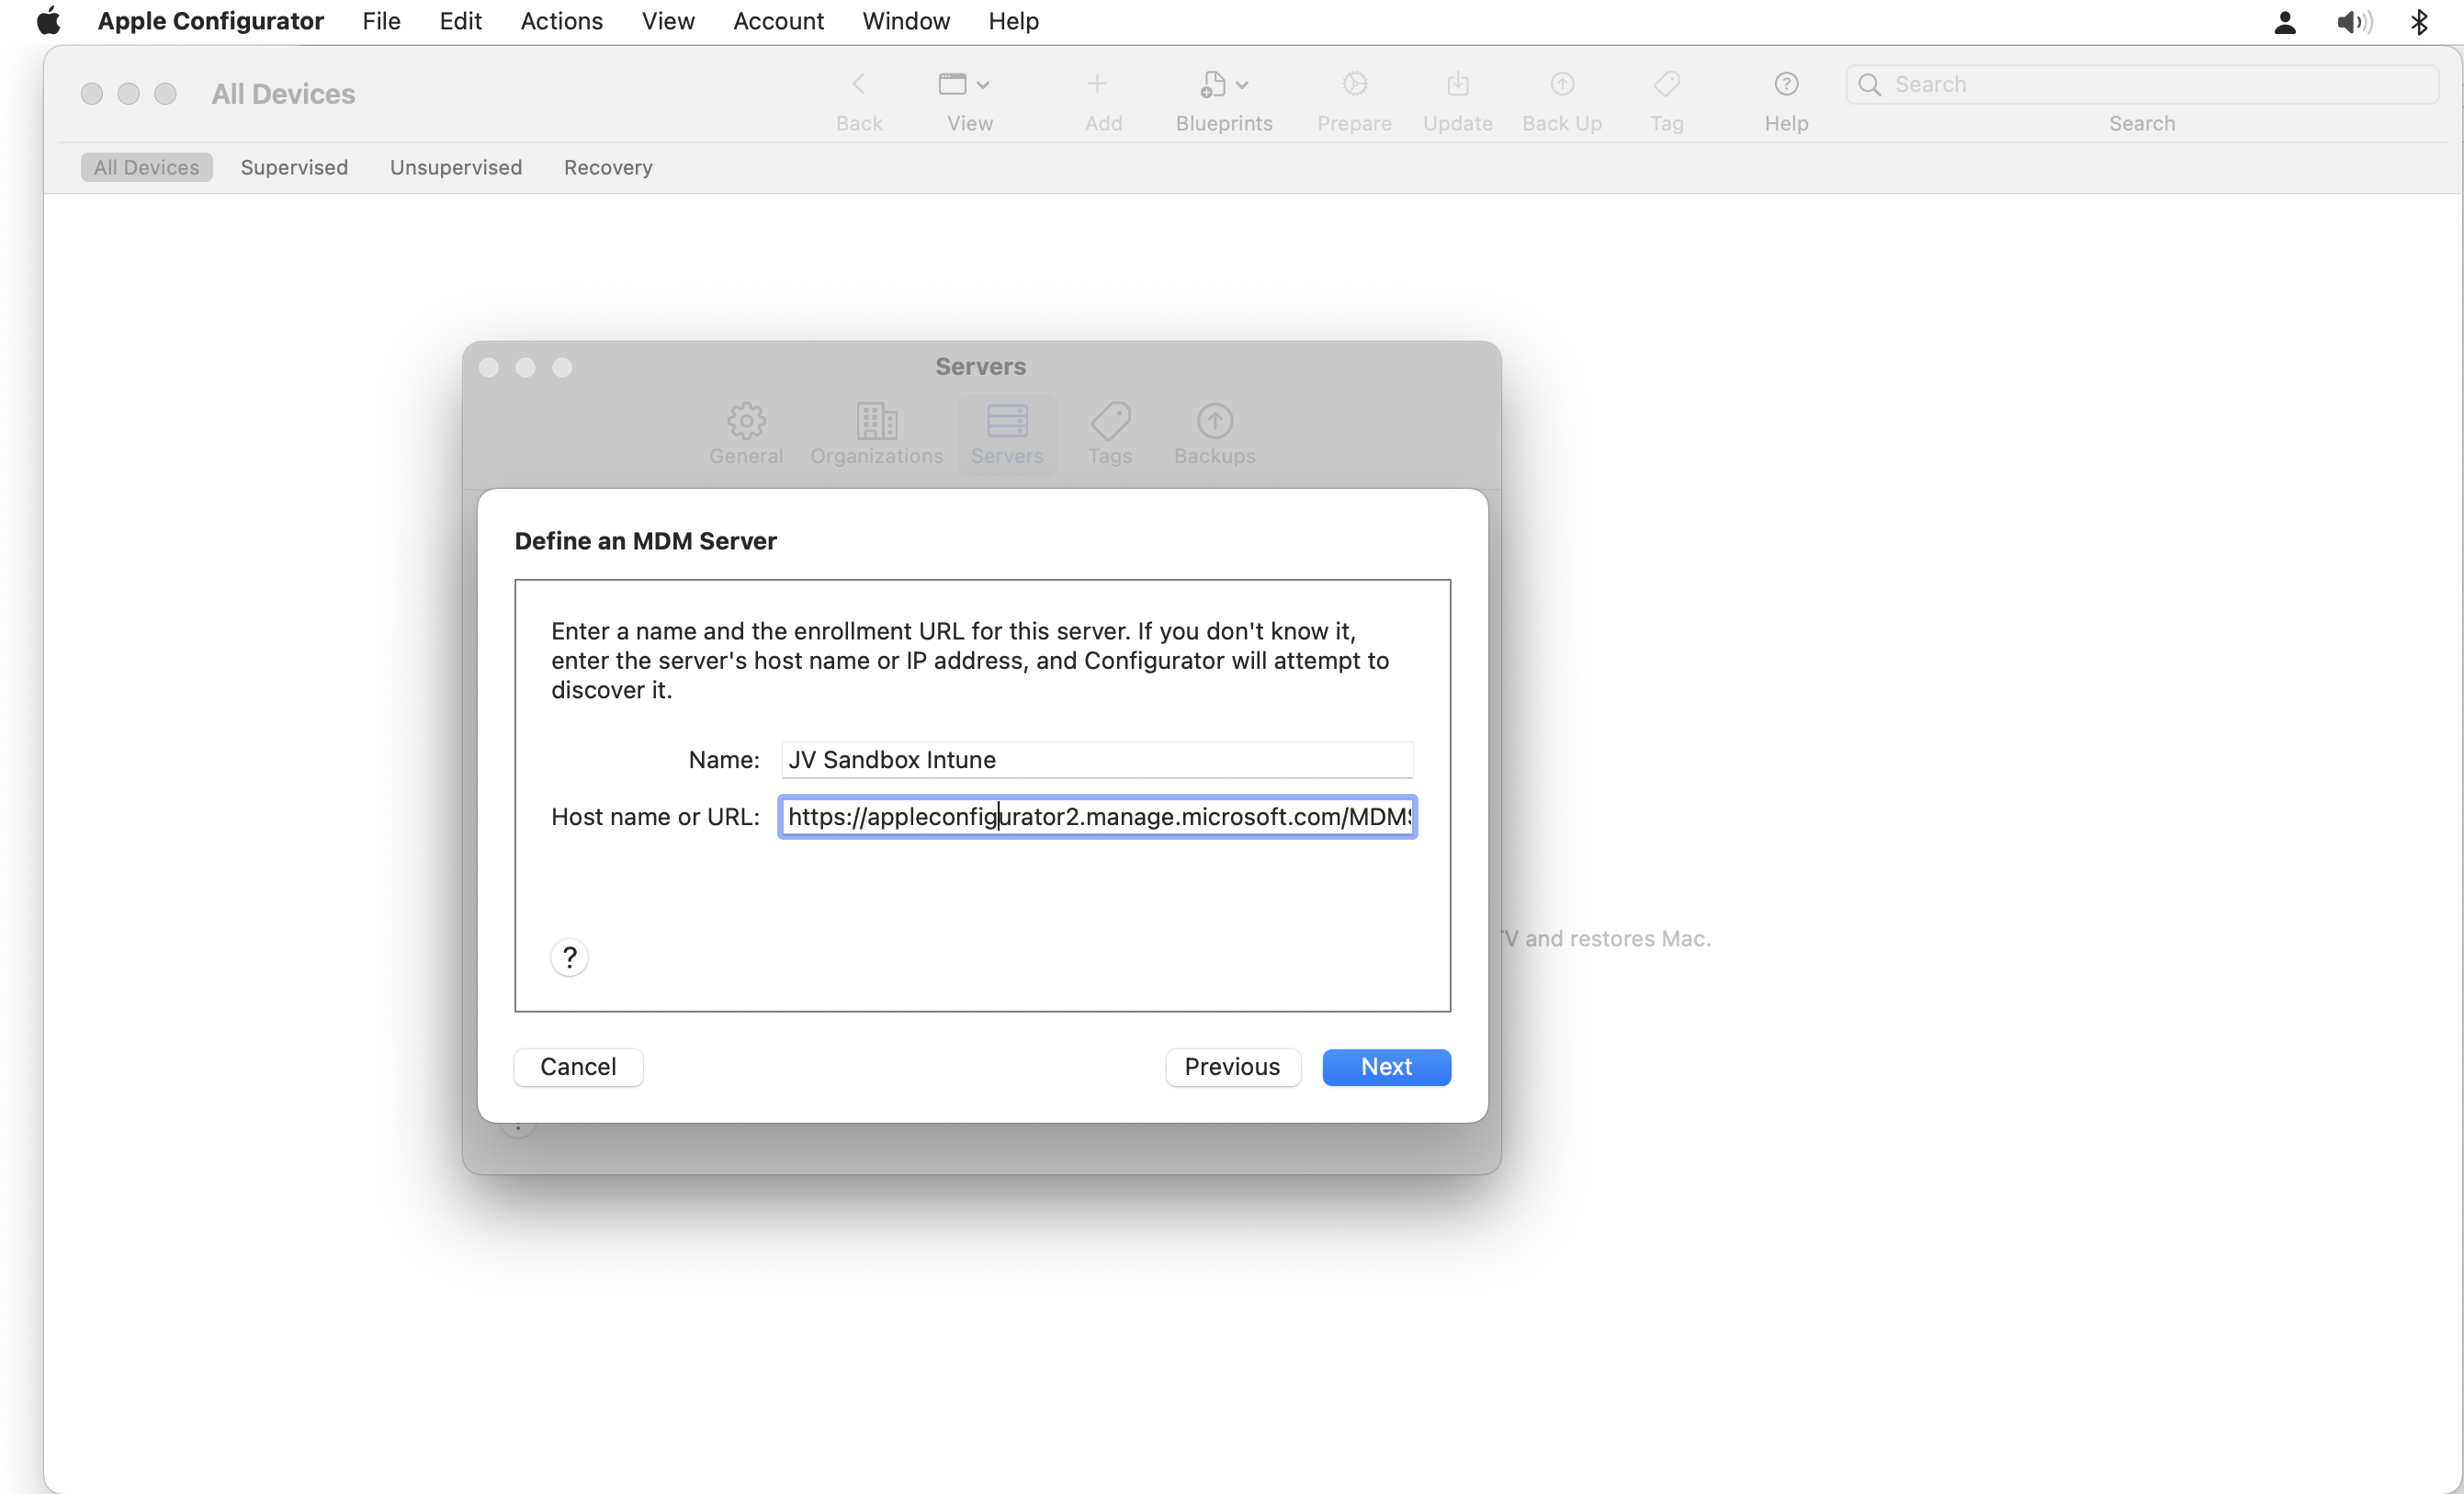
This will add the tenant specific Enrollment URL into Apple Configurator, with which you can now prepare devices.

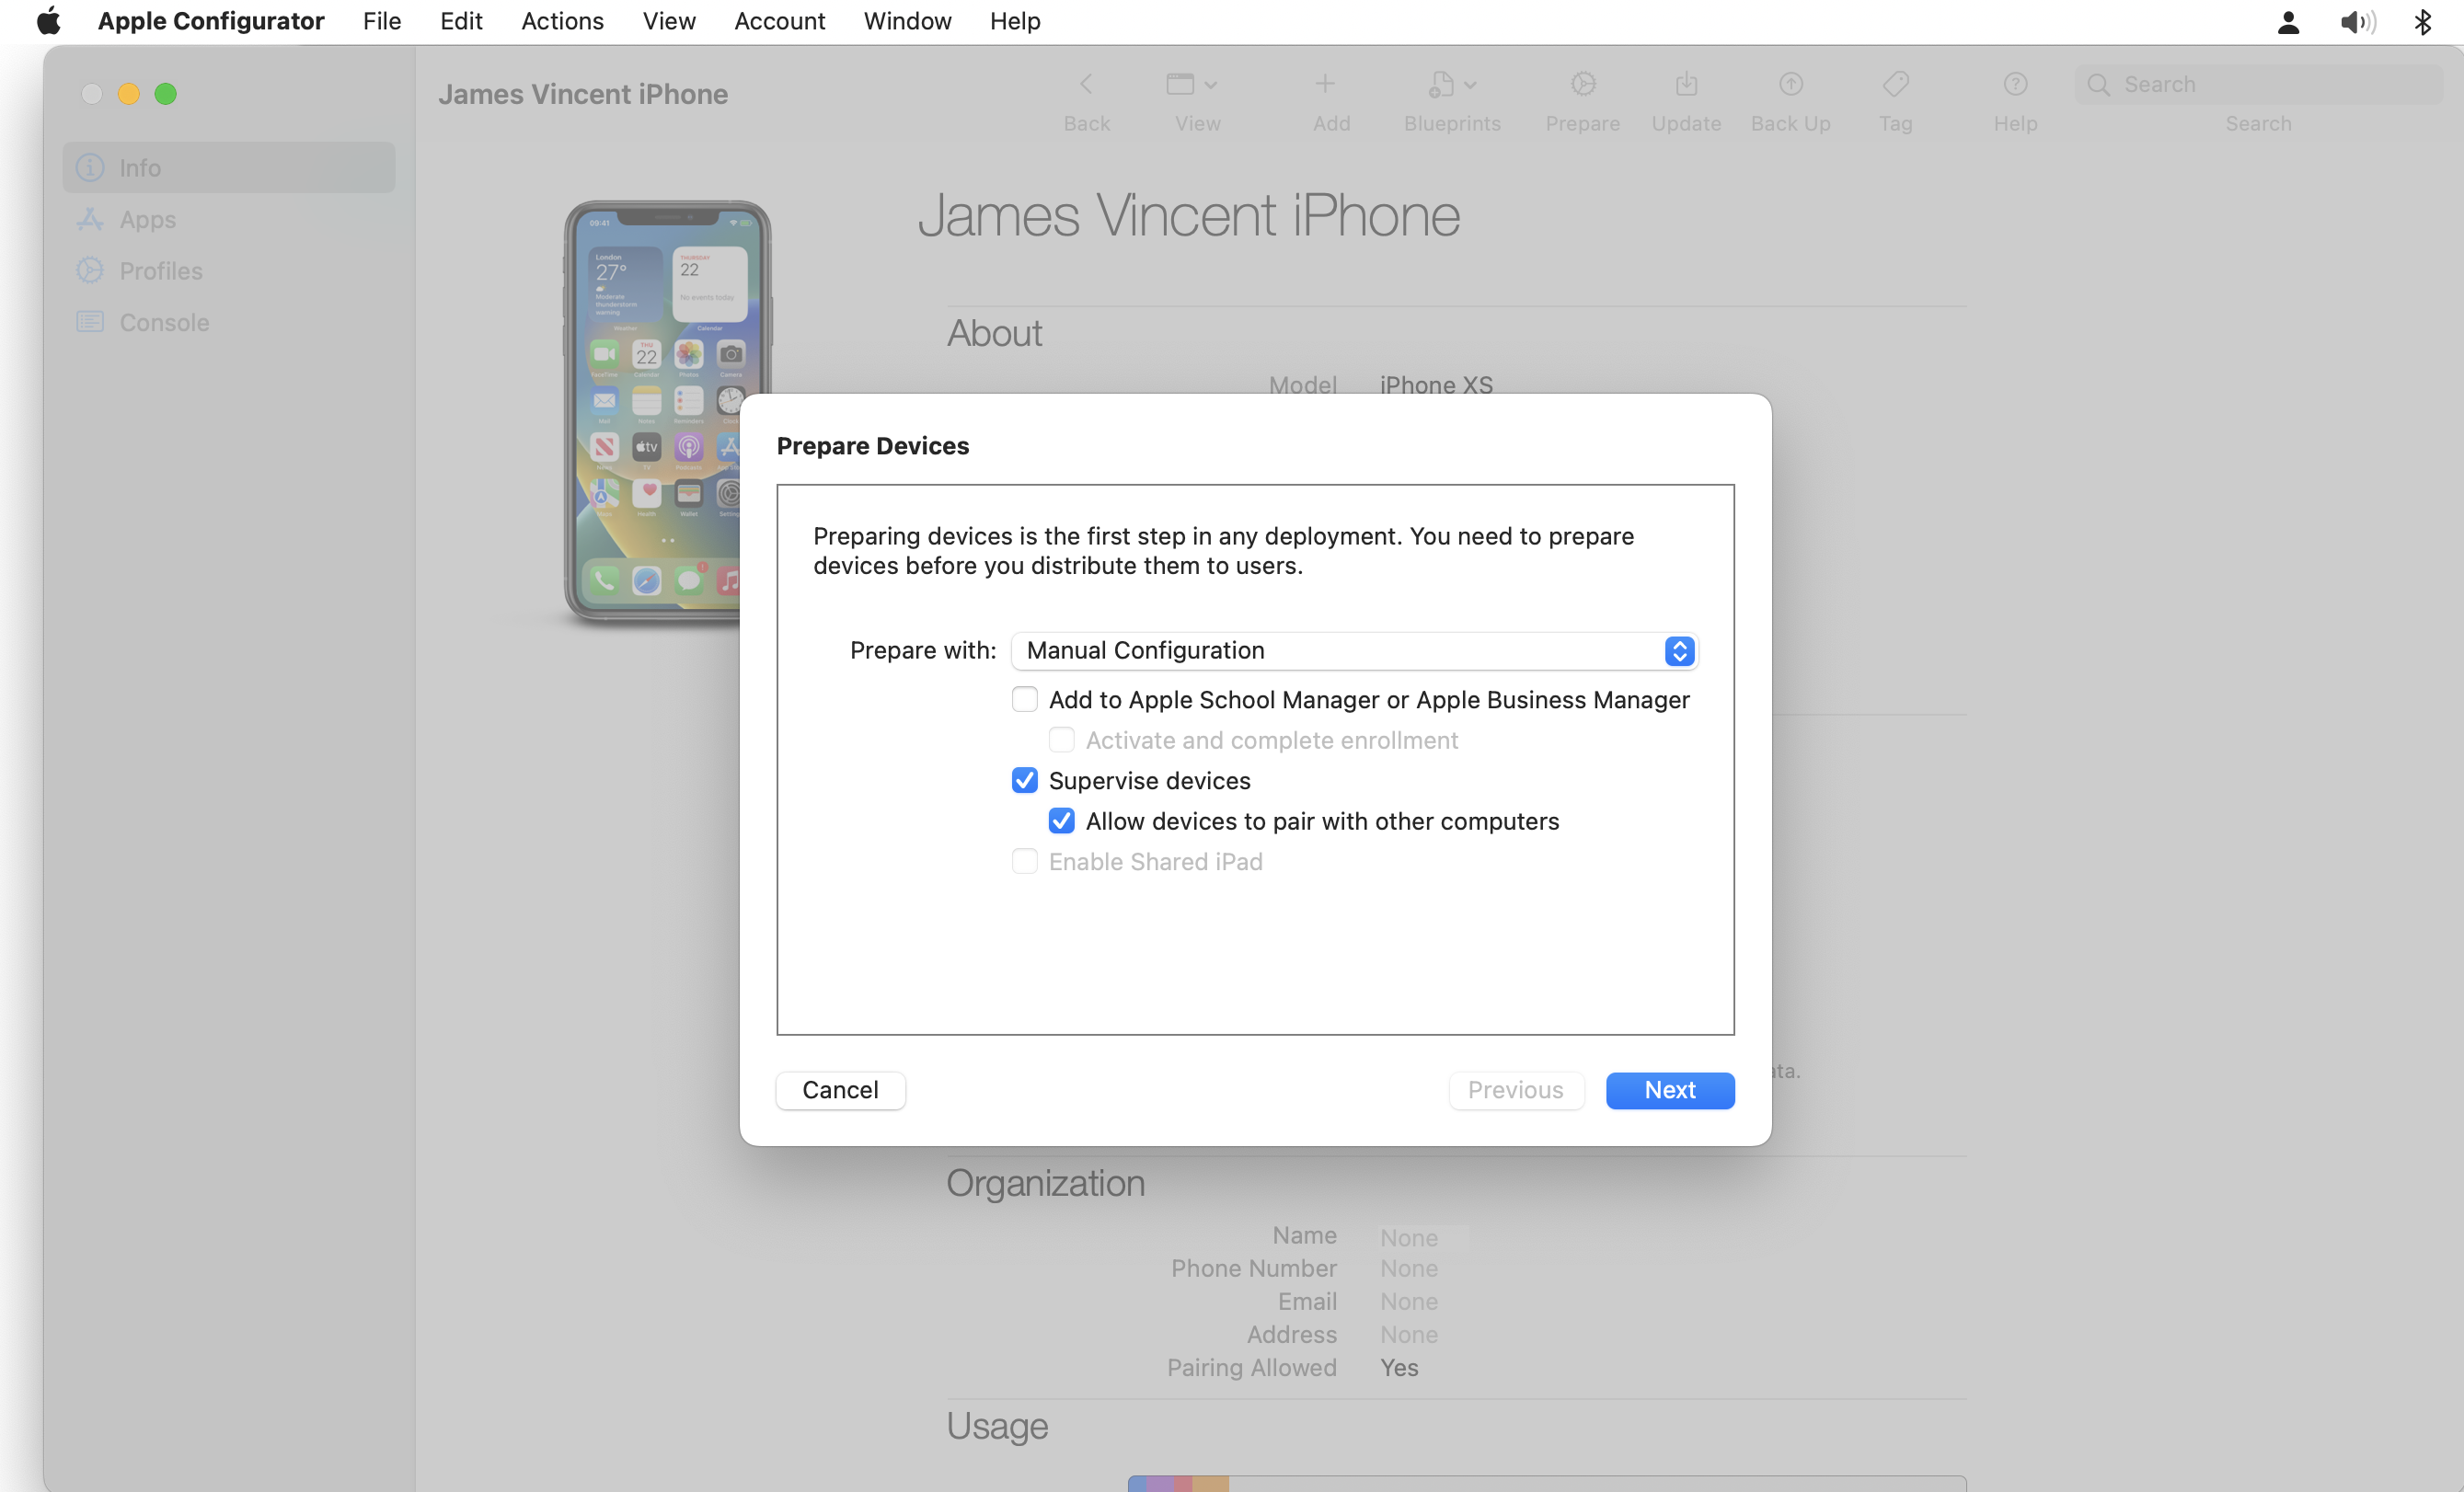
The next step is to connect your iOS device up to Apple Configurator using the cable. Plugging the device in should display the overview page for the device. Under Actions, click Prepare.

The preparation wizard should then open up, for this particular guide/approach, we need to select Manual Configuration, and really, all devices should be Supervised. At least all company owned devices. Without the devices being supervised, some management settings and functionality are simply not available to you. Click Next.
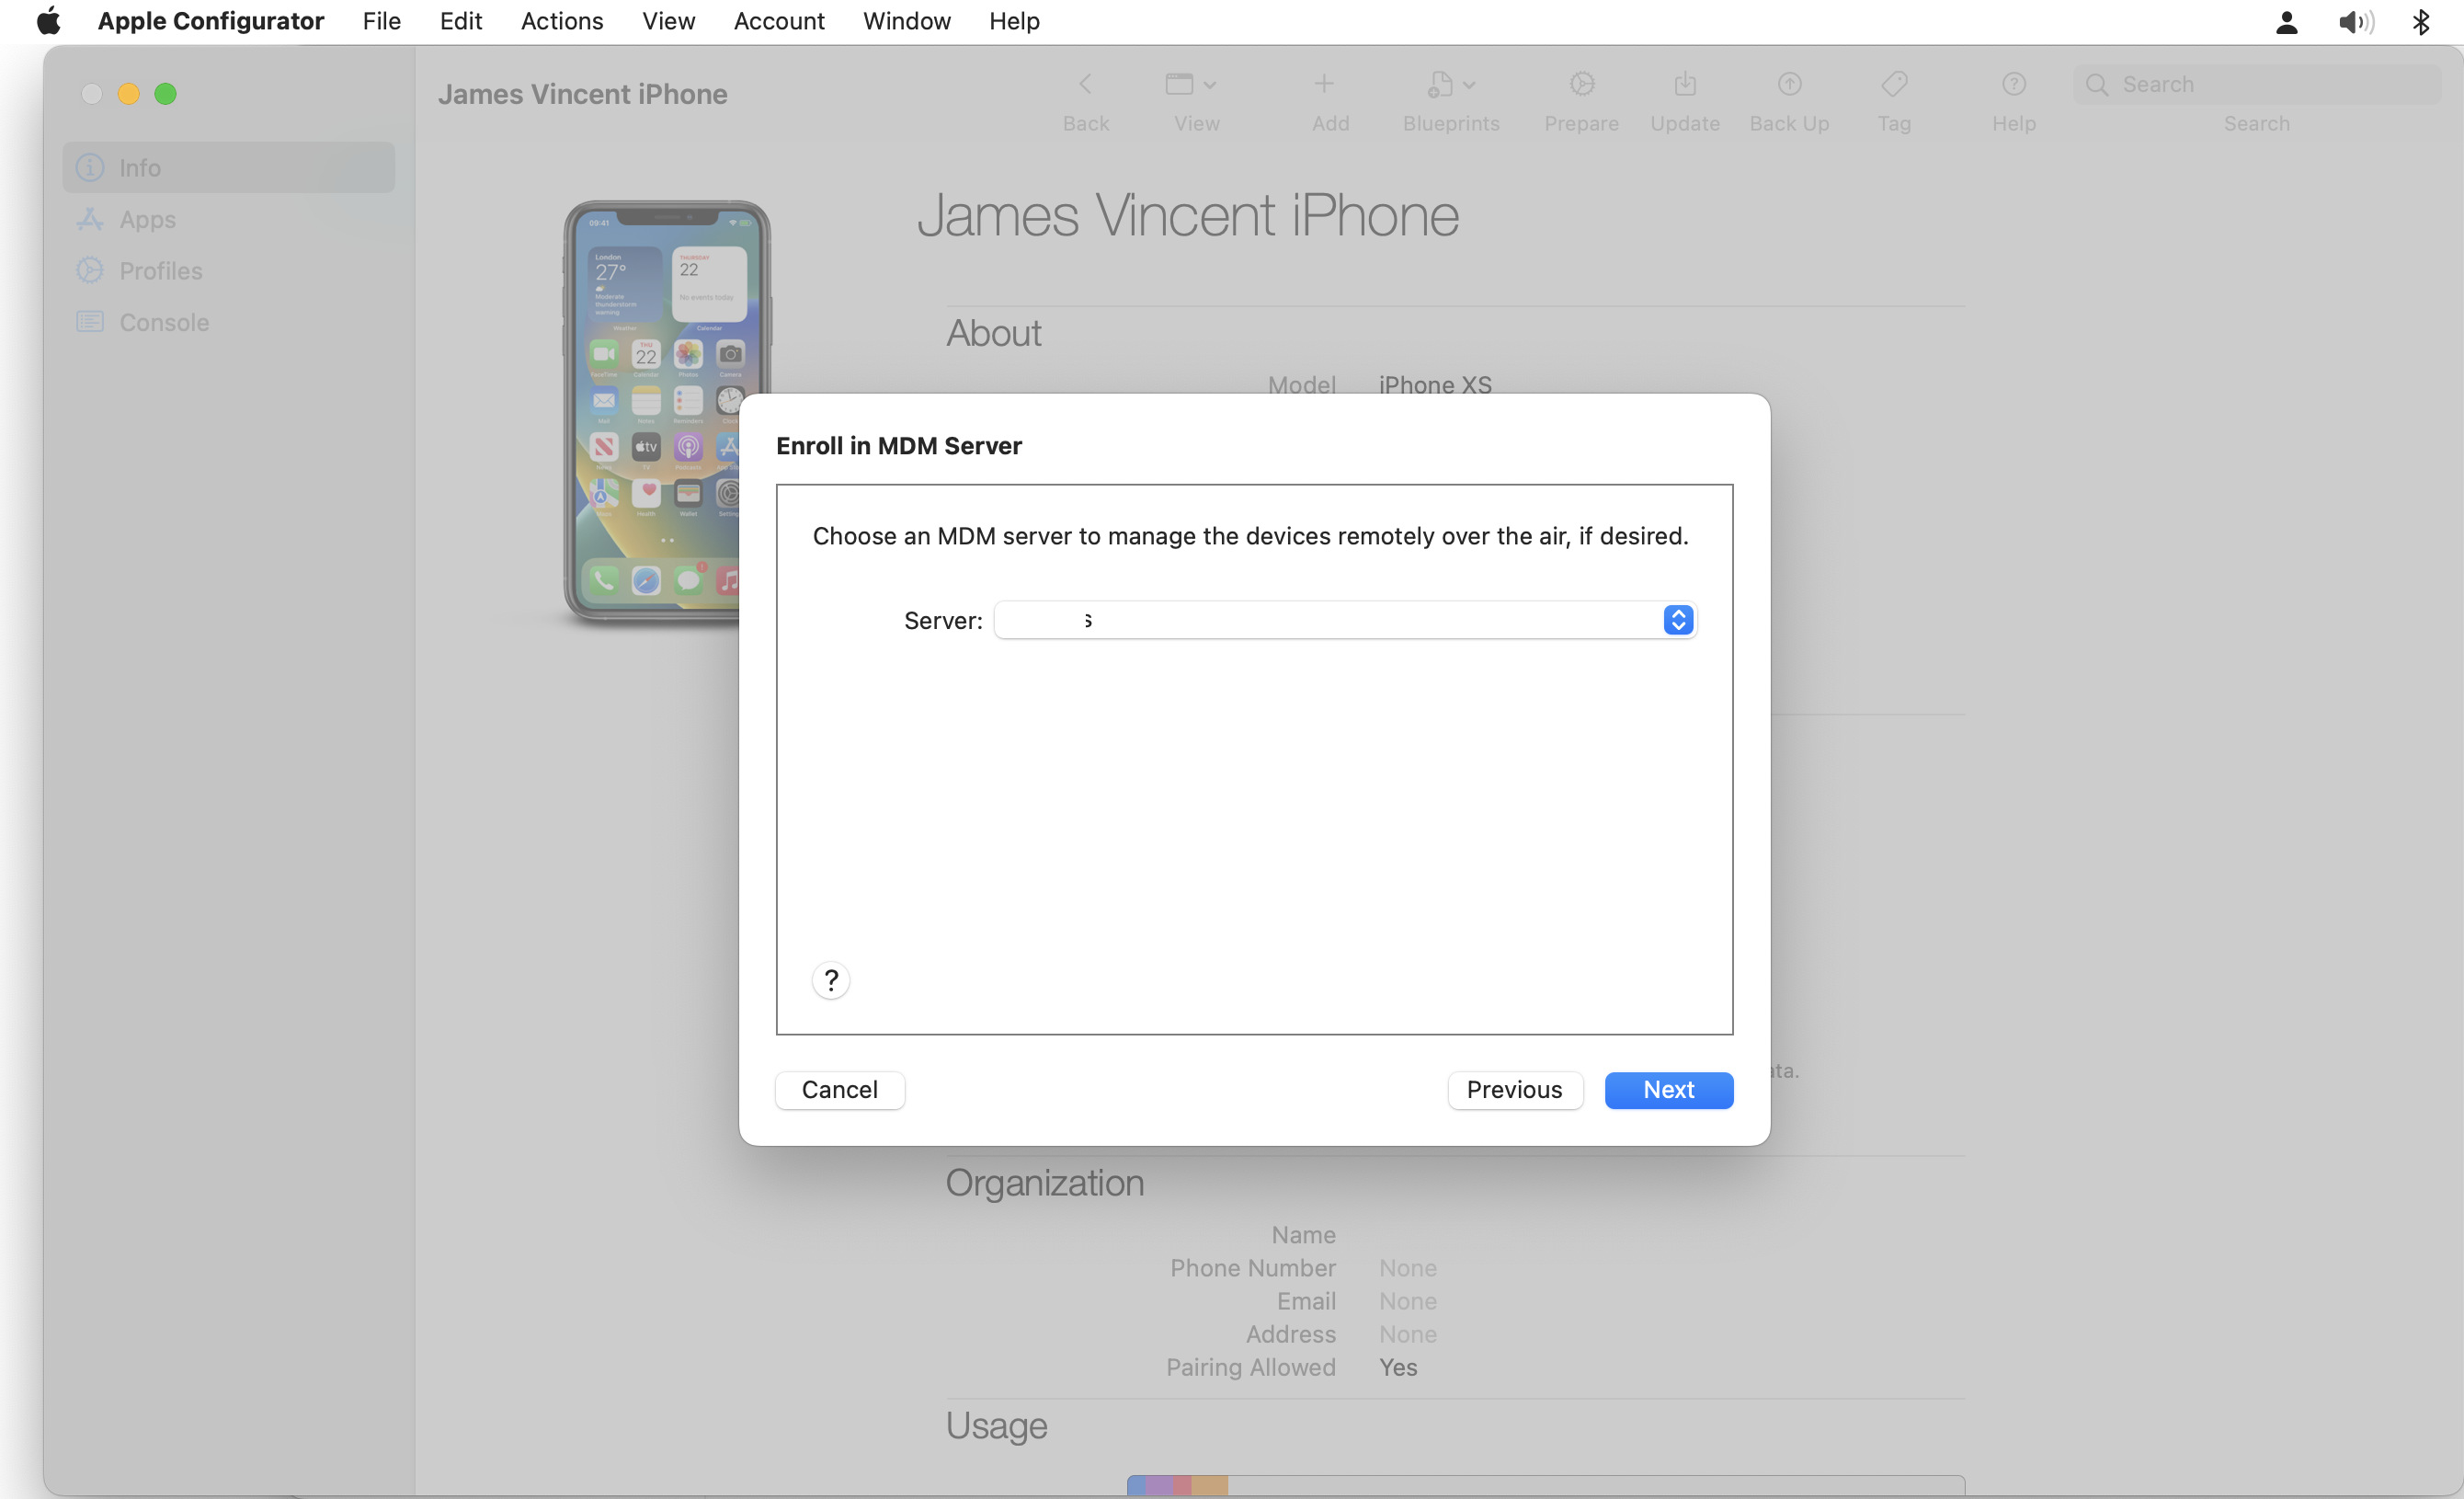
Then select the MDM Server you wish to register the device to and click Next. This is the Server we created above using the Export Profile URL. It would not be uncommon to have multiple Servers if you’re an MSP for example…
On the next step, select the Organisation you wish to tattoo on the device, and click Next.
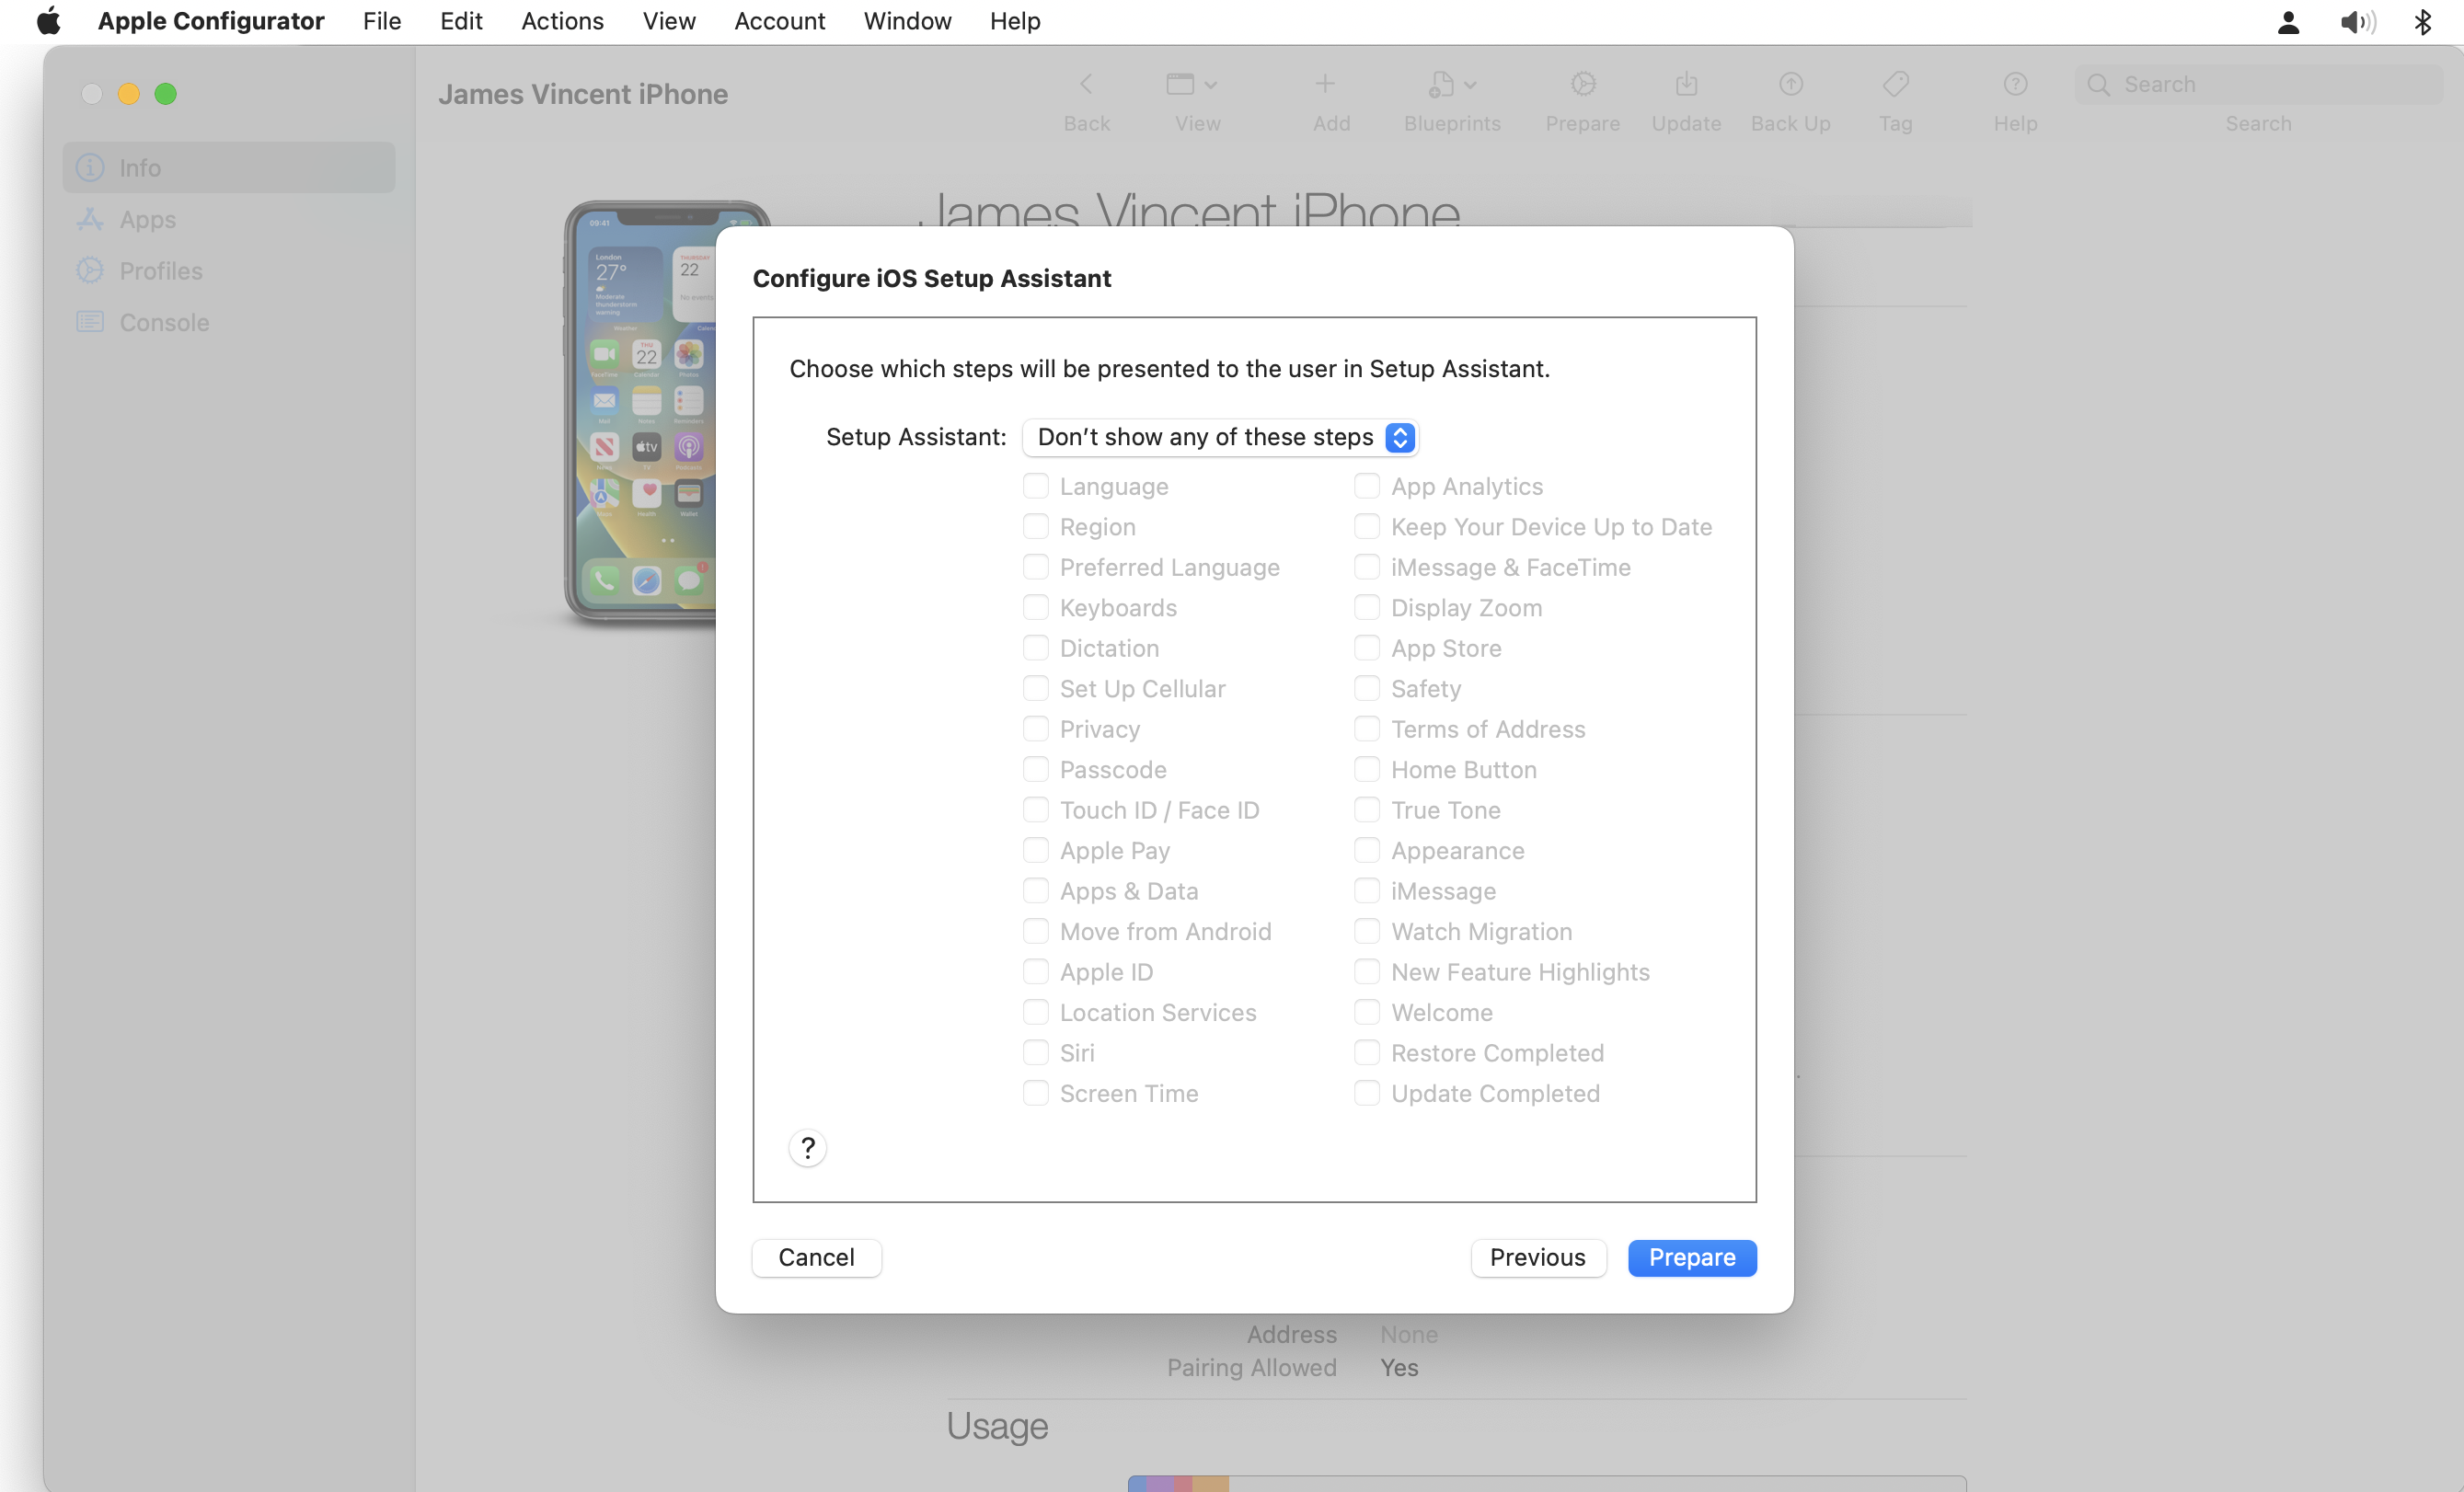
On the final step, you need to select which of the welcome pages are displayed during enrollment, these are the pages such as Language Select, or Passcode configuration etc… In this example, no pages are displayed, but this is entirely up to you. You probably want a fine line between user experience and security/functionality. If you’re going to set some of these settings using Device Configuration profiles, then those pages would be good candidates for exclusion. When you’re happy, click Prepare the the device will be prepared.
Once the device is prepared, it can be disconnected from Apple Configurator, but before doing so, I’d recommend recording the Serial number. We need to create/add this to a CSV file with which we need to import into Intune. The CSV needs no headings and contains two columns, the first is the serial number, the second a description. An example is shown below.
F1324FXL7JM0N,iPhone XS
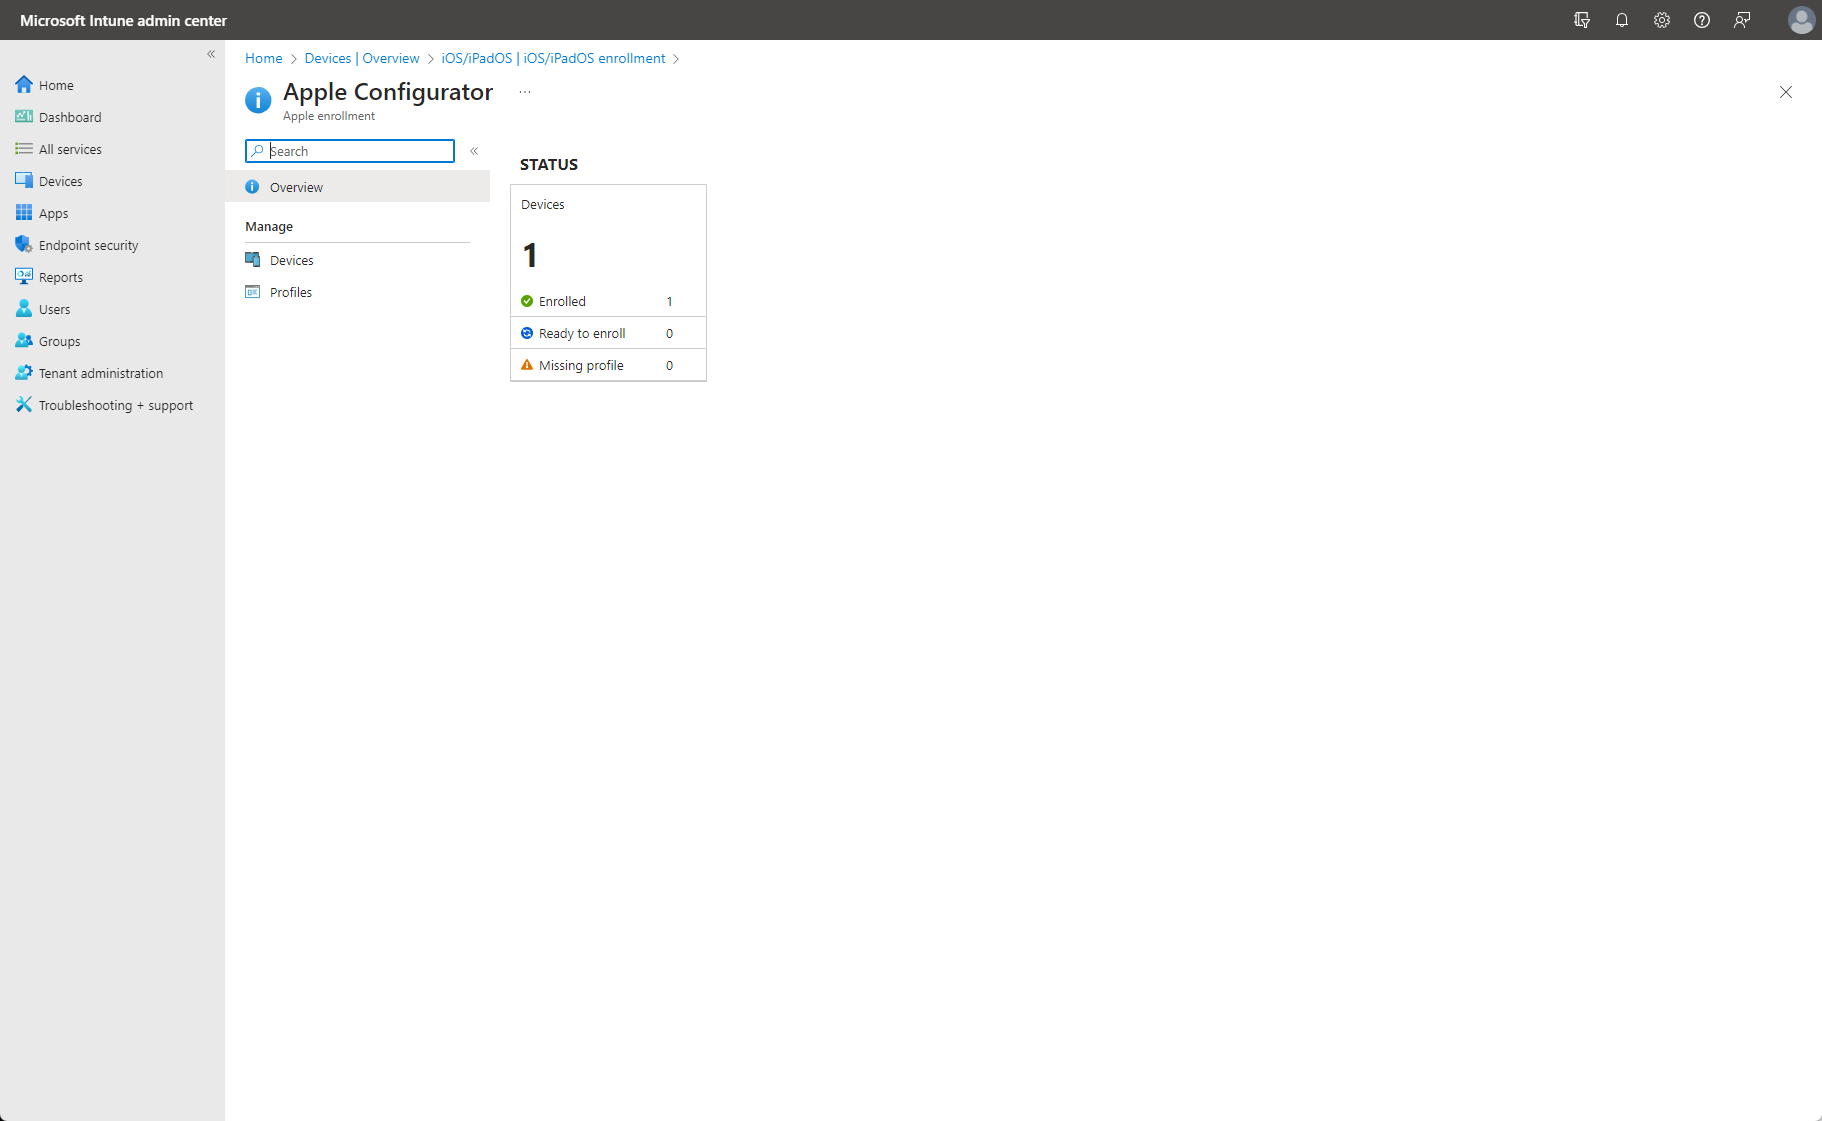
F8973GFA9NS0P,iPhone 14 ProBack in Intune, go back to Devices, and then, click iOS/iPadOS, click on iOS/iPadOS enrollment then Apple Configurator and finally Devices. In here you will see the option to Add, clicking this will display a new blade to the right, in which you can upload the CSV and select which Profile you wish to assign to those devices.
Now that the serial of the device is registered within Intune, you can focus your attention on the device itself. With the newly prepared iOS device in hand, turn it on/click next on the Hello screen. Click on your language and location, and connect to a Wifi connection. After doing so, you should be presented with a screen that suggests your device is being remotely managed.
Pressing Next in the upper right, to acknowledge this information, should then result in the assigned Profile being downloaded to the device and settings configured within taking effect. At this point, any applications assigned via Intune using VPP should install automatically.
If not using VPP, the user will be prompted to sign in with an Apple ID (which they may need to create) in order for the applications to download.
Authenticating within Company Portal will complete the device enrollment and registration and provide you with the ability to fully manage the device.
This process can be quite time consuming, so you don’t want to be making a habit of this. If you have a sizable fleet of iOS devices, you really need to be looking at Apple Business Manager as your provisioning tool. If you’re following this, then you’re likely to be testing, or retrospectively looking to supervise devices that have already gone out into your estate. Remember, these devices need to be physically in your hand so they can be connected to Apple Configurator, and they need to be factory reset for Supervision to occur.
Leave a Reply