Platform SSO (PSSO) for mac is going to be a big in 2026 and beyond. As such, I thought I’d dive in and see how its configured.
This post assumes that you have;
- macOS Devices registered in Apple Business Manager
- macOS Devices running a macOS 14 Sonoma at a minimum
- Company Portal v5.2404.0 or later deployed and assigned in Intune
- Users have sufficient permissions to register and join devices to Microsoft Entra ID
- You have Apple Business Manager and Intune connected
- You have an Enrolment Profile already configured in Intune
- Decided upon your preferred Authentication Method
- Microsoft recommends using Secure Enclave, as such, this guide shows this configuration
What is Platform SSO
Before we do get into it, here’s what Microsoft describe PSSO as being able to do;
PSSO enables users to sign in to Mac devices using their Microsoft Entra ID credentials. This feature provides benefits for admins by simplifying the sign-in process for users and reducing the number of passwords they need to remember. It also allows users to authenticate with Microsoft Entra ID with a smart card or hardware-bound key. This feature improves the end-user experience by not having to remember two separate passwords and diminishes the need for admins to manage the local account password.
There are three different authentication methods that determine the end-user experience;
- Platform Credential for macOS: Provisions a secure enclave backed hardware-bound cryptographic key that is used for SSO across apps that use Microsoft Entra ID for authentication. The user’s local account password isn’t affected and is required to sign in to the Mac.
- Smart card: The user signs in to the machine using an external smart card, or smart card-compatible hard token (for example, Yubikey). Once the device is unlocked, the smart card is used with Microsoft Entra ID to grant SSO across apps that use Microsoft Entra ID for authentication.
- Password as authentication method: Syncs the user’s Microsoft Entra ID password with the local account and enables SSO across apps that use Microsoft Entra ID for authentication.
Powered by the Microsoft Enterprise SSO plug in Apple devices, PSSO;
- Allows users to go passwordless by using Touch ID.
- Uses phish resistant credentials, based on Windows Hello for Business technology.
- Saves customer organizations money by removing the need for security keys.
- Advances Zero Trust objectives using integration with the Secure Enclave.
How it works
When Mac devices join a Microsoft Entra ID tenant, the devices get a workplace join (WPJ) certificate. This WPJ certificate is hardware-bound and is only accessible by the Microsoft Enterprise SSO plug-in. To access resources protected using Conditional Access, apps and web browsers need this WPJ certificate.
With Platform SSO configured, the SSO app extension acts as the broker for Microsoft Entra ID authentication and Conditional Access.
You configure Platform SSO using the Intune settings catalog. When the settings catalog policy is ready, you assign the policy. Microsoft recommends you assign the policy when the user enrolls the device in Intune. But, it can be assigned at any time, including on existing devices.
How to configure Intune
From Intune, goto Devices > macOS > Configuration Profiles and create a new Configuration Profile for macOS. Use Settings Catalog as the profile type.
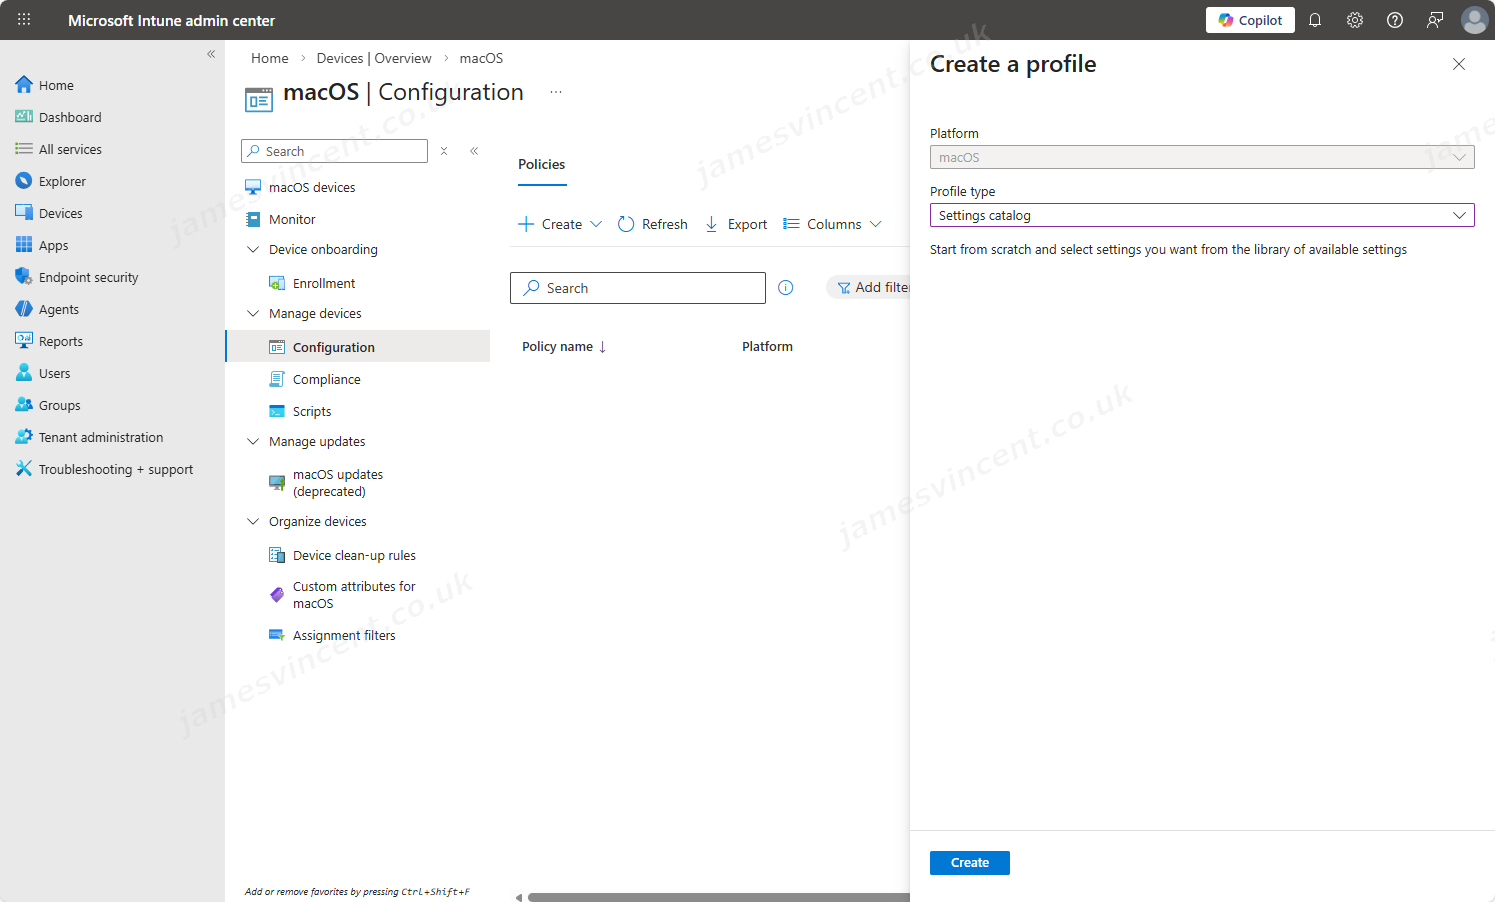
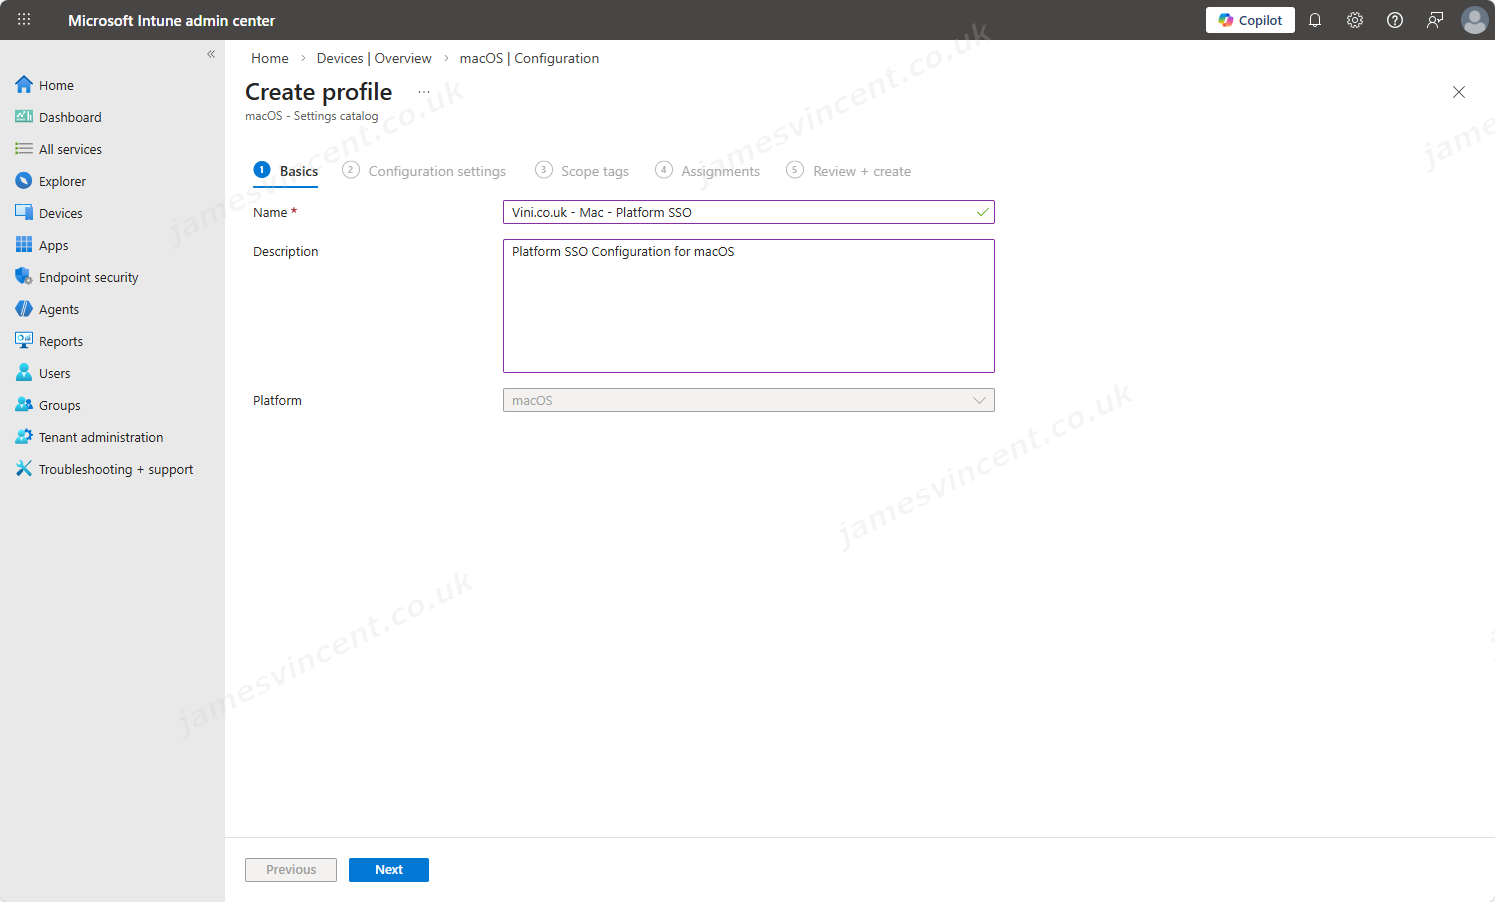
Give the policy a name and description.
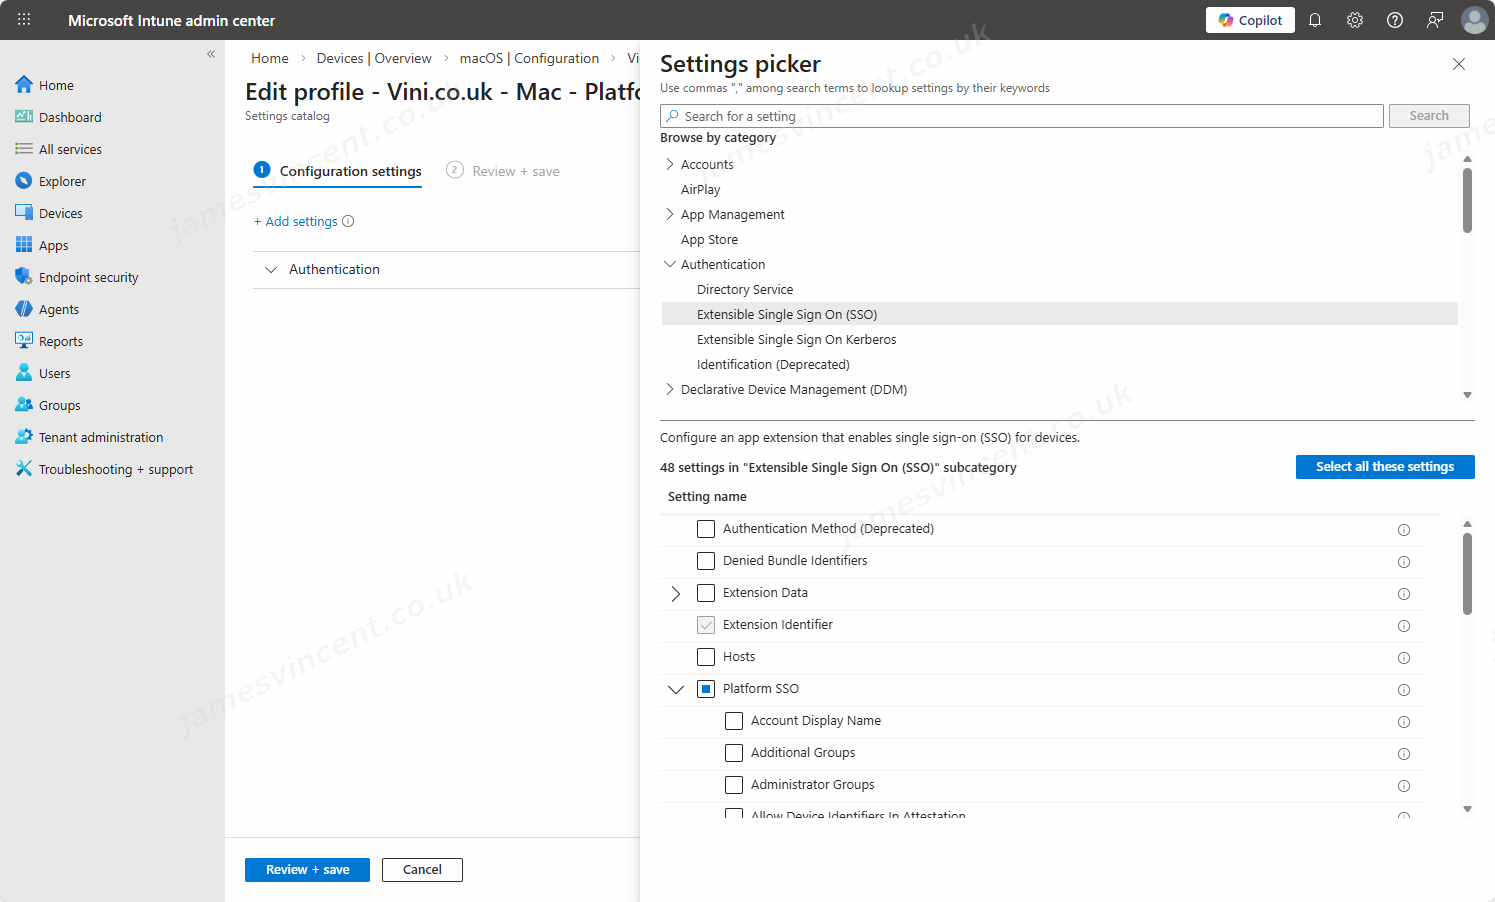
In the settings picker, expand Authentication, and select Extensible Single Sign On (SSO).
In the list, select the following settings:
- Extension Identifier
- Expand Platform SSO:
- Select Authentication Method (Select for macOS 14+)
- Select FileVault Policy (Select for macOS 15+)
- Select Token To User Mapping
- Select Use Shared Device Keys
- Registration Token
- Screen Locked Behavior
- Team Identifier
- Type
- URLs
Copy and paste/mirror the below configuration into the relevant Settings Picker options.
For reference, this was taken from Microsoft’s page.
| Name | Configuration value | Description |
|---|---|---|
| Extension Identifier | com.microsoft.CompanyPortalMac.ssoextension | This ID is the SSO app extension that the profile needs for SSO to work. |
| Platform SSO > Authentication Method (macOS 14+) | UserSecureEnclaveKey | |
| Platform SSO > Use Shared Device Keys (macOS 14+) | Enabled | When enabled, Platform SSO uses the same signing and encryption keys for all users on the same device. Users upgrading from macOS 13.x to 14.x are prompted to register again. |
| Registration token | {{DEVICEREGISTRATION}} | This setting requires that you also configure the AuthenticationMethod setting. |
| Screen Locked Behavior | Do Not Handle | When set to Do Not Handle, the request continues without SSO. |
| Token To User Mapping > Account Name | preferred_username | This token specifies that the Microsoft Entra preferred_username attribute value is used for the macOS account’s Account Name value. |
| Token To User Mapping > Full Name | name | This token specifies that the Microsoft Entra name claim is used for the macOS account’s Full Name value. |
| Team Identifier | UBF8T346G9 | This identifier is the team identifier of the Enterprise SSO plug-in app extension. |
| Type | Redirect | |
| URLs | https://login.microsoftonline.comhttps://login.microsoft.comhttps://sts.windows.net | The URLs are required for redirect payloads and are ignored for credential payloads. |
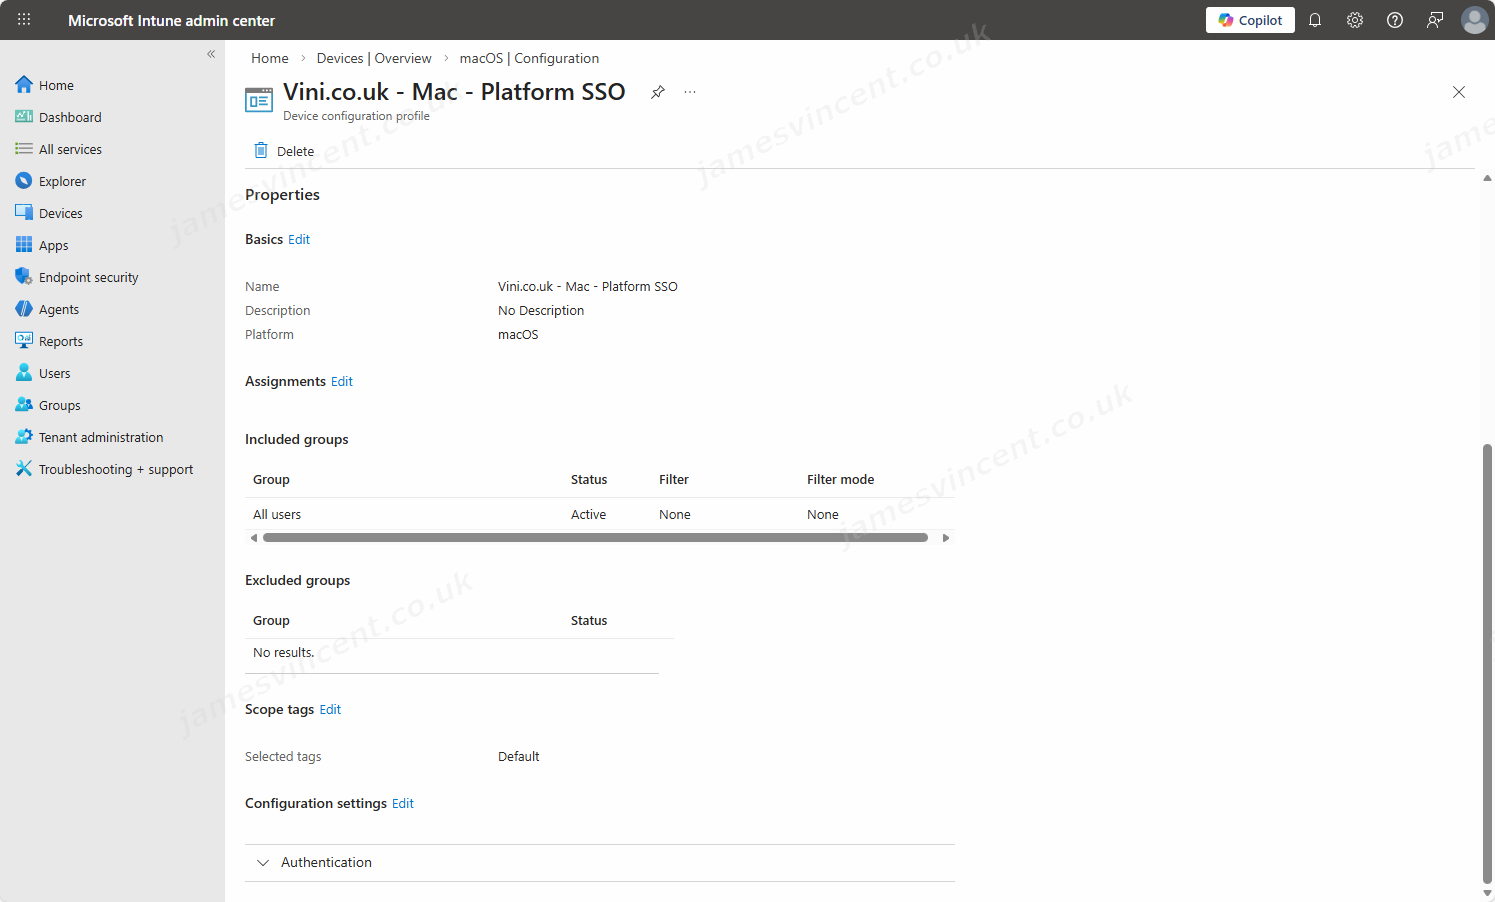
After configuring the settings, click Next, and define Scopes if required.
Then in Assignments, assign the profile accordingly.
For devices with user affinity, assign to users or user groups. For devices with multiple users that are enrolled without user affinity, assign to devices or device groups.
For Platform SSO settings on devices with user affinity, it’s not supported to assign to device groups or filters. When you use device group assignment or user group assignment with filters on devices with user affinity, the user might be unable to access resources protected by Conditional Access. This issue can happen:
- If the Platform SSO settings are applied incorrectly, or,
- If the Company Portal app bypasses Microsoft Entra device registration when Platform SSO isn’t enabled
Assigning this policy now/immediately, will eventually prompt the user to register and PSSO will be configured. But one of the beautiful things with this is that PSSO enhances device setup in that the registration and configuration occurs during that initial out of the box configuration – effectively, the process becomes one step closer to an Autopilot deployment, with Enrollment Status Page type information being displayed.
User Experience
So with the configuration assigned, what might a user experience? If the device is being newly provisioned, then the flow works a bit more smoothly, as it can all be seen as an onboarding flow. However, PSSO config can be assigned to production devices… The prompt to “Register the device” will appear for those in operation. I’ll highlight this below.
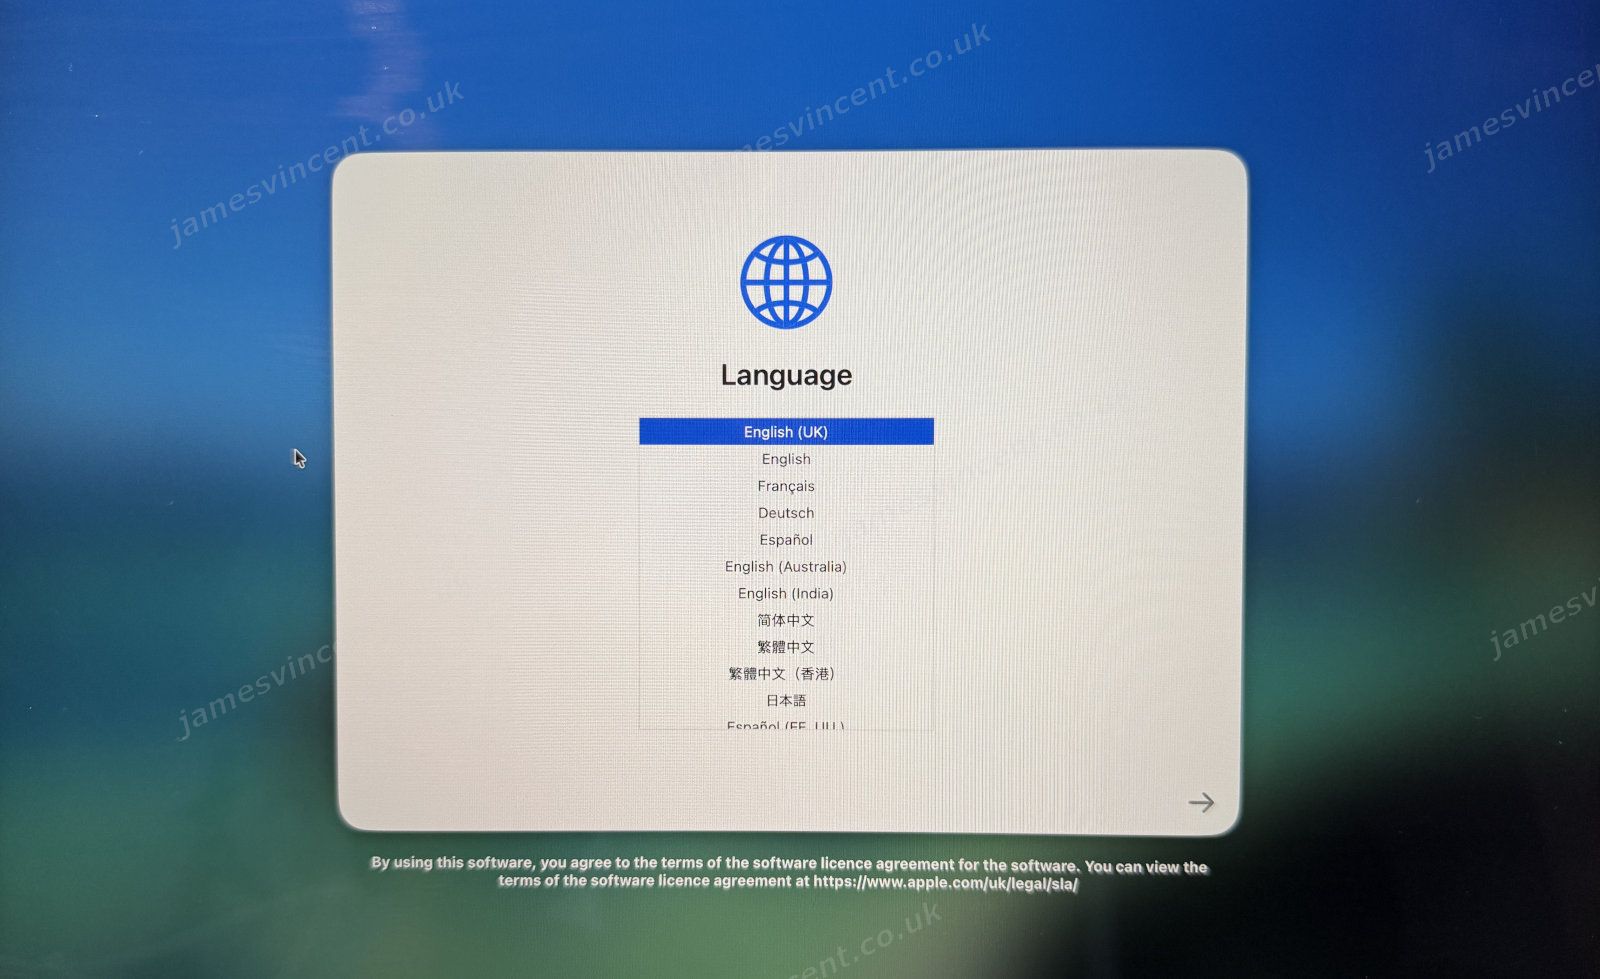
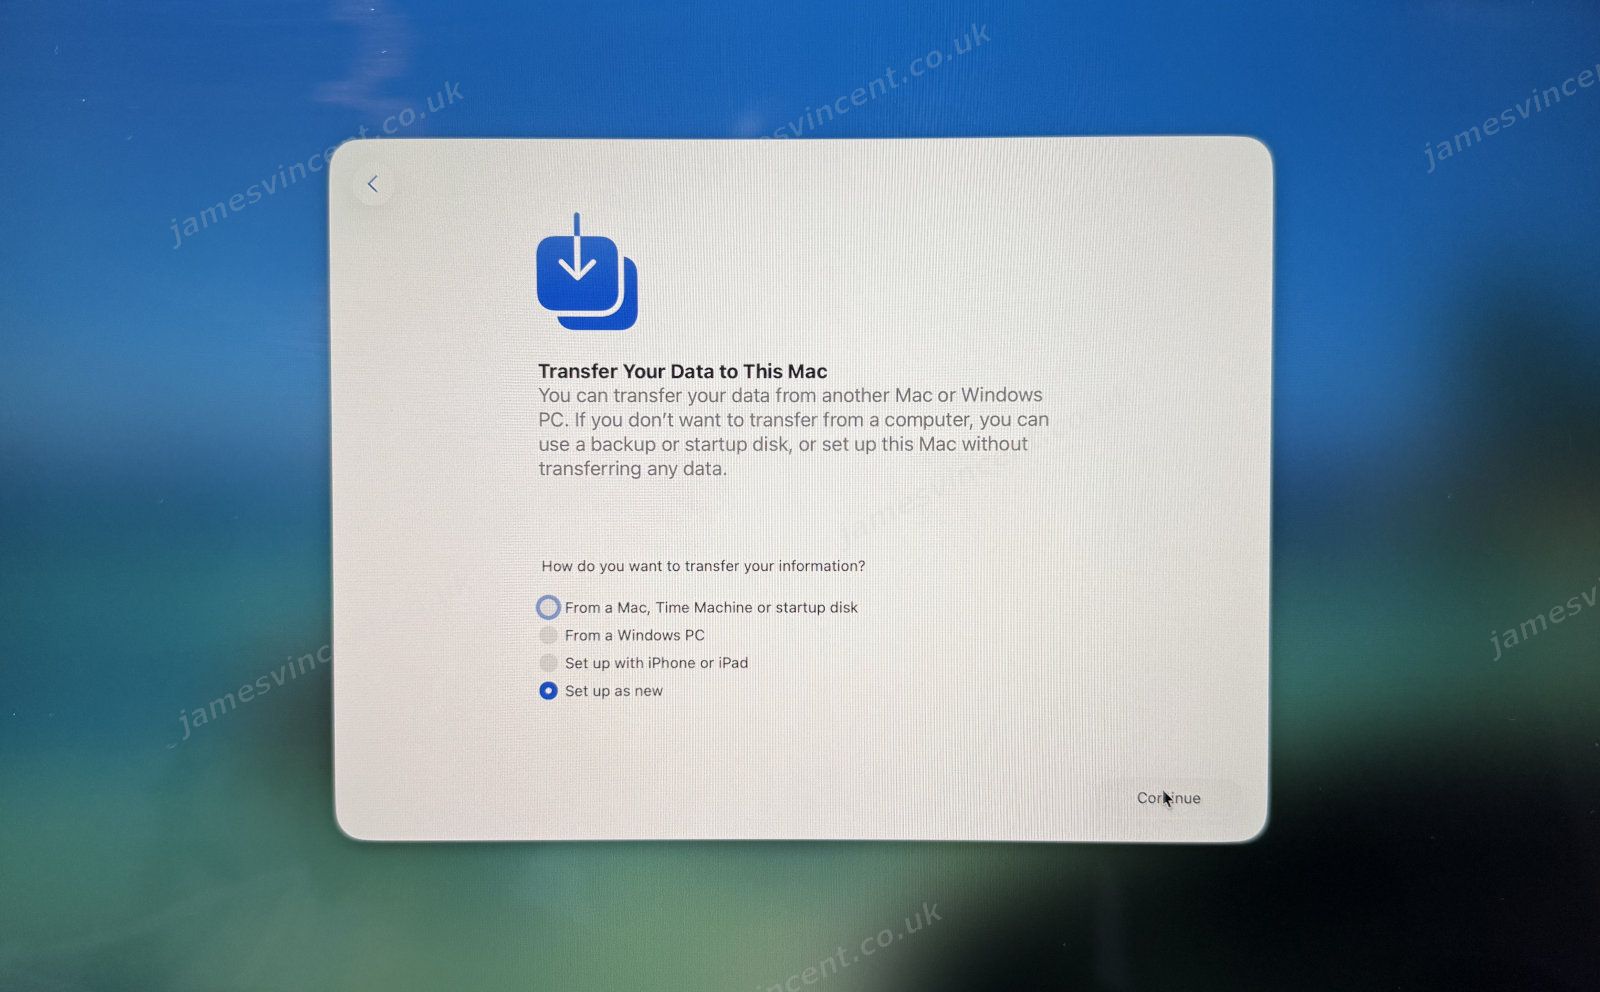
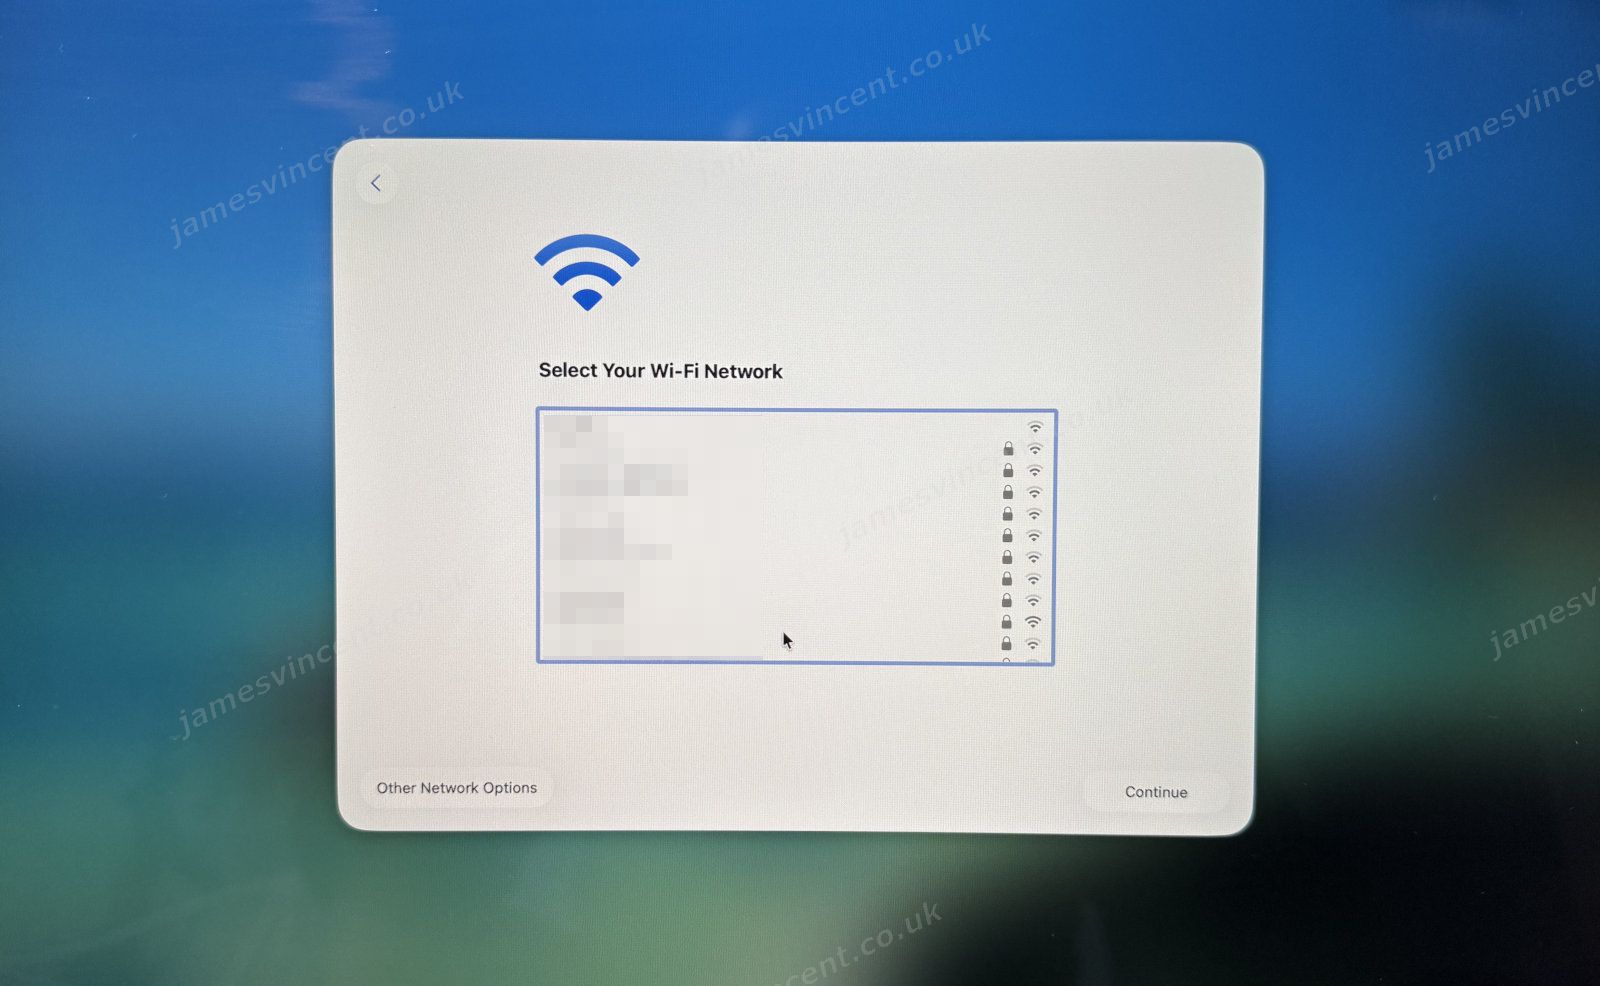
I assume a new build flow in this guide. So it starts with a newly unboxed device, and the user being presented with the Setup Assistant. By default/out of the box, we have three or four prompts we must complete. Language, Data Transfer, Accessibility and most importantly Network Connectivity.
Pick your language and continue through the Setup Assistant.
Set up as a new mac (in this instance).
And finally, select your Wifi/network connection.
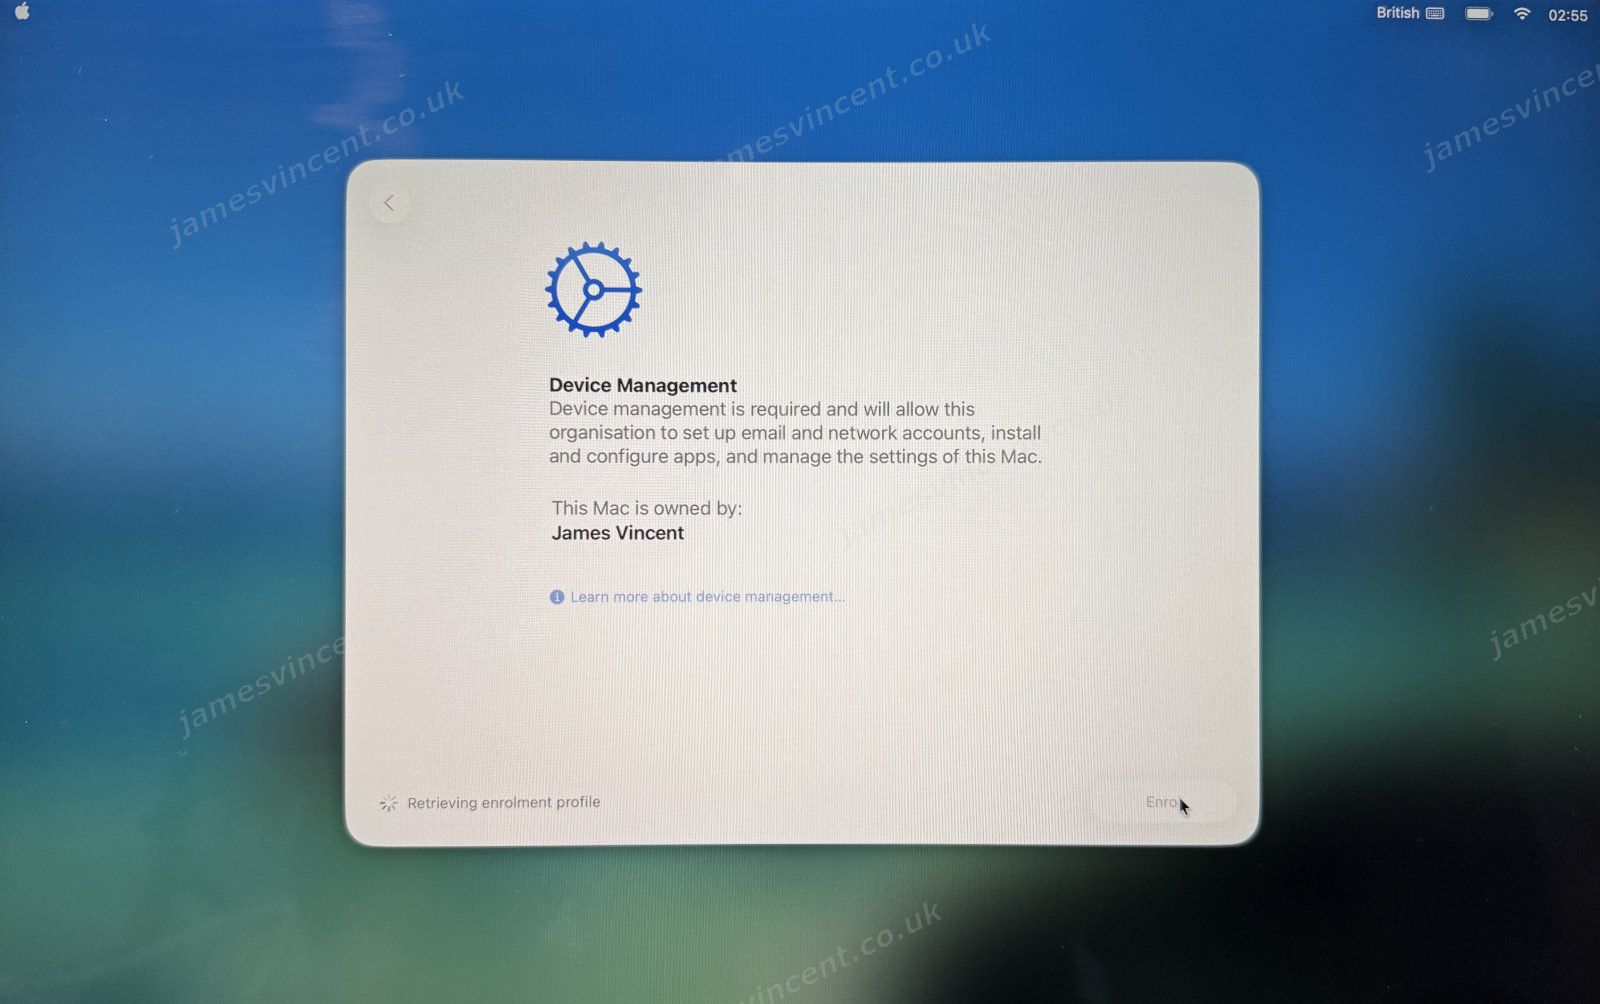
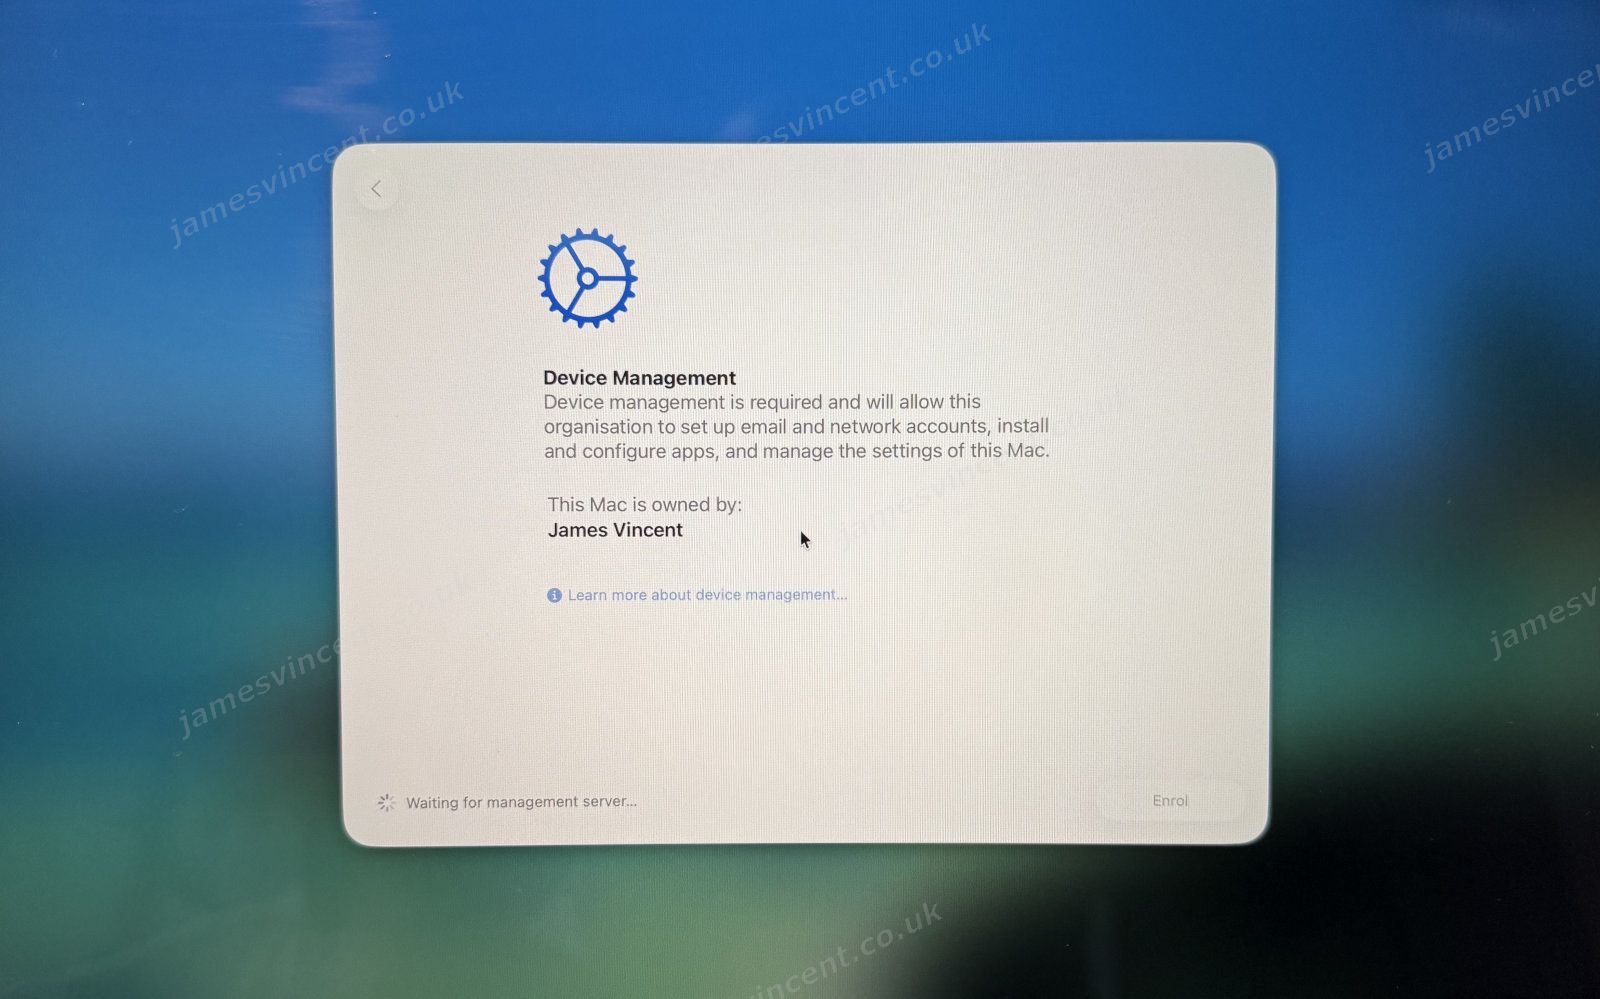
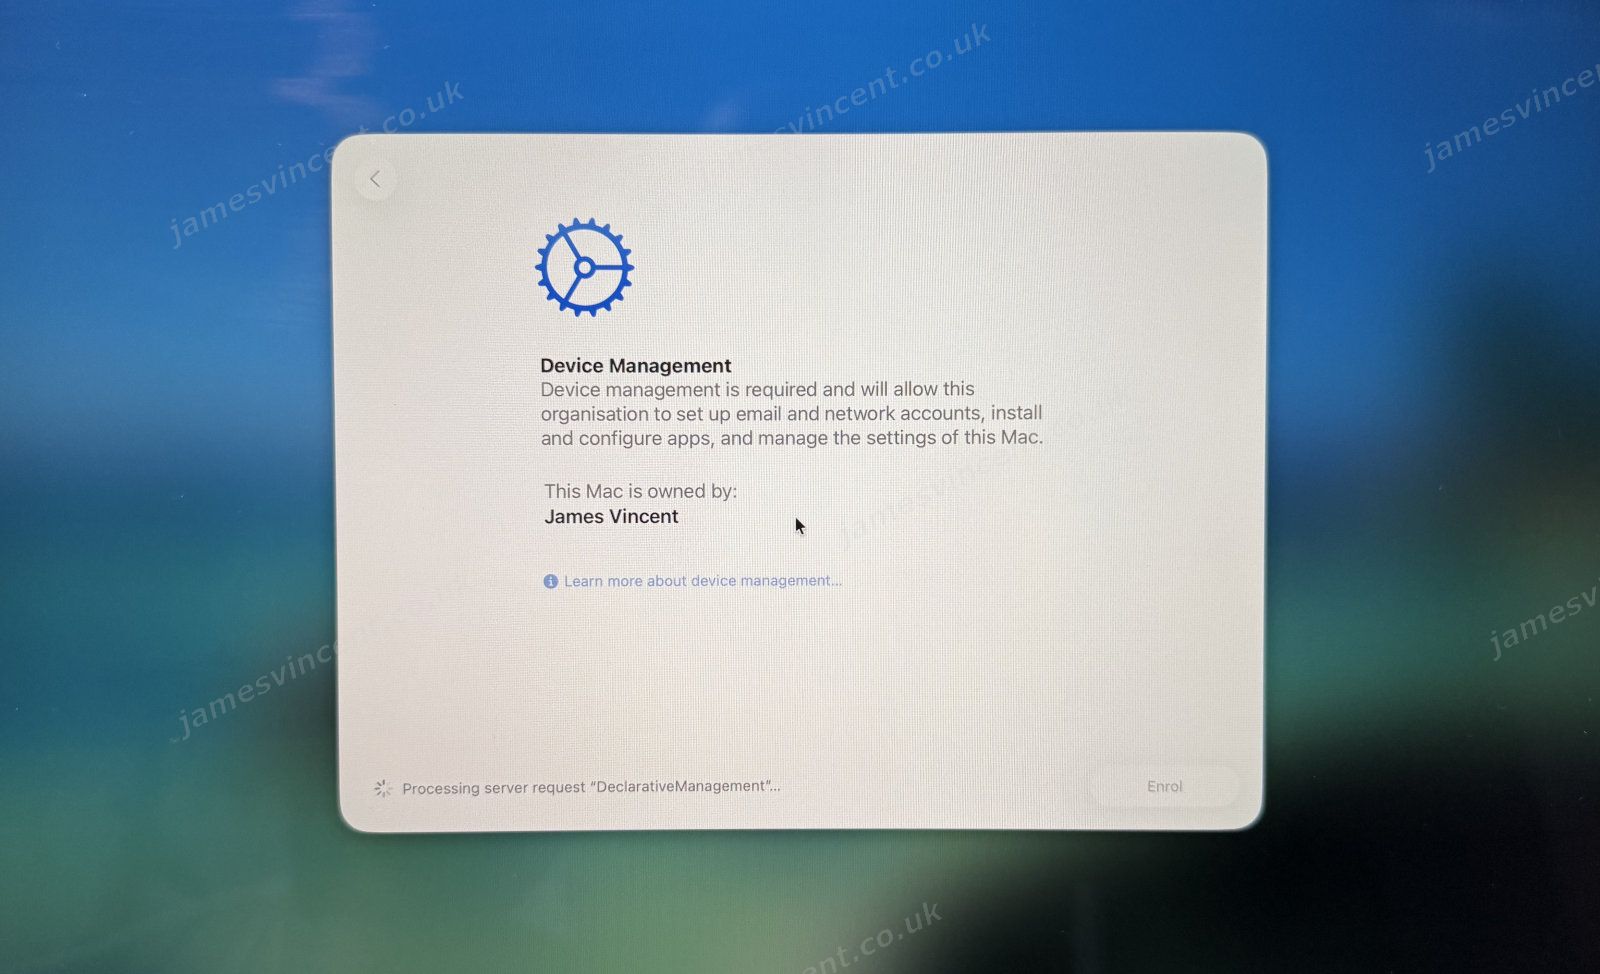
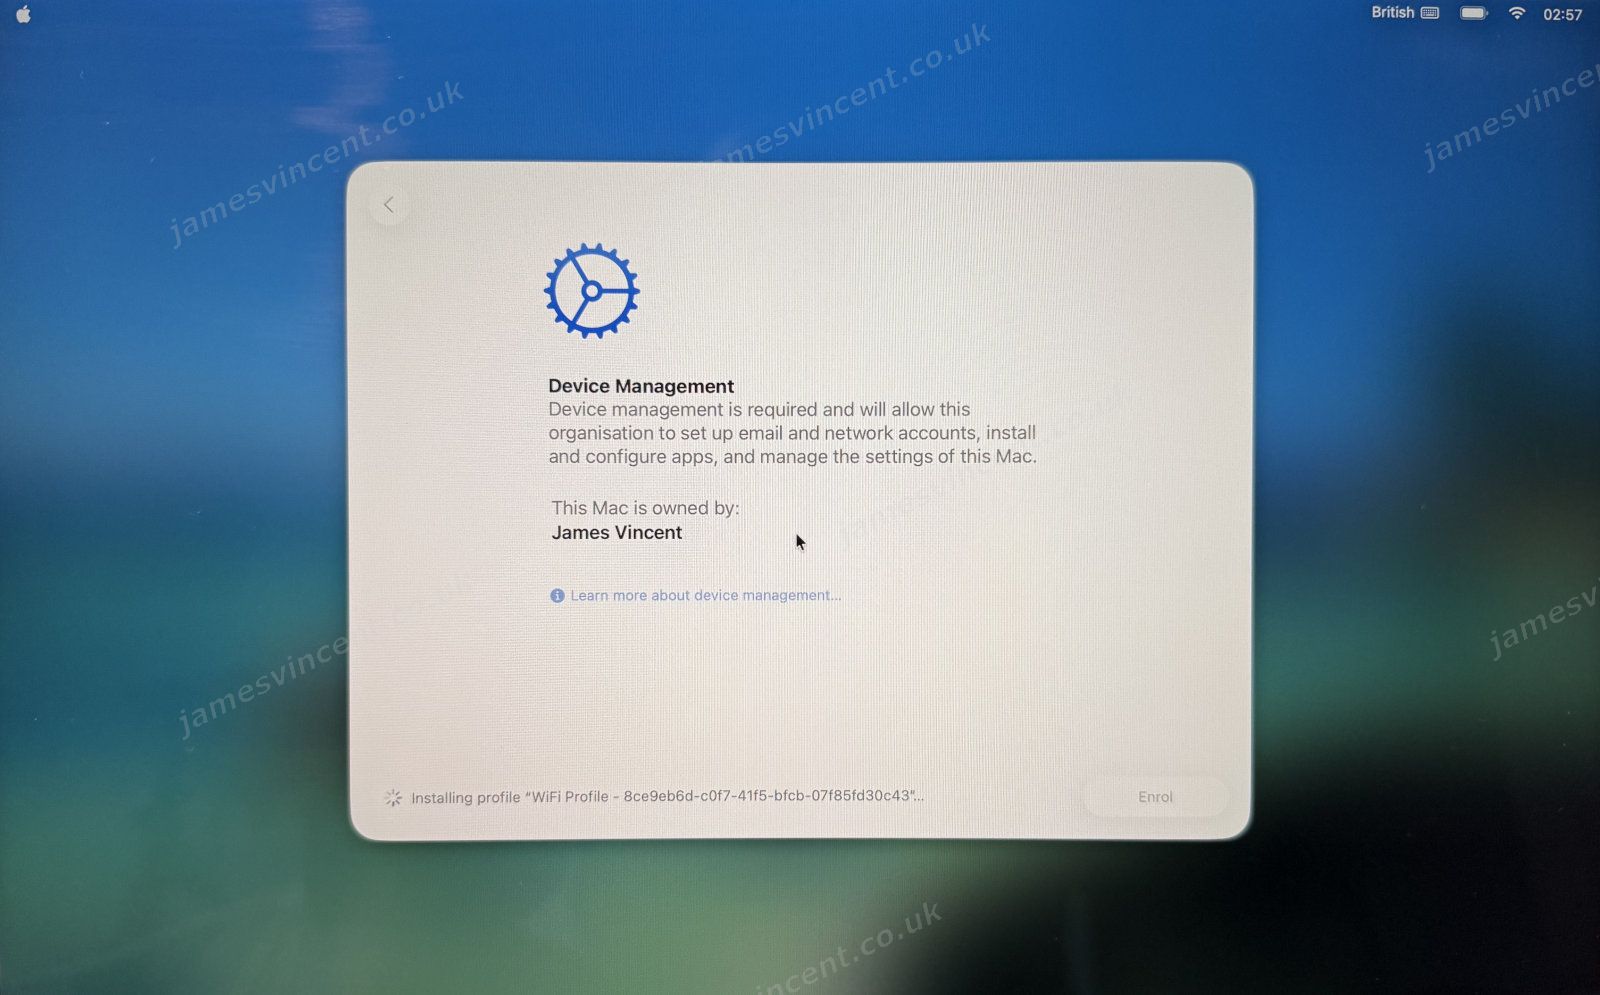
Now we get to the good bit. By connecting to a network, the device can establish it’s management status. So when we click next, we’re presented with a Device Management prompt.

When we click Enrol, the magic begins to happen. This window is now acting very similar to the ESP page that we see with Autopilot in Windows. In the lower left of the window, you can see the status of the MDM enrolment. In this particular example it is “Retrieving the enrollment profile”.
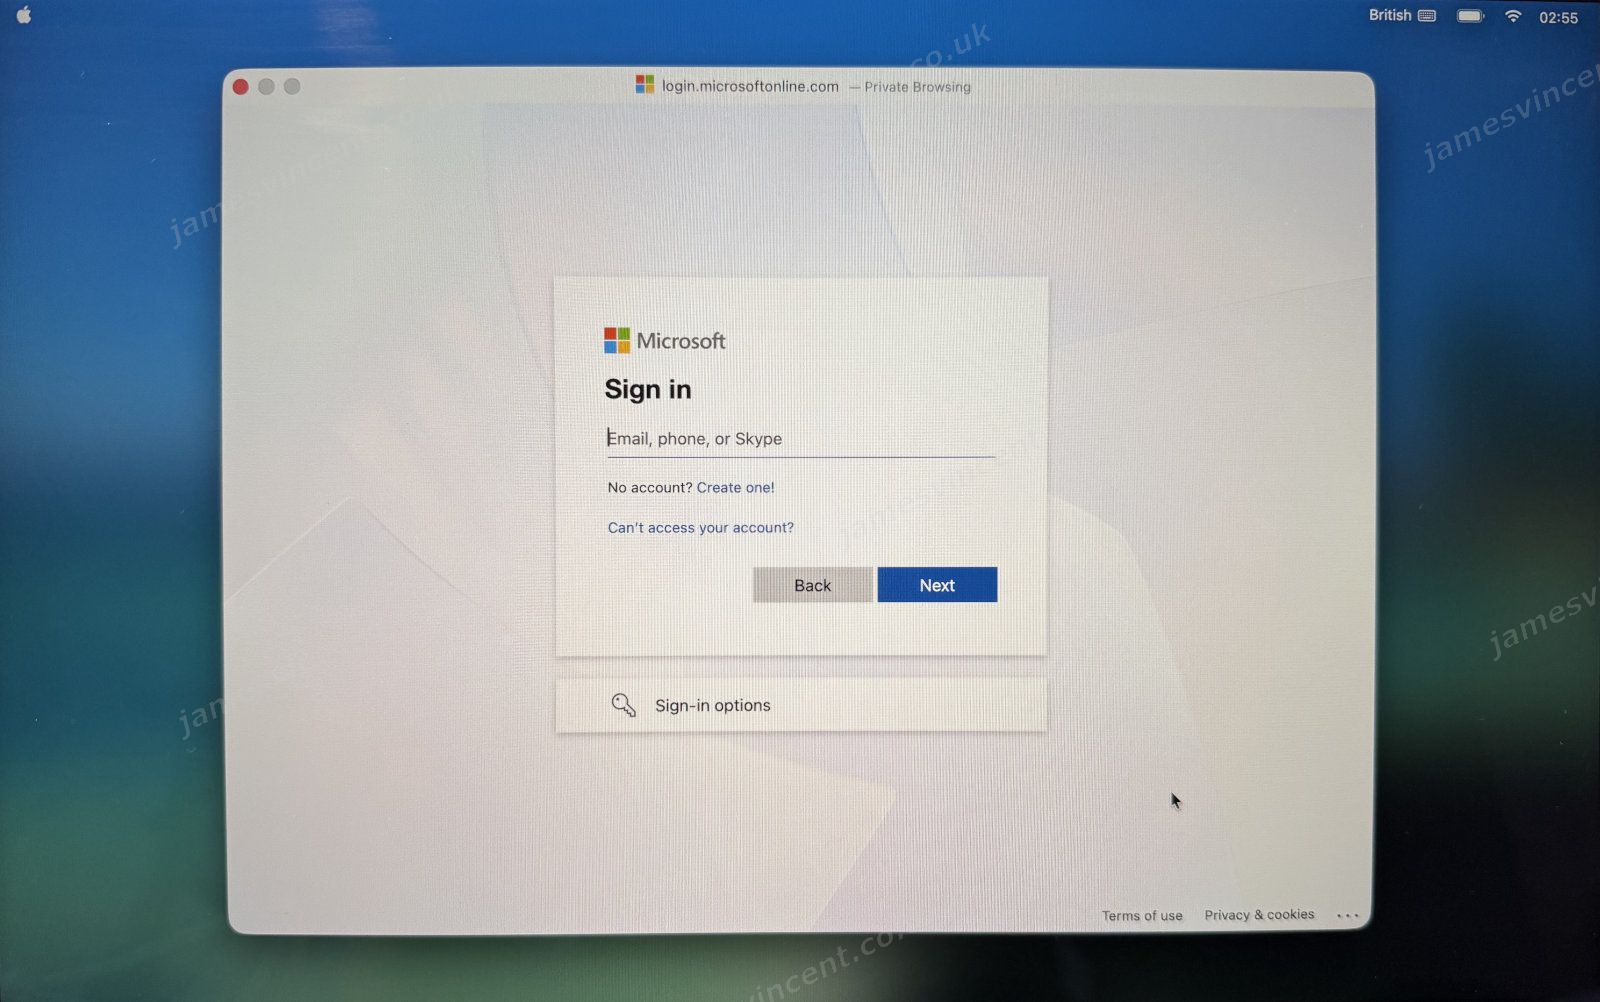
After the enrollment profile is acquired, and the device knows what to do. Based on our configuration, we are prompted to sign in using our identity provider, Microsoft, in this instance.
After authenticating the MDM enrollment continues.
After which, configuration starts to download and apply.
Once all the config applies, you’re prompted to create a Mac Account. This is a local device account, and unfortunately, still requires the use of a password for the local account. This is one “blocker” to a full passwordless experience, but something Apple is no doubt playing with.
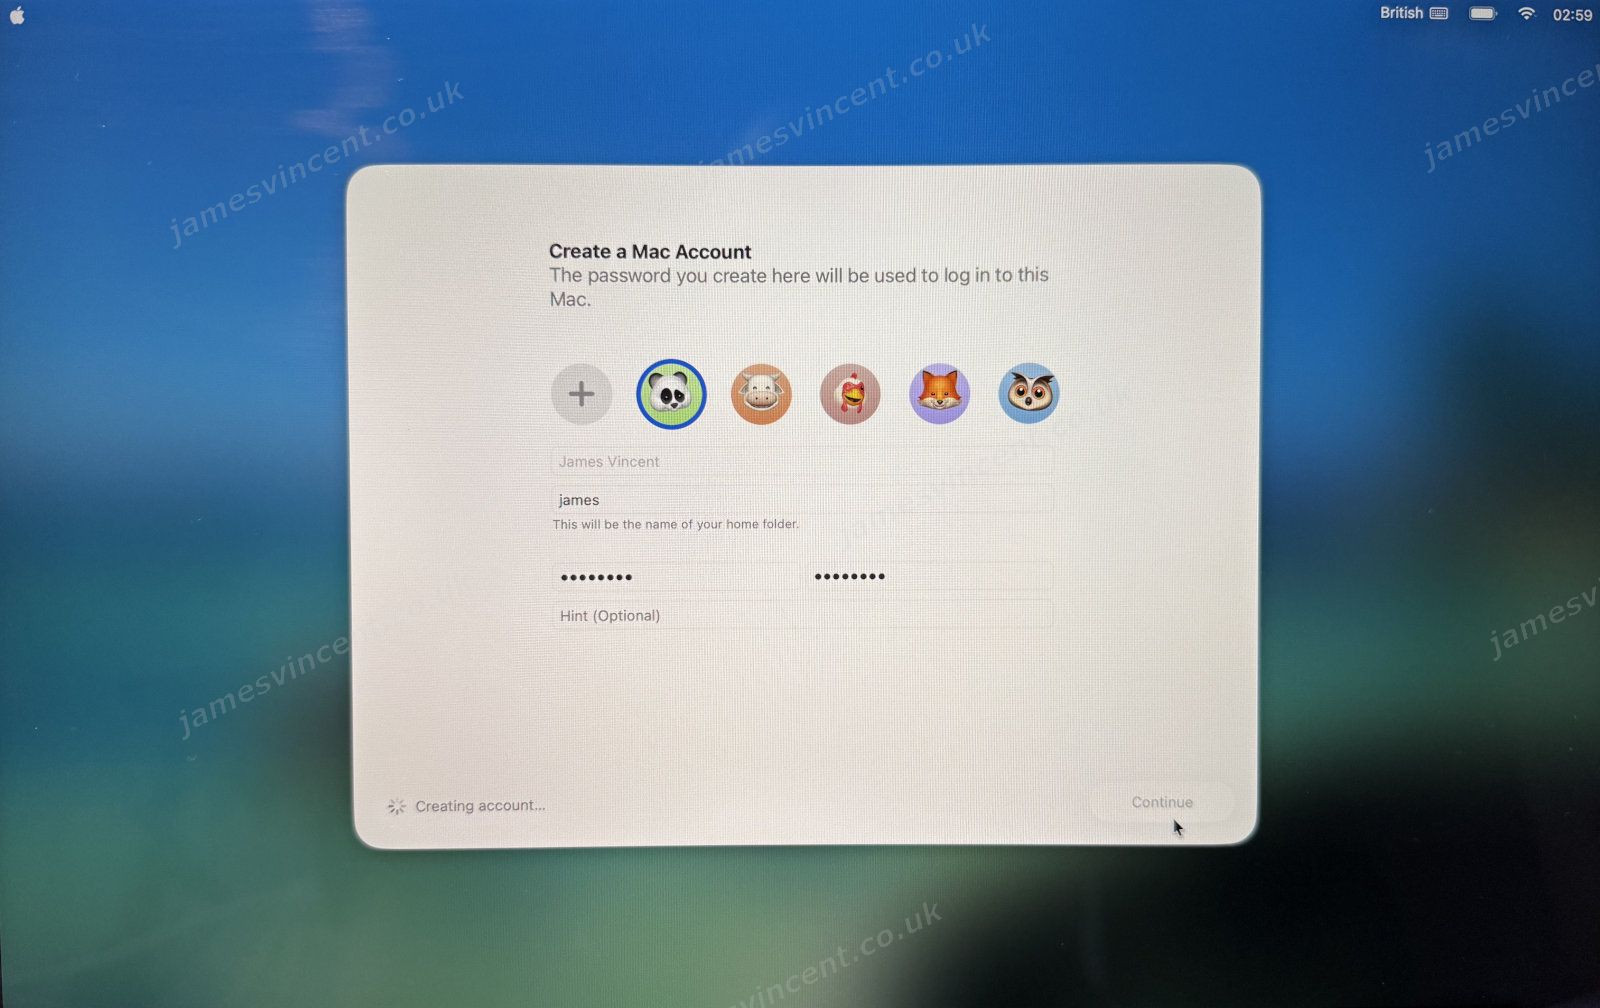
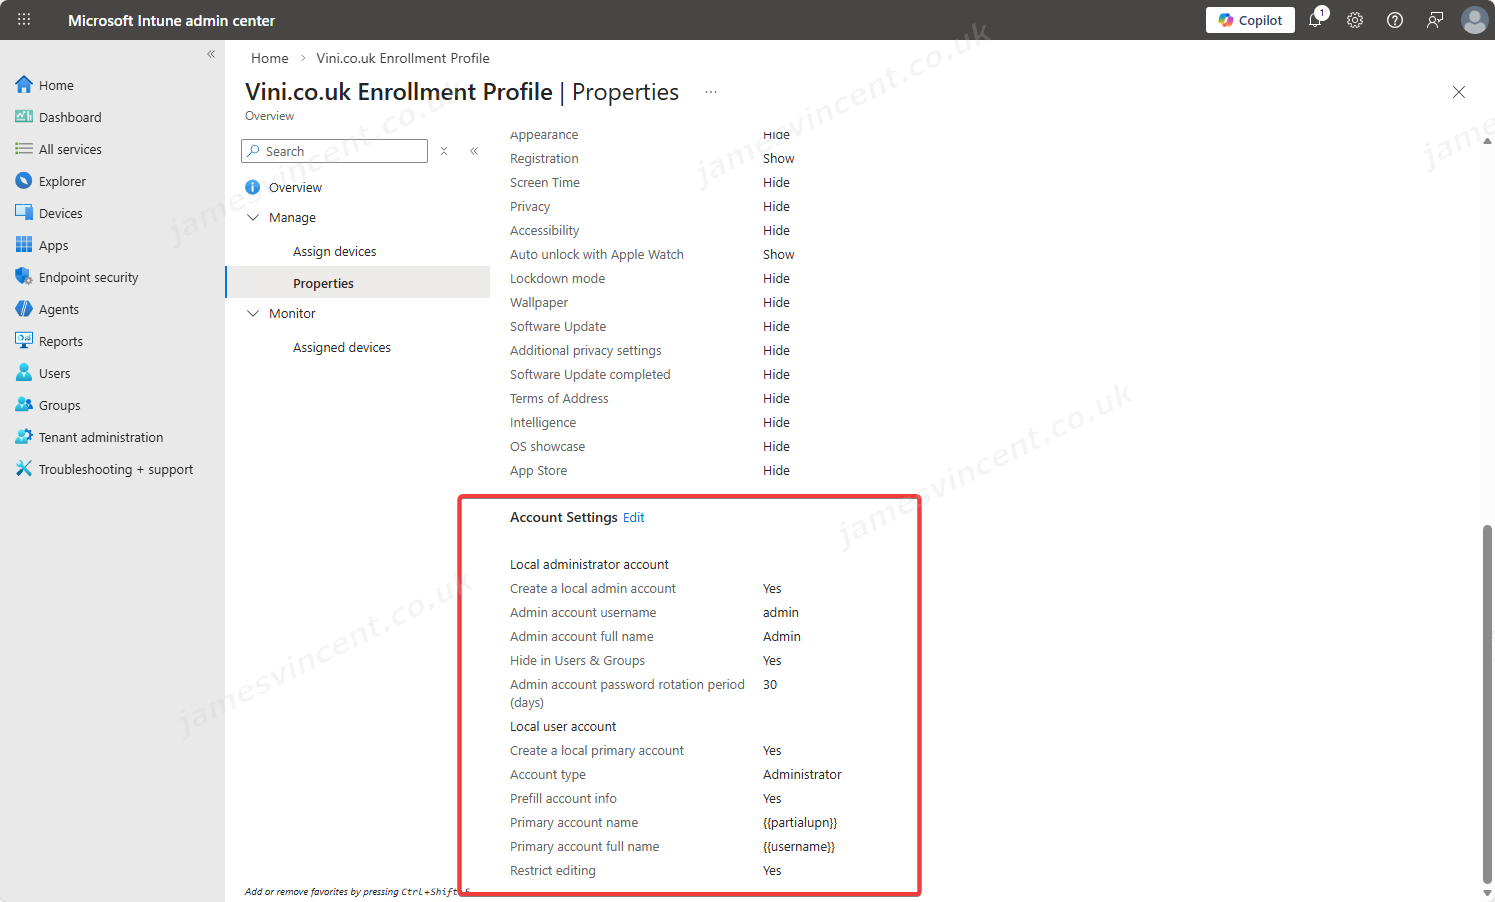
In the image above, both the Full Name and Account Name were pre-populated using settings defined within the Enrollment Profile, under Account Settings.
After defining local account credentials, the rest of the Setup Assistant runs (also, as defined in the Enrollment Profile). Until such a point that you arrive at the desktop of the device.

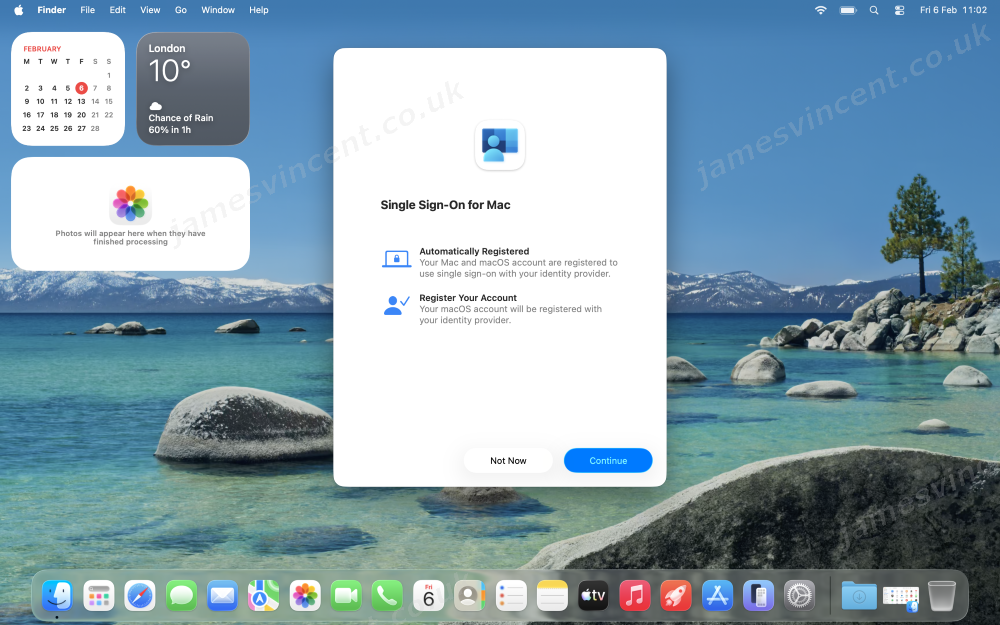
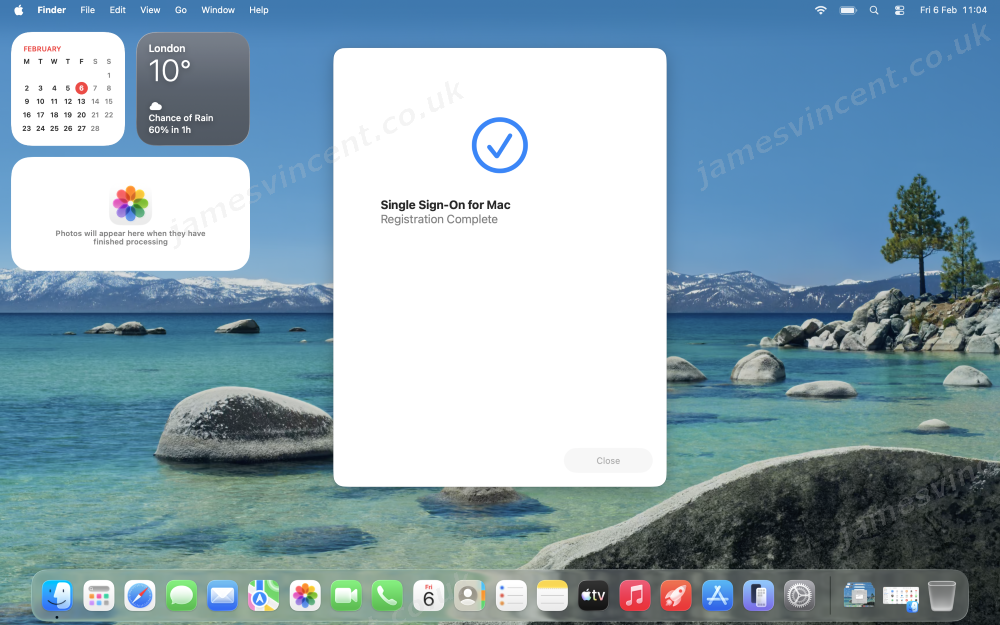
Once at the desktop, additional MDM configurations will apply. We know Platform SSO configuration has arrived when the user is prompted with a notification advising that “Registration is Required”. The notification will persist until the registration is performed.

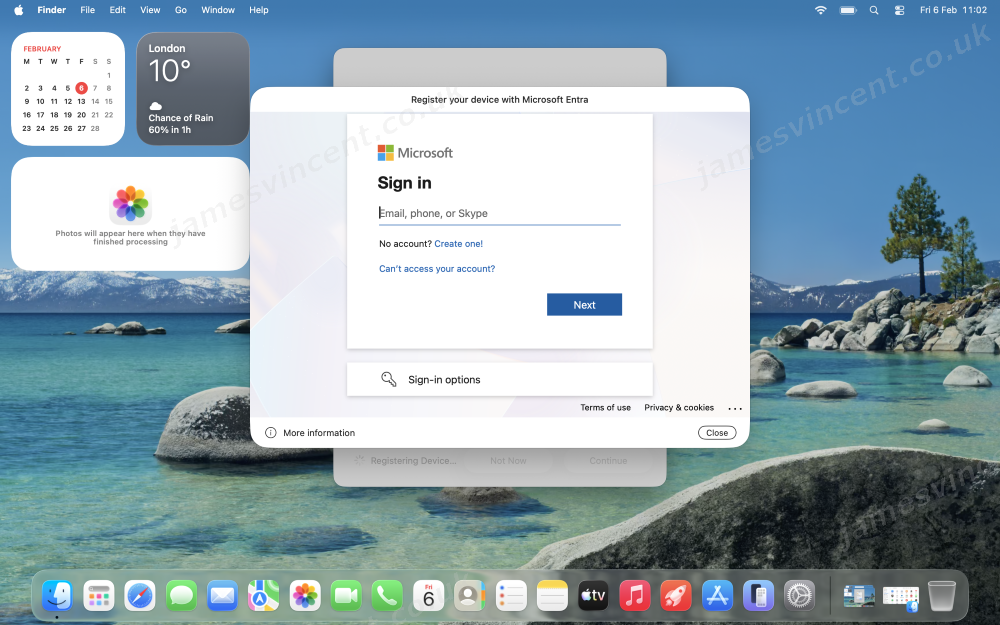
Clicking the notification will open the registration window, which shows we’re registering for Single Sign-on for Mac.
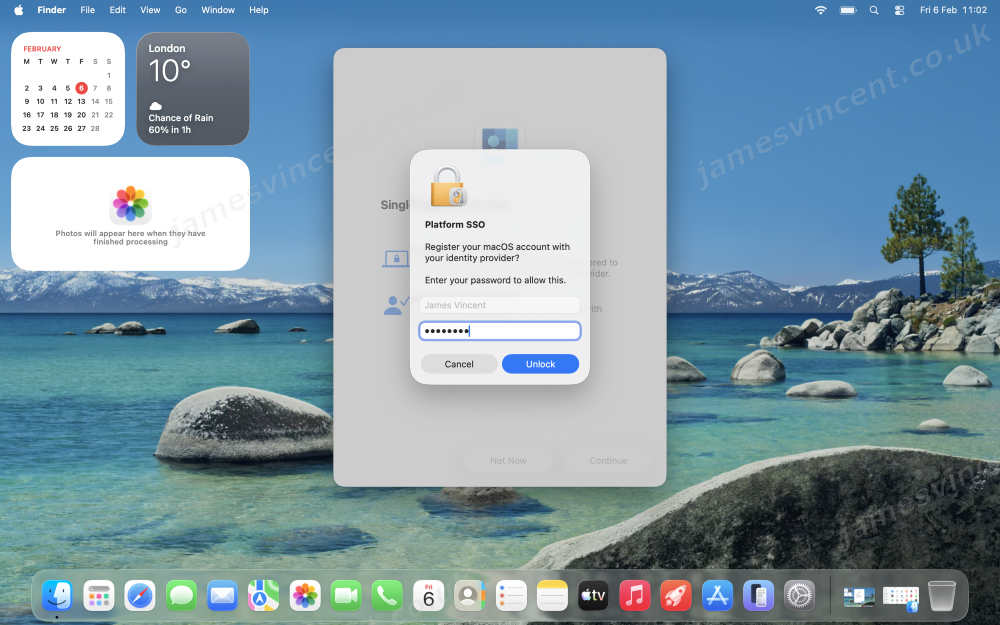
Clicking Continue will prompt you to authenticate against the local account to confirm you’re happy to register the macOS device with the Identity Provider (IDP).
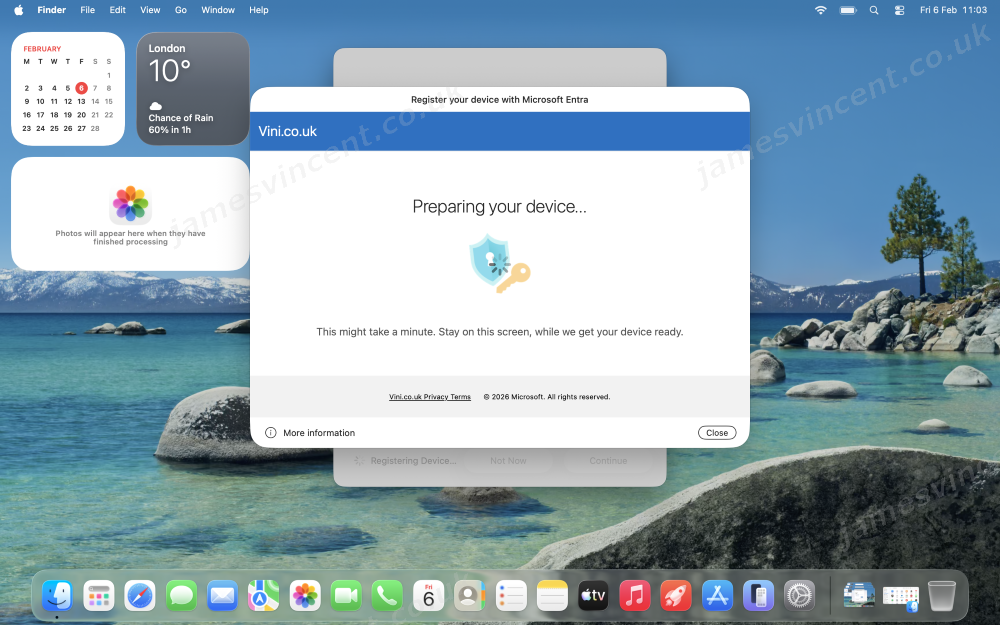
In this example, we’re using Microsoft, so those au fait will be met with familiar screens.
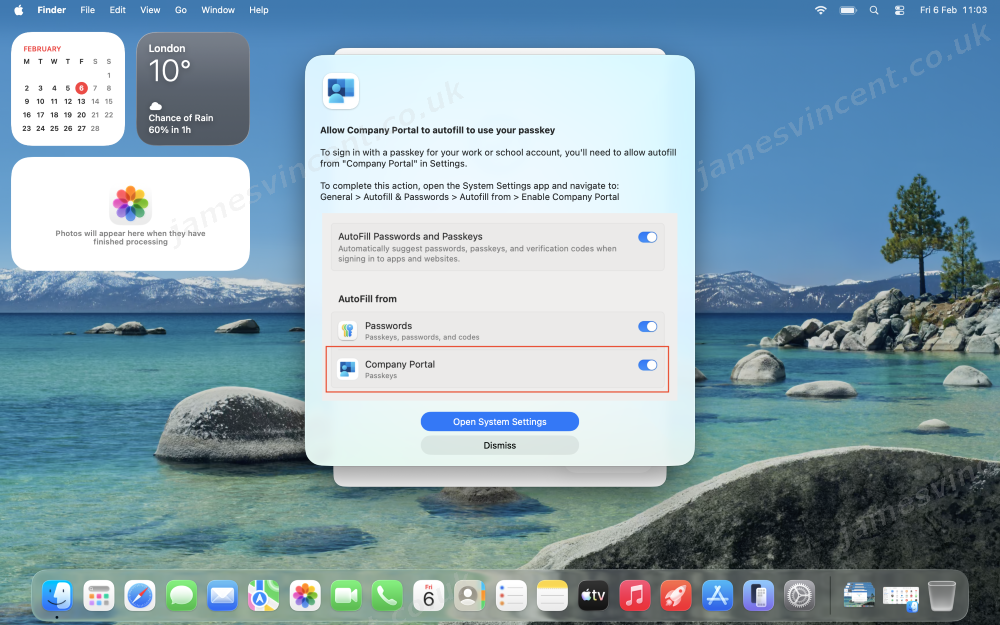
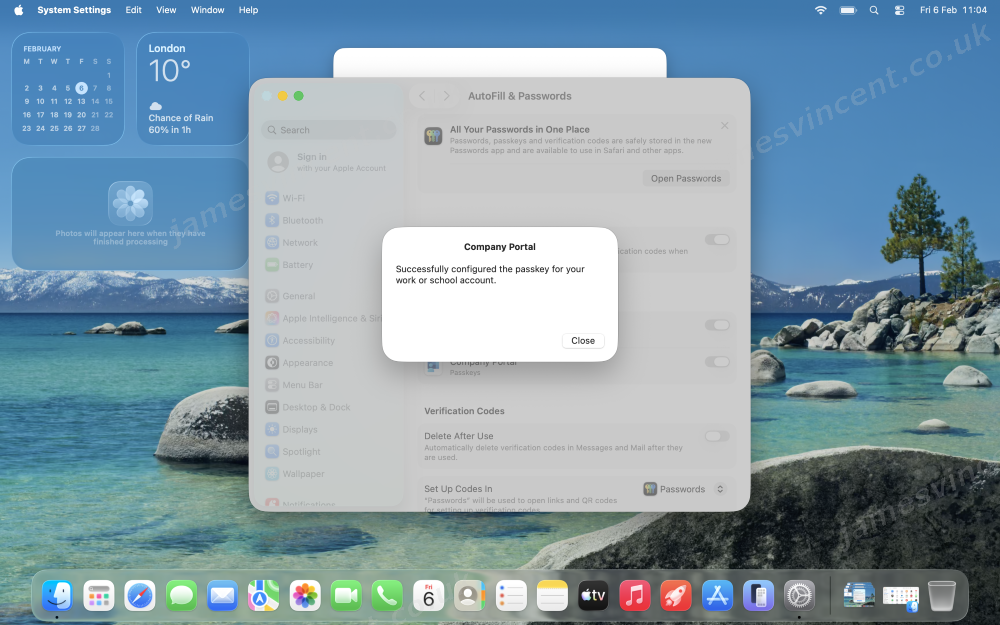
One “slight annoyance” is that you have to configure your Mac to allow Company Portal to autofill Passkey settings. There’s probably a way to pre-define this by MDM, but I haven’t poked that bear – yet….
After doing the above, you’re pretty much there.
Now any supporting applications, will allow you to utilise SSO when authenticating. Obviously, as we’re using Microsoft Entra ID here, and Intune, naturally a good test of our configuration is to try signing into a Microsoft application. Teams for example logged straight in with my Microsoft account being pre-determined, no additional authentication prompts were seen.
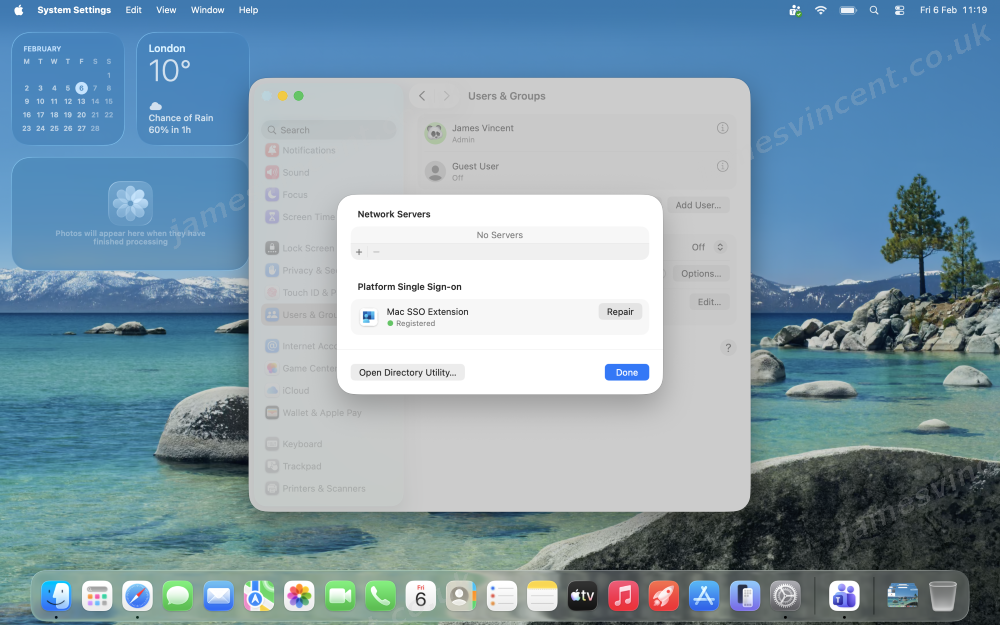
We can verify the configuration of Platform SSO, by reviewing settings within Users & Groups.
If we click on Network Servers, we can see the Mac SSO Extension is happy.
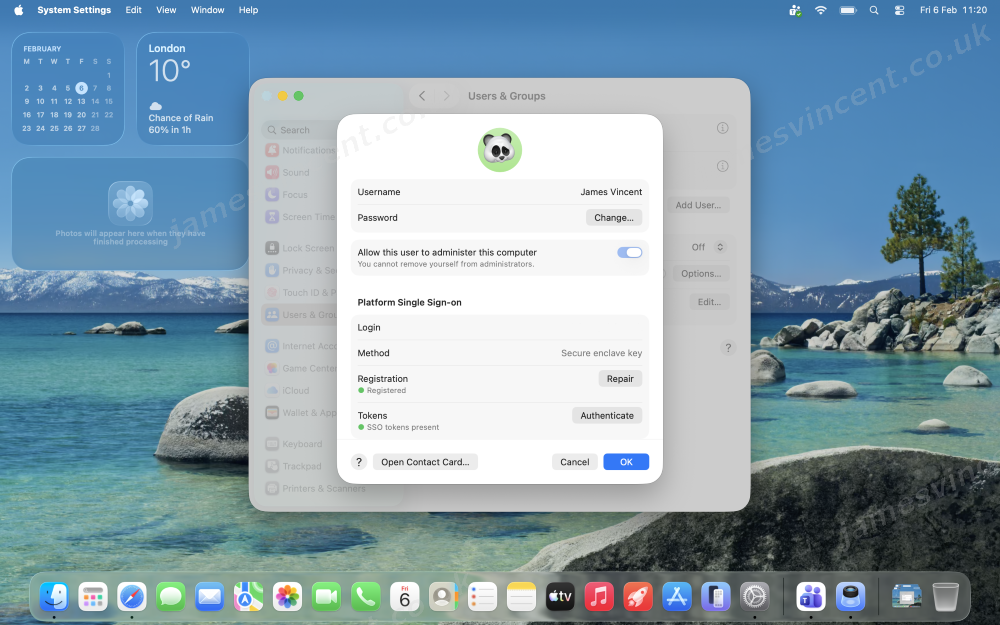
And then if we click on the Information button by our actual user account, we can also see the reference to SSO. With reference to Secure Enclave Key being mentioned, along with SSO Tokens being present.
Happy days.
Configuration that makes your life as an administrator, in a device agnostic world, just that little bit simpler…
I would like to see the MDM and Device Registration occur in a more streamlined manner, and maybe a one time action. Hopefully that will come in due course, but for now, we’ve got what we’ve got.
Leave a Reply to Nizar Jafferbhoy Cancel reply